DIY console table.
Tables mounted on the wall are a very convenient purchase, especially if the room area is limited. This table can be used in a bedroom, nursery or as a computer desk. You can make such a piece of furniture yourself; this will require a minimum of tools and some basic work skills.
Cantilever furniture, that is, furniture hung on the wall, has recently become increasingly popular. Wall-mounted cabinets in the bathroom, cabinets, shelves, tables, all these products have one important factor in common: they take up less space than objects of the same size installed on the floor.
The table you see in the pictures is made in the simplest version. To work, we will need to purchase or glue together two joinery boards 1500 mm long. and width 400-450 mm. . You can also use narrower shields, 300-350 mm. , you can decide for yourself whether the depth of the table is enough for you to work.
The sides between the table top and the bottom shelf are cut from the same panel, the height of the parts is 150 mm. . Planed oak boards 25 mm thick are used here. If your shields are made of 20 mm thick coniferous wood. , then it will be necessary to install an additional middle jumper between the shelves for rigidity.
The table dimensions can be 1500 mm wide. , height 200 mm. , depth 400 mm. . For those who are less familiar with furniture making, I will tell you that the width of a piece of furniture is calculated along the wall, and the depth from the facade inwards, in this case to the wall.
You can assemble the parts on dowels or furniture ties. I think dowels should not be considered in this case; furniture ties are good because there will be no holes on the tabletop. But I would advise you not to be too clever, and screw everything together using eurekas (confirmations) or self-tapping screws with a diameter of 4.5-5 mm. , and then close the caps with plugs. Of course, in both options it will be necessary to pre-drill holes in the tabletop, bottom shelf and at the ends of the lintels.
I would like to clarify the technology of work. First, assemble the table using confirmations and adjust the parts. Then remove the tabletop and attach it to the wall separately. When installing corners, check the accuracy with a level; an inclined table is very uncomfortable and you quickly get tired of it. The corners are attached to the wall with dowels and nails, three to four corners, for each three dowels 50 mm long. with a diameter of 5-6 mm. .
Before final installation of the table, it must be painted. Painting is a general concept; you can use varnishes, stains, and opaque paints. In this case, the oak parts are treated with tung oil.
It’s been a while since I told you about furniture making. Let's talk today about our console table, which my husband and I made last November, last 2014, for printers in our home office.
So, 4 legs 45x45 mm - furniture timber, 3 long pieces of 18 mm furniture board for shelves and tabletop and 4 boards for the drawer. Well, and a few decorative blocks to decorate the table in the form of crosses on the sides.
To begin with, we attached long drawers to the legs, after which we secured the legs to the tabletop on four sides with self-tapping screws and fastened them on the sides.
It turned out like a long bench with high legs :))
Then we turn this entire structure over and attach the bottom shelf from below through the shelf directly into the legs. Self-tapping screws can be recessed using a special countersink drill.
Then we attach the middle shelf from below using KREG. It will give the table rigidity.
Decorative bars for the sidewall. We measure, saw off and adjust to the size of the sidewalls:
I simply glued the decorative strips onto universal Titanium liquid nails, which glue wood perfectly.
I decided to make the lower legs small. These are the remaining pieces from the bars. They were also attached to the screws from below, having first sunk them into the leg, after which the resulting hole can be primed and sanded before painting. Additionally, I coated it with glue before attaching the small leg. To be sure.
Let's move on to painting. I will paint the table in 2 colors so that the bottom layer appears under the top. To do this, I lightly painted the table in the first layer, which will be black. The entire first layer Of course, it is not necessary to apply as much of the first layer as I applied, I just haven’t decided yet where I will make the scuff marks. And it is enough to apply the first layer in those places where they will be.
Now coat the abrasions on top of the first layer with ordinary Vaseline. Vaseline will not allow subsequent layers to soak into the first layer and the places that were coated with Vaseline can be easily sanded off. Apply Vaseline to those places where abrasions usually form on furniture: protruding corners of legs, tabletops. And various decorative details that wear out over time.
The main layer will be gray. To do this, I mixed the leftover gray paint that I had left over from painting the kitchen cabinets with white paint:
We apply 2 layers of base paint, after which we take sandpaper and sand those places that were coated with Vaseline.
Don't forget to sand the paint between coats, especially after applying the first coat. The paint raises the lint. Use sandpaper with fine granules, 220-240. Then the paint will lie smoothly and the coating will be smooth and even.
As a finishing layer to protect against dirt, I apply water-based decorative wax as usual. In this photo you can just see the wax. Then it will be absorbed and the coating will look even.
Some details of the table: I don’t know about you, but I don’t like perfectly smooth chipboard. It's somehow unnatural. Oddly enough, I love pine (for painting) because it is soft and the structure of the wood is slightly visible (this will not happen on hardwood). It's so nice to run your hand over a wooden surface.
What could be better than a beautiful, comfortable table? Maybe two of these tables? Or the same table, but much more compact? We know how to turn the most ordinary table into a narrow console table, with two legs, with our own hands. Or divide it into two and make a rack. Do you know?
Today we will tell you how to turn an ordinary table into an elegant console. You can create a real exclusive from a sawn table with your own hands. You've probably admired them in stores, where prices are often steep. But you can make such a “piece copy” yourself. And it will be much cheaper than the store-bought version.
The best part is that this table can be made from absolutely any high table. You can even take an old tabletop and screw beautiful legs to it (for example, from IKEA). And there are plenty of ways to decorate this item.
Another opportunity to save money is to buy a beautiful (high-quality, new) but heavily discounted table. After all, as you know, stores reduce prices on furniture that has been on display or has even a tiny defect.
In this issue we included 3 master classes on this topic (all from sawn furniture), as well as 20 additional ideas:
- how to make a dining or work table on two legs;
- what to create from the second half of the table;
- how to decorate your improvised console;
- how to make designer shelving (using the same principle).
Happy creativity and great results!
__________________________
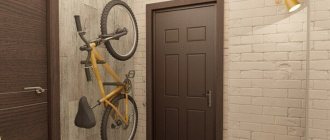
master class No. 1. console table for a narrow hallway
Is there little free space in your hallway? Or do you like miniature things? Or maybe you're attracted to the idea of a classic console table, but you can't afford such a thing? In any case, you will certainly love this idea - a tiny console table made from... a very ordinary table.
Here's what you'll need:
- rectangular table (for example, ISALA from IKEA),
- a piece of fabric 30 cm with a width of 1.20 m (choose any one you like),
- aerosol glue for fabric, jigsaw, screwdriver, tape measure, pencil, scissors, sandpaper, 2 screws and 1 metal corner (for greater reliability, you can take 2 corners and 4 screws), masking tape.
How to make such a console for the hallway with your own hands.
1. First, cut the table into two parts, lengthwise. A tape measure and a pencil will be useful for marking. Sand the edges with sandpaper to avoid splinters.
2. If you have a table with removable legs, secure two of them; if the legs cannot be removed, your console is almost ready.
3. Then fasten metal corners on the back side of the tabletop: one in the center or two at the edges (what to do with the corner further, see step 7).
4. Cover the edges of the table with masking tape - this is necessary so that glue does not get on them. And then prepare a piece of fabric of the desired size and spray glue over the surface.
5. Gently lay the fabric on the tabletop. Make sure that there are no bubbles left (if they appear, smooth the fabric). If there is excess fabric left on any of the edges, trim it with sharp scissors.
6. Once the glue has dried, the tape can be removed. And admire the work of your own hands - the original designer console.
7. Attach the free part of the mounting bracket to the wall, making sure that there are no gaps between the console and the wall.
What else can be added to such a table?
If it is a mirror, it will serve as a dressing table. Hang shelves or a writing board on top - useful for the kitchen or dining room.
If you made it for the hallway, hang a couple of hooks for bags and umbrellas.
Don't want to fuss with fabric and glue? Choose beautiful stickers.
And the table can be painted in advance in some interesting color, varnished, covered with patina... In general, there are many options. All you need is a tabletop and beautiful legs.
__________________________
master class No. 2. a bedside table on two legs made from a sawn table
This compact piece can decorate your living room or bedroom. It is done according to a similar principle. However, there are some nuances that we will talk about.
You will need an old dining table, wood paint and 2 blocks.
Here are the differences from the previous master class
.
1. Shorten the legs, because a side table (or bedside table) is usually lower than a dining table.
2. The table should be cut not along the long part, but along the short part.
3. A product painted in a bright color (with a brush or spray gun) looks especially impressive.
4. A stable position is secured not with corners, but with a pair of bars (approximately 1/2 the width of the already sawn-off tabletop). They need to be connected to each other and screwed to the wall. The finished bedside table is placed on top.
__________________________
master class No. 3. two consoles from one sawn round table
And this tutorial from Sarah Dorsey is a great example of using both sides of the table. One of them (yellow) became a console under the TV in the bedroom. The second one (painted blue) serves as a bedside table in the hallway.
How to make such semicircular console tables with your own hands.
1. Take an old round table, remove the old paint or varnish, and sand down any rough edges. Apply primer.
2. Cut the tabletop with a jigsaw into 2 equal parts.
3. Sand the edges and paint them in colors that you like and match the color palette of the room.
4. If you wish, you can also create an accent section of the wall, as Sarah did for the yellow model.
And below is another example of using two parts of one table
. One (only the tabletop is painted) is for the hall or dining room, the second (completely painted) is like a dressing table for the bedroom.
__________________________
How to choose a furniture console in Provence style
Before purchasing furniture items in the Provence style, use the following tips:
- White furniture is universal, so if you find it difficult to choose, it is recommended to take a closer look at it;
- It’s nice when decorativeness goes hand in hand with practicality; when choosing a console in accordance with the French style, pay attention to both aspects; small drawers and shelves will not be superfluous;
- there is no need to rush to order the first model you like; now there are different firms and manufacturing companies on the market, and everyone is fighting for buyers. Watch, compare, study.
Before purchasing, you need to determine the type of furniture console suitable for your room, namely:
- you need to take into account the dimensions of the room so that the size of the item matches them;
- a room in the Provence style should be decorated with a console of the appropriate design;
- it’s good if the item has an aged appearance, small abrasions and cracks will add a special charm;
- Provence is characterized by the use of natural materials; low-quality products quickly lose their attractiveness;
- any furniture items, including the console, must have good strength, reliability, and safety characteristics;
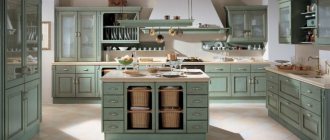
- The main palette of shades used for decoration in the Provence style includes white, cream, lilac, blue, and green.
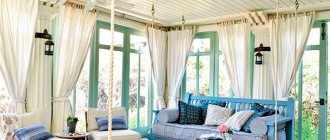
Provence style is characterized by lightness, airiness, and a sense of freedom, and this can only be achieved with the right choice of furniture items. Provence is a special comfort and warmth; you don’t want to leave such a room for a long time.
what other consoles can be made if you cut an old table?
Using the same technology you can make a narrow dining table on two legs
.
This compact model will be greeted with a bang by owners of small kitchens where there is no room even for a snack. To do this, again, you will need a square table - you can buy a modern one, but your grandfather’s inheritance will look especially chic. The technology is exactly the same. Just don’t forget to first remove all the “internals” - drawers, folding mechanism, etc.
But what to do with the second half of the table if you don’t need the second console (see master class No. 3)?
If you want to use such a valuable resource with maximum benefit, make a two-tier console bar with a shelf
. The main difference is that the legs of the upper part are shortened by about half (they can be larger or smaller, depending on the tasks of the rack).
How can you use such a console? Whatever! It is ideal not only for the hallway, but also for the dining room or minibar. By the way, pay attention to how the author of the idea coped with the task of storing bottles: they are stored in tubes for stationery. And the glass holder can be hung from the bottom of the second tier.
In addition to the kitchen and dining room, such a compact table on two legs will be useful in other rooms.
If you strengthen a small rack on top, you will get a workplace
needlewomen or in a children's room.
And if you also have an old door leaf, a shelf and a couple of brackets, you will get an original design with vintage charm
(don't forget to paint everything the same color and create a patina effect).
About that (more than 50 photos), see our special guide.
And in this section there are several more examples of such narrow consoles, made with your own hands from sawn tables.
And another option for “waste-free production”. Do you recognize the good old LACK from IKEA in this turquoise table? Yes, that's him. How did they make him so tall, you ask? It’s very simple - connecting two legs into one. If you desperately need free space under the table, take this idea into account.
A console (console table) is a small table that occupies space under a window or mirror and has a narrow table top. Depending on the overall stylistic decision, this table can be equipped with either straight or curved legs. In this article we will show you how to make a massive, high console table with your own hands.
.
Materials and decor of furniture consoles in Provence style
Furniture sets and individual items that match the Provence style look very attractive. They are often given an aged look to add elegance and class. It is quite difficult to choose real antiques for the interior, and special treatment of furniture helps solve the problem.
The best materials for the Provence style are traditionally considered solid wood and forged metal. Carved patterns look great on furniture consoles. Forged legs are usually slender, graceful and the furniture does not look bulky.
Furniture items to decorate the Provence style are treated with special means, various technological techniques are used to achieve the effect of aging - abrasions and chips are specially added. Products usually have simple shapes; natural motifs are used for decoration.
Cutting the board
Also, in order to make the upper and lower parts of the table, we need a board 3 meters long, 10 cm thick, and 20 cm wide. We cut it into pieces using a circular saw.
You need 4 boards for the top and bottom of the console table, 150 cm long. We cut it with a circular saw and, as you can see in the photo below, we get these components of the table.
Additionally, you need four boards 10 cm wide and 145 cm long. They will rest vertically on the boards cut above. We need 4 squares along the edges (see photo), 10 cm on each side.
Types of furniture consoles in Provence style
There are many models of furniture consoles. Some types can be classified as decorative, others as functional. The purpose of decorative elements is mainly to decorate rooms. They can occupy a corner or niche, thereby rationally using the free space. Compact shapes allow you to decorate a narrow partition or a tiny hallway with such an item. You can install a vase, figurine or lamp on the console. This elegant element is accompanied by a mirror attached to the top. Another original trick is to disguise an unattractive heating radiator with a beautiful furniture console.
Functional products also cannot be denied decorativeness, but they also perform purely practical tasks. They can be used as a small shelf or table to place a glass of water, glasses, a book or a phone next to you. These models are usually larger in width and depth. Functional furniture consoles are equipped with one or two drawers for storing various small items and also an additional shelf at the bottom for greater convenience.
Consoles differ in design, mounting method and installation location. Each type has its own differences.
Sometimes a console can be included in a furniture set, for example, for a bedroom, office, hallway or children's room. Narrow designs that do not take up much space and at the same time are functional are more popular.
Forming the top
Having retreated 2.5 cm from the edge, we place our workpiece on top of the board and generously lubricate both sides with carpentry terminals.
Place the board on top of the workpiece again. We get a pie like the one in the photo below. From below, you can additionally screw the end blank to the board using screws, which we screw exactly near the outer legs on the left and right.