In the homes of modern people, furniture is one of the most important design elements: tables, cabinets, chairs and other objects are always in sight, their appearance is very important. That is why it is customary to replace old furniture with new ones, but there is another way to revive worn-out furniture elements.
Thus, you can give an old cabinet a new life in a completely different design, for which you should simply repaint it, and we will tell you how to paint a cabinet in this article.
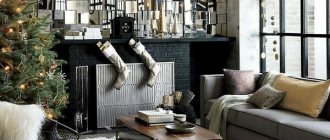
Preparing the cabinet for a design change
Is it possible to repaint a wardrobe or wardrobe if it has lost its presentable appearance during use and looks shabby and shabby? Of course it is possible and even necessary. You should also not throw away old furniture because today you are unlikely to find items of such quality in a furniture store.
During the preparation process, the following instructions must be followed.
First of all, remove from the structure all existing removable parts (handles, doors, shelves, hinges, etc.), as a result, only an empty frame should remain.
To carry out this work you will need the following tools:
- Brush;
- Sandpaper of several types;
- Flat brush;
- Rags;
- Hammer;
- Nails;
- Drill.
The preparation process is as follows:
- The old coating (wax, varnish, paint) is removed from all structural elements, because it will not allow the new coating to lay down easily and smoothly; the surface should be cleaned down to the wood itself. Sand with sandpaper using sweeping movements;
Advice. The main thing in this process is not to overdo it, because you can remove a thin layer of veneer along with the varnish layer.
- After sanding, you need to sweep away all the dust from the surface with a brush;
Note! It is not recommended to use a hoe to remove dust, because... it pushes some of the dust back into the wood.
- Using fine-grained sandpaper, hard-to-reach areas are processed, after which the surface is brushed again;
- After completing the preparatory work, you need to thoroughly clean the room. This is necessary to prevent dust or debris from damaging the coating during painting.
We update the cabinet in the most common way: painting
You can easily and quickly update your cabinet by simply replacing the covering—even a beginner can do it. You will need to completely clean the cabinet from the coating, and then cover it with a new one and change the fittings. If there are deep damages on the surface, they can be covered with a mixture of glue (PVA) and sawdust (the consistency is selected “by eye”).
Tools that may be useful in your work:
- skin;
- Sander;
- paint brush and rollers;
- screws and bolts;
- accessories;
- screwdriver.
Materials required for work:
- solvent;
- Galosha gasoline (petroleum-based solvent);
- primer;
- putty;
- paint (nitroenamel NTs-132, NTs-25);
Basic steps:
Having collected the necessary tools and materials, restoration can begin. It takes place in several stages:
1. Analysis. Use a screwdriver to unscrew all handles, shelves and doors. Consider whether old elements and fasteners will be used, or only new ones.
2. Cleaning. It is necessary to clean the furniture from dirt and dust, and then from unnecessary coating. The paint layer from the surface and fittings is wiped off with a solvent, and then degreased with Galosh gasoline and left to dry completely.
3. Using a sanding machine, in other words, give the surface of the cabinet a smooth shape. If there is damage, you need to use putty to disguise it. Then thoroughly coat the entire surface with primer and let dry. When choosing a primer, pay attention to its compatibility with the future paint color. After complete drying, sand all surfaces with fine sandpaper.
4. Painting.
Good to know:
The best choice for cabinet surfaces would be wear-resistant paint. You should start painting from the most remote areas (back wall, base, shelves), in a thin layer. Depending on the author’s idea, the cabinet can be covered in one general tone, and then details, patterns can be glued on, or it can be made multi-colored (each element of the cabinet can be painted in its own color and shade).
5. Assembly. The final step is assembling the “new” cabinet and attaching the fittings. We carefully attach all the elements of the cabinet back to their places: handles, locks, hinges. The best option for a cabinet would be handles that were decorated by hand according to the author's idea.
Tools and materials needed for work
The choice of materials and tools should be given special attention in such a matter as painting a cabinet with your own hands in order to give it a completely new appearance.
Selecting materials
In fact, you will need very few materials, or rather just two:
- Cabinet paint. When choosing this material, you should give preference to acrylic types, since they are almost completely odorless, wash well, mix with water, this is very important for obtaining the required shade of color. The fact that acrylic paint is washed off with water will allow you to remove any imperfections from the surface. During the drying process, the water from the acrylic paint simply evaporates, and the coating gradually becomes stronger.
Note! These properties indicate that you should be very careful during the drying process of the surface.
It is not necessary to use paint of the same color during restoration. You can combine pastel colors with brighter shades. The combination can be selected by testing both paints on one part of the surface, and then washing off the samples;
Advice. If the store does not have the required shade of paint, you can purchase white acrylic material and a tint of the required color.
- Primer. The primer, as well as the paint, should be purchased acrylic to ensure better adhesion of the paint and the surface. There are no special nuances in using this material, but before applying you should still read what the instructions describe, paying special attention to such parameters as drying time and the area of the surface to be coated. Apply the primer in a thin layer using a brush or roller. (See also article.)
Tools
First of all, you will need a brush. You can, of course, work with a roller, but practice has shown that working with a brush is much more convenient. Using a brush makes painting more accurate, and this tool allows you to paint small details.
It is very important to choose a high-quality brush or roller designed for working with acrylic types of paints.
Note! A low price for a tool may indicate a low quality product. With such a tool you can simply ruin the coating, because... A low-quality brush will produce lint that will remain on the surface.
New fittings
An important stage in the reconstruction of old furniture is the replacement of fittings. First of all, you should pay attention to the condition of the hinges. They need to be replaced if they are rusty or damaged. The location of the hinges is changed if pieces of material are torn out at the places where they are attached. The resulting holes are sealed using putty or sawdust mixed with PVA glue.
It is also necessary to check the condition of the guides in the cabinets. If necessary, they can be replaced with higher quality fittings. The extension system can be roller or ball. The second type of guides is considered more reliable. They ensure silent drawer opening.
The last stage is replacing the handles. They should be chosen taking into account the design of the furniture. Handles can be completely metal or combined - with ceramic or glass elements. For antique furniture, bronze fittings are suitable.
Dyeing process
Repainting a cabinet with your own hands is not difficult, the main thing is to prepare everything you need in advance and paint it in a well-ventilated, dust-free room.
- Painting the cabinet with a lighter shade of paint. It is important that the paint for the first layer is not thick or dry. If it does thicken, dilute it with clean water;
- Depending on what effect you want to achieve, apply one or several layers of a light shade. One layer will create a Provence-style surface with a clearly visible wood pattern. Well, for a denser layer you will have to apply several more layers.
Advice. Brush strokes should be done in the same direction when applying each layer.
- After the light layers of paint have dried, a material of a darker tone is applied. Preliminarily apply masking tape to those surfaces that should not be painted. The paint is applied according to the same principle as a light shade;
- After the cabinet has completely dried, you can apply a matte or glossy effect varnish to the surface to protect the created coating. The varnish is applied with a foam sponge using blotting movements;
- After the varnish has dried, all removable parts are assembled together.
Restoring old furniture is an interesting option to update interior elements and show your creativity. It is not necessary to go to a furniture store or factory and buy new furniture. By showing your imagination, you can give tables, chairs, and shelves an attractive look and a special twist. The simplest and most economical option for updating an old cabinet is to paint the furniture using decorative paints and varnishes.
You can also use wallpaper, decoupage, photo printing, photo wallpaper and decorative plaster for restoration. But which method should you choose?
The easiest and most inexpensive way to update a cabinet that has lost its attractiveness is to cover it with wallpaper or photo wallpaper. This decoration is suitable for the restoration of a wardrobe, wardrobe, chest of drawers and bedside tables, which are installed in dry rooms.
The most suitable are non-woven and vinyl wallpapers or photo wallpapers, which are sold in construction stores.
Pasting is performed partially or completely. How to update old furniture:
- The wallpaper used for restoration should differ in pattern from those that cover the walls in the room, but have a common style and color scheme;
- If the walls of the room are covered with light-colored canvases, choose bright wallpaper to update the old cabinet. When the interior has wallpaper with a pattern or design, the furniture is covered with plain wallpaper;
- Internal shelves and external facades can be decorated in different combinations. Additionally, new fittings are used. It is convenient to decorate furniture with self-adhesive wallpaper;
- To work you will need a brush, PVA glue, a construction knife, and decorative wallpaper. It is easier to glue paper sheets, but vinyl and non-woven fabrics are more durable;
- The product is measured, the wallpaper is cut into strips of the required length, the glue is evenly distributed over the surface, the wallpaper is glued, and the coating is carefully smoothed.
Before wallpapering, degrease the surfaces with alcohol, acetone or gasoline. Self-adhesive is applied to the cabinet elements and smoothed so that air bubbles do not form.
We produce pasting
Collecting the necessary materials
Before you start work, you need to take care of the tools and material. Here's what we'll need:
- sandpaper (sandpaper), an appropriate attachment for a drill or grinder, to prepare the surface for pasting;
- in some cases a hair dryer, but not necessarily;
- measuring instruments - ruler, tape measure, corner;
- tools for markings and markings - pencil, pen, marker;
- cutting tool - knife, scissors;
- primer and wood putty for preparatory work;
- tools for applying compounds - roller, brush, spatula;
- rags for smoothing and removing glue;
- PVA glue.
Related article: Choosing curtains for the windows of a small bedroom
Using a grinder to sand surfaces
As you can see, the list is quite impressive. If you don't have some materials, buy them. By the way, if the fittings of your furniture are worn out, then you can change them too. For example, a handle, a new handle for a cabinet will not cost much, but will add color to your newly made wallpapered furniture.
Preparatory work
Before wallpapering furniture, you need to take care of the surface on which you will apply the material. We need to make it suitable for such work, so we will perform the following manipulations:
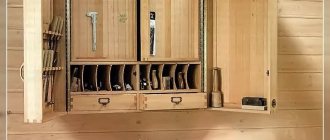
Typical domestic kitchen cabinet after decoration
- To make it easier to work with a cabinet or bedside table, you need to disassemble it and remove all the fittings from it.
- The next step is to sand the decorative surface and remove the entire layer of varnish from it. This can be done using sandpaper, which is very labor-intensive; it will be easier to put the appropriate attachment on a drill, grinder or screwdriver and go over the varnish.
You can also remove the varnish using a hair dryer. To do this, the surface is heated and the applied composition is scraped off with a spatula. But even in this case, you can’t do without sanding.
- If your furniture is made of solid wood and has not been treated with anything, then it is recommended to go over it with sandpaper to create some roughness.
- In the next step, we remove all dust from the skin using a damp cloth. Give the furniture some time to dry.
- After examining the dried surface for defects, we decide whether it needs to be puttied. If the cracks and grooves are not so large, and the wallpaper for pasting is embossed, you don’t have to do this. If the defects are deep, you will have to level the surface with putty, maybe even in several layers.
- As you probably already guessed, after the putty has dried, the putty areas must be treated and leveled with the general surface. This is also done with sandpaper.
- Now the surface of the cabinet is almost ready, all that remains is to prime it for better adhesion to the wallpaper.
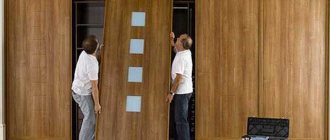
How to update your closet? If you have a closet in your apartment that has lost its original appearance, but which you would like to update, then you can do it yourself with minimal financial costs. You can update the cabinet facade, repaint the entire cabinet in a different color, or cover it with self-adhesive film.
Decorating a cabinet with ceramic tiles looks impressive and stylish, but is only possible if the doors are securely fastened.
An old kitchen cabinet or cabinets can be updated using leftover wallpaper, film, paint left over from a renovation, or other accessible and inexpensive methods.
Application of three-dimensional drawings
Decorative plaster and stencil painting are an interesting way to restore an old cabinet. This design will elevate the furniture and give the surfaces a voluminous decor.
Suitable for decorating not only wardrobes and chests of drawers, but also for restoring kitchen furniture (sideboard, cupboard).
The paint will reliably protect the products from temperature changes and moisture. For work, use decorative plaster, acrylic paint, varnish, a stencil with the desired pattern, a spatula, masking tape, sandpaper, and brushes. Painting a cabinet with your own hands requires following a precise work algorithm:
- The fittings are removed from the furniture.
- Remove the layer of old coating.
- Treat with sandpaper.
- Cracks and chips are repaired with putty.
- The stencil is secured with masking tape.
- Prepare the plaster according to the instructions.
- Apply the material with a flat spatula.
- The stencil is removed and the pattern is corrected with a knife.
- After drying, the drawing is sanded with sandpaper.
- Paint is applied to the renewed base.
- To consolidate the effect, coat with varnish.
The same method is used to paint an old cabinet using a stencil, but without decorative plaster. Against the background of patterns, fittings painted in gold or silver look impressive.
To obtain a contrasting pattern, the product is coated with white paint. After the layer has dried, attach a stencil and spray it with spray paint (shake first) of the desired shade - the decorative coating is ready, and the furniture takes on an interesting appearance.
To ensure that the paint evenly covers the furniture and does not peel off, cabinets, bedside tables, chests of drawers, and wardrobes are prepared for painting by removing dust, dirt, and greasy stains.
Any shade can be used as a base background, but the design looks most expressive when the stenciled cabinet is painted white.
Master class No. 1. Stencil painting
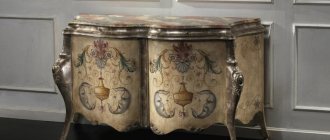
Everything is mixed in this closet - romanticism, Chinese motifs, and even something from Gzhel. Everyone sees something different in him. Let's learn painting techniques.
Materials and tools
- Prepared cabinet;
- white paint;
- solvent;
- blue spray paint;
- gold paint;
- stencil;
- brushes
Step by step guide
Step 1.
- We remove all fittings, locks, handles, etc. from the cabinet. Using familiar technology, we will prepare a wooden cabinet for painting.
- We spread newspapers or a large piece of polyethylene on the work surface (on the floor) so as not to damage other furniture.
Step 2.
- We take white enamel
and solvent. In a small plastic jar, dilute paint and solvent according to the instructions on the paint can. - The paint consumption is also written on the can; it is better to use this information and immediately dilute the required amount. If you mix too little paint, you may end up with a different color the second time.
- We make the background of the picture - apply the first layer of paint
. Leave until completely dry.
Step 3.
- If the color turns out saturated and you like it, then take a stencil and apply it to the cabinet
. Carefully glue on the front side and side walls so that there are no bubbles. - Shake the spray paint well and spray it over the stencil
. For an even color, one layer of blue paint will be enough, so we do everything the first time.
Step 4.
While the blue paint dries, paint the fittings
, taken from the cabinet, in gold leaf. After the parts have dried, screw them into place.
We remove the stencil from the cabinet and place it in the most visible place in the room - after all, it now deserves special attention!
You can decorate the closet with a stencil, for example, with flowers.
Painting polished furniture
Interior items made from natural wood and coated with a polished layer can be given an unusual look using cabinet paint. An old product, refined in a modern design, will become the central element of the room and give the room a special charm.
How to paint a cabinet or decorate a wardrobe:
- For work use acrylic paint with a matte effect.
- To degrease the base, use acetone or white spirit.
- To apply paint you need brushes, and for decoration you need new pens.
- Old fittings are removed from the cabinet, shelves and drawers are taken out.
- All surfaces are treated with a sanding machine.
- Coarse and fine-grained sandpaper is selected for the tool.
- If there are large chips on the surface, they need to be puttied.
- Treat the furniture with white spirit or acetone and dry it.
- How to paint a cabinet - Apply a thin base coat of paint.
- After drying, rub over with fine-grained paper.
- Remove dust with a dry cloth, apply the next layer and dry.
- Rub again and apply another layer until the desired effect is achieved.
Using this method, you can transform an old polished cabinet into original vintage furniture that will decorate a classic interior. The fittings are screwed into their original places.
For exclusive work, you can use not full painting, but dot painting - a pattern is applied to the furniture facades with a marker and the design is drawn with acrylic paint.
What can you do with an old wardrobe?
An old cabinet can be repainted or decorated using fabric, decoupage or special plaster. First, you need to remove the fittings from it. Experts also recommend removing drawers. The frame of the furniture is not disassembled. If desired, only the doors can be removed.
After the preparatory stage, you need to move on to working with the surface of the furniture. Do-it-yourself restoration of an old cabinet is carried out taking into account the material from which it is made and the type of top covering.
To work with wood you will need an eccentric sander. With its help, the top layer is sanded. If you don’t have a sander, you can get rid of the coating using a remover. After applying this composition, the surface is covered with a film. This will enhance the effect of the wash. The peeled coating is removed from the tree using a spatula.
To seal defects in the form of chips and cracks, putty, furniture sealant or wax are used. A sanded solid wood cabinet is impregnated with oil or coated with wood protective compounds.
Soviet furniture made from chipboard is updated in a similar way. The main problem during its reconstruction is the thick layer of paint and varnish. It is recommended to get rid of it by sanding. There is also a technology for painting polished furniture over a paint layer.
The easiest way to remodel an old polished cabinet is to paint without sanding. For this you will need:
- Otex adhesive primer on an alkyd basis (or another similar composition for problematic and previously painted substrates);
- alkyd paint;
- White Spirit;
- brushes or foam roller;
- covering film;
- rag.
Work order:
- Cover the area around the furniture with covering film.
- Wipe down the cabinet, remove handles and remove drawers.
- Degrease the surface with white spirit.
- Apply primer evenly. Let the product dry. Apply a second coat of primer to the furniture.
- Apply paint. For uniform coverage, painting is done in 2 layers, allowing each layer to dry completely.
- Varnish the furniture.
Alkyd-based products have a strong, unpleasant odor. Therefore, during restoration work the room should be well ventilated.
Updating chipboard cabinets
Furniture made from particle boards loses its attractiveness over time, no matter how carefully it is used. You can return your products to their beautiful appearance and add fresh colors to the interior by painting old chipboard cabinets.
It should be taken into account that chipboard does not absorb paint well, since the furniture is covered with a moisture-repellent laminated layer.
In addition, if the condition of the cabinet fastening elements is unsatisfactory, it is recommended to replace the fittings and further strengthen them. How to paint an old chipboard cabinet:
- All removable elements are removed from the furniture so that an empty frame is left for painting.
- Using coarse sandpaper, remove the layer of old paint (if any) and varnish.
- The surfaces must be rubbed carefully so as not to damage the base. The cabinet is swept with a dry rag to remove dust.
- Corners, edges, joints and protruding elements are treated with fine-grained sandpaper.
- Water-based acrylic paint is a better option than painting chipboard. The color scheme is chosen according to your taste.
- Before painting, a chipboard cabinet must be primed so that the paint is less absorbed into the material.
- The primer is applied in a thin, even layer and the composition is allowed to dry - usually acrylic primers dry in no more than 12 hours.
- Apply several layers of paint with a roller or brush (preferably a brush), each time drying the coating before painting.
- When the furniture is painted to securely fix the coating, after complete drying, the chipboard cabinet is treated with varnish, and the product is assembled using new fittings.
When painting furniture, choose only high-quality tools that do not leave lint on the painted surface. The more layers of paint are applied, the richer the color of the decorative coating will be. You need to repaint with a brush in one direction - from top to bottom, apply the paint with a roller in a cross-shaped motion.
On video: detailed instructions for updating an old chipboard cabinet.
Self-adhesive film
Despite its apparent simplicity, this work has its own characteristics.
They are simple and do not require special knowledge and skills, only attentiveness and accuracy.
What will you need for the job?
- Dry rags.
- Scissors.
- Sharp knife.
- Medium grit sandpaper.
- If necessary, use wood putty to seal cracks and other defects.
- Primer composition.
- A film smoothing roller or squeegee, which is available from any self-adhesive supplier.
- Acetone, solvent, glue thinner. They will be needed to degrease the surface of the cabinet.
Return to contents
Surface preparation
If you ignore this process, the film will probably soon come off the surface of the furniture, since the main reason for this finishing material peeling off is insufficient preparation of the base or the lack thereof. First of all, you need to ensure the evenness of the cabinet walls and their stability. Therefore, before starting work, you should tighten the bolts holding the wooden panels together.
If the furniture is made of chipboard, you need to make sure that there are no delaminations at the ends. If there are cracks, work is carried out to seal them using putty compounds. This job is easier to do with a small rubber spatula. First, the defects are degreased, primed, and only after that a leveling putty layer is applied.
The surface of the cabinet intended for finishing with self-adhesive film must be smooth and clean.
It is especially important to fulfill this requirement when using glossy films, since in the glare of light the slightest roughness underneath immediately becomes noticeable. If calendered film is used, it is recommended that the sharp corners of the furniture be slightly rounded, which will prevent the film from tearing when it “shrinks.”
How to Update Kitchen Cabinets
The kitchen is a wet and frequently used room. The furniture in this room is exposed to temperature, steam, moisture and mechanical influence, so kitchen cabinets are more likely to lose their original appearance than furniture for the living room or bedroom. You can restore an old cabinet in the kitchen by painting or finishing the products with rattan fabric.
What paint to paint? Acrylic moisture-resistant composition or alkyd enamel are suitable. An updated cabinet with a glossy shine looks impressive.
The procedure for painting kitchen cabinets is as follows:
- Preparing furniture - the doors are removed from their hinges, thoroughly cleaned of dirt, degreased, washed with soda to remove all dirt;
- Removing the old coating - all surfaces of the kitchen cabinet are treated first with coarse-grained sandpaper, and then with fine-grained sandpaper, and wiped off dust with a dry cloth;
- An acrylic or alkyd primer is applied with a roller or brush - depending on the chosen paint material. The primer is allowed to dry;
- How to repaint a closet? Apply the first layer of paint thinly using brushes or rollers. After drying, apply a second layer with a paint pad using longitudinal and transverse strokes;
- When the front side is dry, you can paint the edges of the furniture parts and the inside. When working, do not press on the pad to avoid drips;
If the resulting color does not match the desired shade in terms of saturation and brightness, the product is painted again. The use of white color is suitable for any kitchen interior. The furniture is assembled using new fasteners and decorative fittings (handles, rails, moldings).
If, when disassembling the cabinet, you have difficulty unscrewing the fasteners, you can drop a little oil on the screws. You can also lubricate the doors so they don’t squeak.
Dressers, chests of drawers, and bedside tables are painted in the same way, but it is not necessary to use water-repellent paint for them - you can use oil, acrylic and alkyd compositions for interior work.
To give an old cabinet an unusual look, they use not only painting, but also fabric upholstery, decoupage, vinyl stickers, stained glass film and other decorating techniques. In what cases can they be used to restore an old cabinet with your own hands:
- Closet. It usually has mirrored or glass doors. You can decorate furniture using stained glass film or vinyl stickers. The decor is glued to the doors of the wardrobe.
- Old wooden furniture made of plywood and fiberboard will be transformed if you use decoupage or artificial aging to update it, decorating the furniture in a retro style.
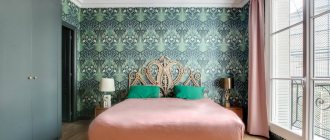
- An antique china cabinet can be improved by applying decorative plaster techniques or by repainting the furniture completely white using bleaching paste.
- Wardrobe for children's room. A child will like “cheerful”, bright furniture, which is repainted independently using dot painting with children’s scenes.
- Wardrobe in the living room. Furniture decorated with a collage of photographs looks unique. Beautiful photographs are pasted onto the cabinet completely or in some places and covered with colorless varnish.
Using your own imagination and creativity, you can update an old cabinet and make it the highlight of your interior. The furniture will sparkle with new colors and become the central element of the room. The most unusual techniques are used for decoration, the choice of which will satisfy any artistic taste.
Master classes from specialists (2 videos)
New life for old cabinets (33 photos)
Szafa pomalowana na bialo i oklejona powiekszonymi fotografiami.
Wykonanie i aranzacja: Malgorzata Szczepanska It often happens that there is furniture and it is not damaged, just tired. With wooden furniture everything is obvious; you can repaint it. What if it’s chipboard, lacquered furniture or MDF? There are, of course, nuances here. Today I’ll tell you, using my own experience, how to repaint a chipboard cabinet.
Furniture made from MDF and lacquered are painted in the same way.
This article is a continuation of the post about updating a room with your own hands. In the first part, I told you how to do cosmetic repairs yourself and without experience. In particular, I managed to repaint ordinary vinyl wallpaper. You can read about this.
Background
: There will be several repainting objects.
- A huge corner wardrobe, this was our first family furniture purchase. I would never buy such chipboard now))). Although the closet is, of course, very practical, it essentially replaces a small dressing room. But... it is 15 years old, it is absolutely outdated in appearance, and since this cabinet is not an antique, old age is not doing it any favors. And most importantly, I’m so tired of him that I don’t want to look at him.
- Dresser. The chest of drawers is veneered and has already been redone once (more on that), but the change in textiles and wall color made it not really fit into the interior. I would also like to pair it with a closet.
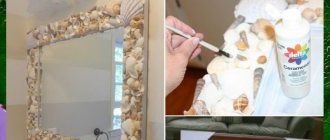
- Mirror, homemade, with a bamboo frame. As dear as a memory. This is the first thing my husband and I did together. This is where my apartment handicraft began. It has also already been repainted and also does not match the current interior, so I will change the color.
According to my preliminary calculations, the cost of these alterations will be somewhere around 4,000 rubles. Agree, this is negligible compared to buying new furniture. What I needed:
- The brush is soft with artificial bristles. 2-3 pieces.
- Small fur roller 10-15 cm. 2-3 pieces. You can take one handle-nozzle and three replaceable rollers.
- Roller tray. Also small, should fit the size of the roller.
- Masking tape.
- Aerosol acrylic paint (black).
- Adhesive primer OTEX Akva (Tikkurila). 1 jar. This primer is water based and therefore odorless. It is used for difficult surfaces on which the paint does not adhere or adhere. It is she who must firmly bind the chipboard and paint.
- Acrylic paint or enamel. 2 cans. I chose ESCARO (acrylic paint for furniture, made in Estonia). At first I wanted HELMI (Tikkurila), but I had to travel far to get it. Alkyd enamel can also be suitable, but it is solvent-based, so it smells, and painting is not a quick job. In general, any not the cheapest, high-quality acrylic paint. In my Estonian it was explicitly stated “for furniture”. I liked it and can confidently recommend it.
- New handles for furniture. I ordered it on Aliexpress for 80 rubles. thing.
- Sandpaper (skin), with grain 320. I.e. very small. 3-4 sheets.
- Rags.
- Degreaser. Convenient with a spray nozzle. You can, of course, use regular white spirit, but the smell is deadly. The degreaser smells significantly less. Leftovers can also come in handy: it’s great for removing labels, washing a mirror or glass that nothing can take anymore and the stains stubbornly remain))).
- Polyethylene to protect the floor and painting area.
- Screwdriver Set.
Work order:
Closet.
Stage 1.
I removed unnecessary things from the closet, I didn’t put everything away (I somehow wanted to move around in the apartment more or less freely), I just pushed them deeper and covered them with plastic. She unscrewed the handles. I took the doors off their hinges.
At first I wanted to paint it like this without removing the door, then I realized that it would be inconvenient. So I took a risk... and filmed it. It turned out not to be difficult. True, worries about how to put them back on were present until the last moment. In the end, I also screwed it myself; I didn’t have the patience to wait for my husband))).
I pulled out the built-in lights and wrapped them in a suspended state with masking tape. The same tape was used to protect the walls on the sides of the cabinet, the floor, and the mirrors on the doors. Prepared the workplace. I decided to paint... on the bed)))! I covered it carefully with polyethylene. And I have never regretted this choice. The bed was large and high, everything fit, there was no need to bend over and crawl on all fours. I prepared approximately equal stacks of books and wrapped them in cling film. They are needed as substrates so that the doors can be lifted and painted as if suspended; the painted edges will not come into contact with a flat surface.
Stage 2.
I sanded all surfaces that needed to be painted. It is necessary to sand lightly, without fanaticism, with the finest sandpaper. Light circular movements. Purpose: to create roughness without removing the laminated layer. If there are dents and scratches, they should be filled with putty at this stage. After sanding, thoroughly wipe all surfaces with degreaser. It will remove dirt, grease marks, and everything that can disrupt the adhesion of the primer and paint.
Stage 3.
Primer.
I went through hard-to-reach places with a brush, the rest with a roller. A thick layer is absolutely not necessary; it must be covered with primer without drips and in a thin layer. Uneven coloring is not a problem, but there should be no gaps. I didn’t prime the rattan inserts; the paint applied well to them anyway. Stage 4.
This is the main part - working with paint. You need to paint in two layers. Be sure to roll the roller on the tray to remove excess paint. More thin layers are better than one with drips. Difficult places were painted with a brush. I decided not to paint the inside of the cabinet, but since it was necessary to “marry” it with the outside, I painted the outer ends of the shelves and the fronts of the drawers.
They are easy to paint - just roll them with a roller; with a brush it is more difficult not to go beyond the edges. Wipe off any blemishes immediately with a cloth. Each layer was dried, as recommended, acrylic dries in an hour and, in principle, you can carefully turn it over and paint the door on the other side.
Stage 5.
I assembled the closet. I screwed the doors and handles. I removed the masking tape and cleaned everything up. At first I planned to keep the doors open for two days, I was afraid that they would stick. Nothing like that - you can close it right away.
Dresser.
She pulled out the boxes. Protect the surface to be painted with masking tape. Since the chest of drawers was already painted, I didn’t prime it, I just lightly sanded it and used a degreaser. I painted it faster, got impudent and didn’t wait the allotted time to apply the second coat. The first one dried out (about an hour) and the second one immediately. In the end everything is fine. I didn’t buy new handles; I repainted the existing ones from a spray can with black aerosol acrylic paint.
Mirror.
The mirror was covered with white acrylic paint, which I had in stock, and lightly patinated (aged) with a dry brush using silver paint.
Important!
Acrylic paints dry quite quickly “touch-free”, but polymerize for at least a month; with a primer the process can take even longer. The painted product can be used almost immediately (or it’s better to wait 2 days) and even wiped with a damp cloth. But within a month, the coating remains very vulnerable; it must be handled carefully, not scratched or rubbed with force. If shelves or horizontal surfaces are painted, then it is better not to immediately place things on them that may “stick”, wait until the paint “sets”. Although I immediately put everything I needed on the chest of drawers, nothing stuck).
Well...the work is labor-intensive, but I was pleased with the result. The paint job ends up looking no worse than the factory paint, no brush marks are visible. It holds up well too. I haven’t tried scratching, I use the furniture as usual. But usually I don’t scratch it))). Although I will conduct an experiment in a month. The room has been pretty updated). Alas, the photos after compression leave much to be desired; in fact, the colors are brighter and cleaner, but this is not so important.
If you also want to redo furniture and have questions, write and I will answer. And if such a rework seems complicated to someone, I assure you that it is not, labor-intensive - yes, but quite doable without any experience. You can just start with internal, unnoticeable parts, or with small furniture, a chair, for example. The rework took three days. At the same time, I managed to cook and... suffer from bronchitis + after the cast I still have a slightly lame leg. The “disabled painter” was able to paint, which means you can too))).
If you have an old cabinet, sideboard or wall at home, do not rush to throw it away and buy new furniture. Old things can sometimes be very stylish and will look great in the interior if they are updated just a little. To do this, you will need to clean the surfaces from the remnants of old paint and varnish, and then cover them with a new layer of paint. At the same time, we always have the opportunity to experiment and choose some completely new shade.
Today we will conduct a small master class on painting furniture at home. First, we’ll tell you in detail and show you how to update and paint an old, shabby cabinet. And then we will give a number of other examples of painting a variety of interior items.
Using craquelure
The technique of coating wooden products with a special varnish consisting of 2 components will transform an out-of-fashion cabinet. With its help, it is possible to create an old wardrobe that grandmothers used. To complete the work you will need PVA glue, craquelure, acrylic paint and varnish, and a wide brush.
The technique also does not require specialized talent; all manipulations are similar to conventional coloring. The algorithm of actions looks like this:
- preparation - the old product is sanded, if necessary, putty is used to seal large holes. The final stage of preparation will be a primer in several layers;
- coloring - for work you will need compositions of 2 colors: dark and light. They do not have to be in harmony - the dark version is used to decorate cracks, and the light version is used for the main coloring. Using a brush, apply a dark color, evenly distributing it over the surface of the product;
- craquelure - once the paint layer has dried, you can apply craquelure. This must be done quickly and preferably in several layers - the thicker the varnish, the more visible the cracks will be. Dry the product until your fingers stick slightly;
- second color - the master class on craquelure at this stage suggests applying a light color and waiting for it to dry gradually. As soon as the coating dries, a characteristic mesh will become visible;
- applying varnish - a completely dry restored cabinet is coated with acrylic varnish to consolidate the effect.
When choosing craquelure, it is worth considering that if there is an image on the cabinet, you should not touch it. For this, a two-phase composition is used, the work with which is characterized by application in 2 stages.
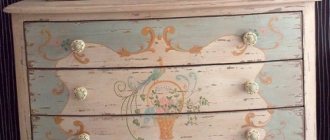
This technique is suitable for restoring cabinet facades, but similar manipulations can be performed inside the product. This beautiful antique wardrobe will appeal to all lovers of vintage interiors.
Painting an old dark cabinet a light color
This is what the cabinet looks like, which we will paint and give it a completely new look.
We decided to paint the cabinet in rich light shades: ivory and light green. But first you need to clean the surfaces well. First of all, we disassemble the cabinet as much as possible, removing from it everything that can be removed: doors, handles, pulling out and disconnecting drawers, etc. To do this, we will need various screwdrivers and other tools.
Preparing for painting furniture, cleaning surfaces
Now you can start cleaning the surfaces. The most important thing is to remove the varnish layer, paint residues, wax, grease and other contaminants. The easiest way to do this is with coarse sandpaper. We take the sandpaper and go over each part with sweeping, wide movements along the fibers. Just don't put in too much effort. Otherwise you can wipe through thin veneer! If this suddenly happens, you will have to putty the surface to heal the “wounds” inflicted on the tree. And this is extra work that we don’t need at all.
After treating the surface with coarse sandpaper, you need to sweep it with a wide brush. It is important! Be sure to use a brush, not a rag or rag. Why? Yes, because with a rag you will drive some of the dust back into the microholes on the surface of the furniture.
Now we go over the surface of the part again, but with fine sandpaper. Particular care must be taken in hard-to-reach areas that were difficult to reach with coarse sandpaper. Again we fan the surface with a brush.
Another important point. Before painting parts, you need to thoroughly clean the room. This is done to prevent small dust particles and specks from getting onto the surface of the furniture during painting or immediately after the process is completed.
We wipe the surface of the parts with a damp, freshly wrung out clean cloth. Then we wipe it again, this time dry.
Selecting paint, primer and brushes
In this case, we decided to use acrylic paint and the same primer. This paint is odorless, easily diluted with water when thickened, and can be mixed to obtain the desired shades.
We will paint with brushes. This makes it easier to get a uniform color over the entire surface, including in hard-to-reach places. Don't use cheap brushes, because the result may be completely unsuccessful.
With the primer everything is simple - since we take acrylic paint, then the primer is the same. In this case, the paint will stick much better.
Parts painting process
First, apply a thin layer of primer. There is nothing complicated here, but it is better to first read the instructions on the can of material. The primer can be carefully applied with a roller. You can use a brush to cover some areas.
Initially, it was planned to paint the cabinet in two colors. I was able to buy ivory paint at the store, but to get the desired light green shade I had to mix white and green paint.
First we paint all the parts with a lighter paint. In our case - ivory. You can paint in one layer, or in two. Before applying each layer, you need to wait until the previous one is completely dry.
After painting the furniture in the first color, you need to seal the parts that you will not paint with the second color. You can not seal them completely, but only along the contour. And after that, we paint the necessary surfaces in a light green color. If we want, we then apply a second layer. After drying, remove the paper stickers.
After the paint has dried, carefully apply acrylic varnish on top. We will apply it with a foam sponge. It is advisable to apply 2-3 layers of varnish. Before applying each one, wait for the previous one to dry.
After the varnish has dried, screw all the handles on. We assemble the furniture completely. And now you can gild individual elements. As a result, we get this wonderful view in the Provence style:
Wardrobe pasting
The process of updating furniture using film is not difficult, but it requires patience and knowledge of how to cover a cabinet and what tools will be needed.
Required tools and materials
To start updating your cabinets, in addition to adhesive tape, you will need a number of available tools:
- ruler or tape measure;
- pencil or marker;
- scissors, stationery knife;
- silicone spatula or dry rag;
- spray bottle with soapy water;
Preparation
Gluing a polished cabinet with self-adhesive film begins with preparing the surface. From the very beginning, all removable fittings are removed. For convenience, you can remove the doors from their hinges.
All furniture must be carefully inspected for protruding fasteners, chips and cracks in the coating, since all these defects will appear in the future. Self-tapping screws and bolts can be easily tightened with a screwdriver or wrench, but unevenness will be more difficult to deal with. You will have to level the surface with putty and then sand it with sandpaper.
After leveling, begin cleaning and degreasing using any detergent and ethyl alcohol.
If the cabinet is made of wood, MDF or chipboard without additional coating, you can apply a thin layer of furniture primer and let it dry to enhance adhesion.
Pasting the cabinet
When gluing the film, 2 methods are used - wet and dry. The positive outcome of the entire process will depend on choosing the right one.
It is advisable to use the dry method when processing small areas, applying decorative elements, in corner areas or if the surface is uneven.
When dry gluing, you must first separate a small section of the substrate, freeing the adhesive base, apply the film to the place of fastening and level it. Then, as the gluing progresses, the backing is pulled back, and the sheet is gradually secured and leveled in parallel using a silicone spatula.
If the question arises of how to properly cover an old cabinet completely and at the same time eliminate the possibility of wrinkles and other defects, it would be better to use the wet method.
The process consists of gluing the film onto a damp base, which will allow you to correct errors immediately during the process.
To moisten the adhesive layer, use a spray bottle in the “fog” mode. To do this, the substrate is completely removed. For wetting, prepare a soap solution of 10 ml of detergent and 1 liter of water. The main rule with the wet method is not to overdo it with moisturizing. This greatly slows down the adhesion and causes the material to slip.
The prepared canvas is placed on the cabinet and moisture begins to be squeezed out from the center to the edges, while holding the surfaces together. The remaining solution will completely evaporate after 48 hours. After a day, you need to treat the canvas again with a roller.
We glue all the walls and facades in the same sequence.
What do you do with old furniture?
Poll Options are limited because JavaScript is disabled in your browser.
I received an old kitchen wall cabinet as a gift. Its frame was quite decent and it was a pity to throw it away, and we wanted to save money on buying new kitchen furniture, which we didn’t have. Then I decided to restore this cabinet using regular self-adhesive film.
There were a lot of colors in the store, and the price for such a film was low. I purchased two meters of film 45 centimeters wide. First, I unscrewed the old, out-of-shape furniture handles. Since the cabinet had already been covered with film, we had to remove it. It can be removed quite simply, but leaves behind an unsightly sticky layer that must also be removed. I removed this layer using regular cleaning powder and an abrasive sponge. I can say that I had to scrub thoroughly, but I still cleaned the closet. The doors must also be unscrewed to make it easier to glue them over. Next, you need to measure the length and width of the film for covering the door. We take the length and width of the film with a margin of 3 centimeters. Then we separate the edge of the film from its base and carefully apply it to the top or bottom of the door from the front side (see the photo below how this is done). Please note that it is very important to separate only the edge of the film, and not all at once. Now we take a piece of soft fabric and, smoothing the film with it, glue it to the door. With our right hand we slowly pull the base of the film, which is located below, and with our left we constantly smooth the front side. Thus, the film will stick very smoothly without bubbles or bends. When the front part of the door is pasted over, turn the door over backwards. Let's start gluing the end parts of the door. To do this, first glue the film to the lower (or upper) end (see photo). Next, we make a cut on the side in the same way as shown in the photo, and wrap the cut piece, gluing it. We cut off the part that sharpens on top using a simple stationery knife. We bend the remaining sharp edge and glue it to the inside of the door. Then we process the corner on the other side in the same way. We also glue the end on the opposite side. We bend the edge of the film along the long end of the door and glue it. We trim the protruding edges with a stationery knife or regular scissors.
There is no need to buy a new cabinet when the previous one is still quite functional. If the doors no longer look presentable, or you have changed the interior and the old cabinet does not fit in, change it beyond recognition! All the methods that we list below are suitable for both sliding wardrobes and chests of drawers and even shelving with alternating open and closed sections.
Examples of repainting furniture
And now - some interesting examples of such repainting of various pieces of furniture.
Repainting a dark chest of drawers a wonderful light green color. They also didn’t forget to gild the handles!
The dark blue table was already quite cute. But when the interior was changed, it had to be repainted in a milky-creamy shade.
The dull wood-shaving color chest of drawers became like a completely different piece of furniture! Note the gray moldings and silver handles.
Another example of giving an old chest of drawers a bright and rich Provencal style.
And here, from an old chest of drawers, we got a thing in a sort of “techno” style.
You can repaint the chair too!
And even a chair! Go ahead and experiment, good luck!
There is no need to buy a new cabinet when the previous one is still quite functional. If the doors no longer look presentable, or you have changed the interior and the old cabinet does not fit in, change it beyond recognition! All the methods that we list below are suitable for both sliding wardrobes and chests of drawers and even shelving with alternating open and closed sections.
DIY chair restoration
Look how this piece of furniture can be transformed, simply beyond recognition!
To do this you just need:
- screwdriver;
- new fabric;
- foam;
- dye;
- scissors;
- pins;
- optional - varnish.
First of all, you need to remove the fabric back and seat on the plywood.
To do this, unscrew the screws on the back of the chair. Disassemble these parts. Attach the old fabric back to the new canvas, outline along these contours, and cut. Also cut out a new fabric back. If the foam rubber is already worn out, replace it too. Attach these parts to a base, usually made of plywood. Before you put all these upgrades in place, paint the wood frame. This continues the restoration of the chair. White looks beautiful, which is also very fashionable now.
When 2 layers of paint have dried, place the new back and seat in the corresponding holes and secure. This is how the old chair turned into a new one, thanks to your skillful hands and imagination. They will also help to carry out other changes in the home environment.
Cover with fabric
This method gives a smoother, more textured look than wallpaper. It is better to cover large elements such as wardrobe doors with fabric, fasten them with a furniture stapler or with glue. It is interesting to choose leatherette as a fabric for a luxurious look.
Fabrics made from pieces using the patchwork technique will make your closet more comfortable and will help you fit it into a child’s room or into styles such as Provence and country. The style can be embodied with wallpaper or film if you cover the panels of the drawers with materials with different patterns.
Paint
Paint will be a real savior in furniture restoration. Before applying paint, sand the surface and coat with primer.
You can simply paint the cabinet in 1-2 colors, or you can paint a real picture on it. If you don’t have enough artistic skills for painting, you can make a drawing using a stencil. Geometric lines and shapes can be easily created using masking tape - it will serve as a smooth border for the paint. And for more complex patterns and pictures, the stencil will have to be made specially.
We talked about ways to transfer images to surfaces here:. And follow this link for detailed instructions on using stencils:
Add volume
If you want to achieve a classic look for your cabinet, all you have to do is glue on wooden slats or stucco molding, and then paint - and the effect will add up. You can paste an inscription cut out of wood with words that are meaningful to you or the name of the contents of the box.
A voluminous texture can be created with colored sawdust or other similar material: the door is covered with glue, and the sawdust is inflated on top, then everything is secured with spray varnish. Please note that such a surface is very difficult to clean.
Do not forget that the appearance of furniture is greatly influenced by fittings. In any case, it is worth replacing the handles, and maybe this will be enough. Lighting can also enliven the familiar look of a cabinet or shelving unit.
Photos: bohemianjunktion.com, anangelatmytable.com, decorpoint.com, fondodejuventud.org, theroomedit.com, hfapconference.com