Often gardeners refuse to grow seedlings because the boxes clutter up the whole house. Then shelving is what you need! They are aesthetic and functional - while the seedlings are growing, they can be placed near the window, and then installed along the wall or removed. In this article we will tell you how to make a rack for seedlings with your own hands using wood, iron and even plumbing pipes.
Lighting organization
Since seedlings begin to be planted in late winter, when there is still very little sun, the rack must be equipped with an artificial lighting system.
Lamps should be located above the plants. They are mounted on the “ceiling” of each “floor” with the possibility of height adjustment, depending on the growth phase of the seedlings. The longer the sprouts become, the higher the lighting fixture is hung accordingly.
Note! The lamp must provide the plants with the necessary light, but the heat coming from it should not be too strong, otherwise you can simply burn the seedlings. For this reason, incandescent lamps should absolutely not be used!
Industrial shelving in a greenhouse.
What sources of artificial lighting are suitable then?
- LED lamps are used most often. With very economical energy consumption, they provide plants with bright light, which contributes to their favorable growth.
- Conventional fluorescent lamps.
- Phytolamps for plants serve as a kind of artificial sun, but their light can be harmful to human eyes.
However, experienced gardeners prefer this particular lighting source. The phytolamp has a radiation spectrum that stimulates plant development, improving metabolic processes and increasing the immunity of young shoots. Moreover, this type of light source consumes very little electricity and is absolutely safe for seedlings.
Tips for using phytolamps
- It is advisable to choose phytolamps that have a color spectrum consisting of blue, red, violet and white LEDs - this combination will have the most beneficial effect on the seedlings.
- The maximum time of use per day is 14 hours; they must be turned off at night.
- Proper installation of the lamp is important so that each seedling receives the necessary and uniform dose of radiation.
- When the seeds have sprouted, it is necessary to illuminate the seedlings continuously for 4 days.
Useful materials A selection of popular materials about caring for seedlings:
- Growing seedlings in a greenhouse;
- Methods for supplementary lighting of seedlings;
- The benefits of hydrogen peroxide for seedlings.
Models
Today, the market is filled with a huge variety of different models of racks for seedlings and plants, so it is important to choose a truly high-quality option that is ideal for your seedlings and will also serve you for a long time. Among the highest quality models, there are several options.
- Shelving unit "Hedera". The special design allows you to place it even on a narrow window sill, since you select the dimensions yourself when purchasing. “Hedera” has a number of advantages: the depth of the window sill takes up only a quarter of a meter, it can be disassembled very easily and quickly, which allows you to remove its frame for certain seasons of the year wherever you need it. The shelves are arranged like a ladder so that the boxes with seedlings do not interfere with each other. This shelf also has attached phyto-lighting and special trays that do not allow excess moisture from watering plants to spoil the window sill.
- specializes in creating greenhouse racks with a height of 4 or 5 shelves. The products are distinguished by the quality of materials, workmanship and a large number of positive reviews. The design is practical; the materials used are plastic and a special greenhouse film, which creates the necessary temperature conditions inside the rack. The design also includes special lamps for lighting and heating plants.
Hedera
Clover C
- "Unique". Metal racks for plants and seedlings from this manufacturer are distinguished by functionality and ease of use. The design is compact and fits even on a small window sill, the shelving type is collapsible, which means it is possible to remove it in parts. The design includes metal legs and ties, as well as 3 thin metal shelves.
- “Phyto-Pro-6” is a stationary, but quite compact rack with 3 shelves and phyto-lighting. Powerful LED lamps are included and are removable, thanks to which seedlings grow much faster.
- FS-800. Small stationary rack with plastic pallets and light. This bookcase includes 3 shelves, each of which is illuminated with special lamps.
Unique
FS-800
PVC shelf for the bathroom
Quite recently, my wife said that we don’t have enough shelves in our bathroom; you see, she doesn’t have enough space to store all sorts of odds and ends, including contact lenses. Yes, it’s true - all this equipment lies in the kitchen near the microwave - bottles, tweezers - small everything, not even an hour - you wave your hand and everything will roll in the corners.
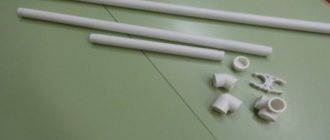
It’s necessary, it’s necessary, I take it and do it... Well, I think there’s no need to grieve - it’s a trifle: I ordered a plastic window sill 150mm wide, exactly a meter or sixty in length, from the window makers, got a piece of aluminum tube from the garage, locked everything home and settled down comfortably on the balcony I'm making it slowly.
I have already made a shelf of this design: The design is very simple - there are 8 main parts, 4 of which are screws. The shelf canvas itself, as was said, is made of PVC window sill. The upper surface of the shelf is formed not by the front side of the shelf, but by the back side, in this case it turns out to be a very useful, as for me, side, which prevents things standing on the shelf from falling in case of an emergency.
Since the shelf is designed to be two-story, I first cut the window sill exactly in half with an electric jigsaw, that is, the length of the shelf will be 800 mm. Then I cut it to the size of the tube - the cut must be made exactly at a right angle.
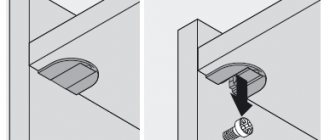
To do this, I make a loop of masking tape on the tube and cut along the edge of the tape with a hacksaw. I process all pipe sections with a file and remove burrs. Now it’s time to make holes for the tube in future shelves, only the holes are not through, but only in one layer of plastic: in the top shelf, the holes will be in the bottom layer of plastic, and in the bottom shelf, respectively, in the top layer.
Unfortunately, I don’t have a drill or a pen with a diameter of 22 mm and had to make the holes the old-fashioned way - I drill the sieve along the internal contour with a small drill, then remove the bridges between the holes and use a shoemaker’s knife to bring the idea to fruition. It turned out even a little better than required.
Well, all four holes in the shelves are ready and now you can insert the tubes into place and secure the structure with screws (the screw must be shorter than the width of the shelf, otherwise it will go right through it).
We insert the tube into the hole and press the end cut tightly against the plane of the shelf; again - the tube should be at right angles to the plane of the shelf: we check the corners with a square and when everything is aligned, tighten the screw. In this design, the element that bears almost the entire load is the screw, so the screw must be hardened and strong. We first fix the tubes on one shelf, and then we attach the other and fasten it too.
Since the shelf will be attached to the wall through a tube, it is necessary to make holes in it (the tube) for fastening: to do this, we drill holes with a diameter of 4 and 10 mm and cut off the partitions using a needle file.
Now our shelf is ready and we can put it in place. We mark the location of the future fasteners on the wall and drill holes for the dowels. We hammer the dowels with a hammer, screw the screws into them and actually (tadam!!) put the shelf in place.
It took about two hours of work to do everything, but it was a big plus for my wife’s karma. For this I bow.
From plastic window sills
Of course, you can buy a rack for seedlings, but it’s much more interesting to make it yourself, especially if you still have trimmings from the window sill after the renovation. For this kind of creativity you will need:
- PVC window sills;
- 2 pcs. brackets for pipe fastening;
- 18 pcs. consoles for pipes;
- 5 pieces. end caps for window sills;
- 3 pcs. metal pipes 2 meters long.
If you are using two store-bought window sills, 3 and 2 meters long, then saw them crosswise to make shelves 1 meter long. Using a drill attachment for cutting locks, make three holes in each window sill.
Fix the pipe fastening brackets in each with self-tapping screws, and thread the pipes themselves. This design can be placed on a windowsill. If you want it to stand near the wall, then secure it using two pipe brackets.
If desired, place fluorescent lamps under the shelves. This is how wonderful a do-it-yourself rack for seedlings of flowers and vegetables will turn out to be.
Basic requirements for racking
A rack for seedlings can be made from various materials, but in any case it should be:
- durable;
- suitable for repeated use;
- convenient, i.e. provide comfortable conditions for caring for plants (it is important to have quick access to seedlings for watering, inspection and loosening);
- having an aesthetically attractive appearance.
The dimensions of the structure can be completely different, but racks with the following parameters are considered universal:
- number of shelves – from 3 to 6;
- the length of the shelves is sufficient to accommodate standard fluorescent lamps (i.e., from 50 cm);
- height between shelves – from 40 to 50 cm;
- the distance from the floor to the bottom shelf is from 10 cm.
Often the bottom shelf is used to store various garden tools or household items.
If you do not plan to keep seedlings on the last shelf, the top of the rack can be left open by installing front and rear horizontal supports instead of the top shelf. They will not only support the entire structure, but will also be an excellent place for attaching lighting elements.
How profitable is it to make shelves yourself?
There are several reasons why it is better not to buy a shelving unit with lighting, but to make the design yourself:
- cheap shelves are made from low-quality material, so they are short-lived;
- models made from good material are expensive (around 6,000 rubles and more);
- a model sold in a store does not always fit in size, but a home-made rack can be made according to individual dimensions of the required dimensions.
If you decide to buy a rack in a store, then you should pay attention to the quality. It must meet the following requirements:
- high-quality from moisture-resistant materials;
- ready for repeated assembly and disassembly;
- provide free access to seedlings from any side;
- have an aesthetic appearance.
The material used for making structures can be different:
- wood;
- metal;
- plastic.
The most common materials among gardeners for making illuminated racks are wood - affordable and environmentally friendly, and metal - strength and durability.
What types of racks can there be?
The simplest corner structure made of wooden blocks
Some readers may now be thinking, “why make racks for seedlings with your own hands when you can buy ready-made ones in any specialized store.” There may be some truth in this, but we will still present several arguments in favor of self-production.
- Most racks for seedlings are very unreliable and are produced in a strict economy of materials, and this can lead to disastrous consequences - if such a rack breaks, you will not only lose all the seedlings, but also provide yourself with cleaning work for a long time.
- Despite the low quality and durability, the distinctive feature of such racks is their price. For comparison, to independently manufacture a standard rack, you will spend about 2,000 rubles, while in a store it can cost up to 5 thousand or more.
- Most ready-made shelving comes in standard shapes and sizes, which is why it is often simply impossible to place them in your home. If you make it yourself, there will be no such problems. And you can collect exactly what you need.
In a word, making your own shelving is a good idea from all sides. The whole process will not take much time and effort, but the result can be enjoyed for more than one season.
Stationary rack with perforated corners, which can be replaced with a regular profile pipe
A stationary plant rack is ideal for those who plan to regularly grow seedlings, and the area of the house allows you to place a structure that cannot be disassembled.
Such racks are installed using the “dead” fixation method, that is, they are attached in several directions, which gives them strength and durability. As for the materials from which they can be made, both wood and metal are suitable here with equal success (see Making a metal rack with your own hands). Moreover, metal is considered more preferable because of its strength, of course, subject to its processing and protection from corrosion.
The main thing when making such a rack is a thorough calculation. It is important to take into account all the nuances that may affect the seedlings, since it will be very, very difficult to remake such a structure later.
Collapsible rack
Drawing of a collapsible rack with all components
Is your living space large? Then collapsible racks for seedlings are what you need. They can be installed only during disembarkation, and put away in the pantry after they are no longer needed.
It is somewhat more difficult to make such a structure, but it has a number of advantages over stationary shelves:
- You can move the rack as needed.
- Adjust the height and size of the structure.
- The rack does not get in the way in the apartment and is removed as needed.
As for the materials for manufacturing, in principle, you can use wood, but you must remember that with constant assembly and disassembly, it will quickly become unusable, so a metal corner and profile is considered more preferable.
Window shelving
Wooden window rack with lamps
This design is also called a proofing rack, that is, it is installed on racks that extend the rack from the window sill to the top of the window. This fastening gives the rack additional strength, and if necessary, it can be easily removed.
The main disadvantage of window structures is that they have a height limitation, that is, if the distance between the racks is planned to be 50 centimeters, then a maximum of three shelves can fit on one window, and only on the condition that the seedlings should not be tall.
The choice of the optimal design entirely depends on the characteristic features of the room where it will be located, which is why it is so important to take into account all the nuances, even those that at first glance seem insignificant. Well, in order to visually see how different shelving in a house or apartment will look like, we suggest you watch the video in this article.
We suggest you familiarize yourself with painting wooden doors with your own hands
Rack made of plastic pipes
This type of structure is assembled like a metal rack. It has a low specific gravity, so it is easy to move around the room.
To make a rack you will need:
- PVC pipes;
- hacksaw;
- tees (4 pcs.);
- corners (12 pcs.);
- corner crosspieces (4 pcs.);
- roulette;
- marker for marking.
You can assemble the rack according to the following instructions:
- Cut 4 long pipes for supports (180 cm each), 6 crossbars (50 cm each), 4 crossbar pipes (150 cm each) and 4 “short” pipes 30-40 cm each.
- First take one crossbar 50 cm long and put two tees on it at an equal distance from each other. Do the same with the second cross member.
- Take 4 pipes of 180 cm each and cut each in half (i.e. 90 cm). Connect the two parts together using a corner cross. Connect the rest as well. There should be 4 such elements. Place two elements parallel to each other.
- First, insert one assembled cross member into the crosspiece, forming the letter “H” from the pipes. Do the same with the second pair of elements. The result was two separate “H” shaped structures.
- Take two more crossbars 50 cm long. Using corners, secure one at the top and the second at the bottom of the H-shaped structure. You will get a new figure - a figure eight, like on an electronic watch. There will be two such parts. These are vertical supporting walls. Place them parallel to each other.
- Insert a crossbar pipe into the last free holes of the crosspieces. This way the two side support walls will be connected to each other and will be able to stand stably.
- The resulting frame is only missing a “shelf”. Using angle brackets, secure one “short” pipe at each end of the crossbar pipe. The result will be a bracket-shaped structure. There will be 2 of these shelf parts. Insert them into the remaining free holes of the tees, placing the shelf parts parallel to each other.
- Place the pots with seedlings on the “shelf”. You can install a pendant lamp on top, firmly securing it to the side posts.
You can put a sheet of plywood on the bottom of the shelf if you are using pots, but it is better to just choose tall cassettes or spacious boxes for seedlings.
How to make a rack for seedlings with your own hands
If conditions in the house allow, then the best option would be a stationary structure, which can be made in a workshop or garage, transported to the place where seedlings are grown and assembled.
This method has two undeniable advantages:
- The frame and the attachment points of the shelves do not become loose and do not lose strength for a long time;
- The shelves of the rack can be used to store household items, utensils, and tools.
In addition, when assembling a stationary frame, the most loaded part of it - the vertical racks - can be secured using the walls of the room, and the shelves themselves can be made removable or even adjustable.
One of the possible schemes for arranging a wooden frame with an adjustable shelf installation height is shown below. The design is quite simple, but you can make a rack only if you use the walls as a load-bearing part.
It would be most convenient to make shelves in one of the corners of the balcony. Initially, you will need to make racks from wooden beams or strips of at least 60 mm in size. Depending on the variety, height and number of seedlings placed on the shelves, support grooves are cut on the racks in increments of 120-150 mm. The depth of the grooves is selected depending on the load; the greater the weight of the seedlings with soil, the thicker the posts should be and the deeper the cuts.
The racks are cut to size, applied to the wall and aligned with a vertical plumb line. For fastening, use ordinary dowels or bolts with embedded threaded plugs. Shelves are best made from varnished plywood.
The best option is to use the balcony space
For tall seedlings, the structure can be made according to the standard design; instead of grooves on the racks, support bars are sewn, and the height between the shelves is fixed at 50-60 cm. The whole structure turns out to be quite rigid, so in the summer the shelves can be filled with flowers in pots or removed, freeing them up space on the balcony.
Most metal shelf frame projects involve the use of welding as the main method of joining parts. A rack made from a corner or pipe is very durable, but extremely inconvenient to carry even in a country house. In a garage or shed, this option looks quite acceptable, but for an apartment or cottage it is better to make a system according to the diagram below.
The rack is assembled from short sections of metal pipes, placed one on top of the other. The shelves need to be made of thick plywood; four holes are drilled in each sheet, the diameter of which is equal to the size of the inner pipe, but smaller than the outer one. As a result, the shelf gets sandwiched between two segments, the upper and lower elements of the vertical post.
The frame is quite strong and lightweight
Despite the external complexity, it is quite possible to make such a rack even without the use of welding. In addition, this design has very real advantages:
- A rack with shelves can be easily disassembled into parts and can fit in a box 40x60x120 cm;
- The stepped shelf arrangement system provides more efficient lighting for seedlings.
Important! According to gardeners, such a shelf system can even be used as home furniture or a cabinet for storing books or utensils.
Cascade arrangement of shelves
At the same time, the appearance of the rack turns out to be quite aesthetic and is fundamentally different from the official appearance of standard metal frames, and with seedlings installed on the shelves it easily turns into a living wall of plants.
Polypropylene pipes are considered an ideal material for making all kinds of home crafts, including stands and shelves for growing seedlings.
Plastic is a fairly weak material for shelves for heavy trays
Only small stands can be made from a thin half-inch pipe; the material itself turns out to be too elastic, so it can be used to make stands and the upper part of the mount for installing lighting. Shelves for placing pots with seedlings will have to be made from wooden slats.
You can make a base for shelves from an inch plastic pipe
To grow seedlings in an apartment or your house, you will need a specially equipped rack. It may have lighting and consist of a different number of tiers. In this case, it will be possible to grow seedlings even in a small one-room apartment. It won’t be difficult to make a rack for seedlings with your own hands. How to assemble such a structure will be discussed further.
Plants need certain conditions. If you make a mistake, the seedlings will begin to get sick and die. Therefore, creating a rack for seedlings with your own hands (a photo of the finished work is presented below) must be approached responsibly.
It must meet certain requirements:
- the structure must be strong and stable, able to withstand the weight of containers with seedlings;
- the material from which the rack will be made should not be destroyed by moisture;
- the design must be reusable and durable;
- plants should be comfortable on the shelves of the product;
- there should be free access to the seedlings so that they can be watered, loosen the soil, etc.;
- the rack must be aesthetic, since most often it is installed in an apartment, in a living space.
Before starting assembly, you need to carefully develop drawings of the seedling rack. In this case, it will be easier to make the structure with your own hands. The drawing must indicate the exact dimensions of all elements of the rack. It can have 3-6 shelves, the length of which must correspond to the dimensions of standard fluorescent lamps. Their parameters need to be known in advance.
The width of the shelves should be no more than 60 cm. Otherwise, caring for the seedlings will become more difficult. The distance between shelves should be at least 40 cm and no more than 50 cm.
Some gardeners doubt whether it is worth installing lighting on the rack. Experts say that you can’t do without it. Therefore, it is worth indicating on the drawing the places where the lamps will be located, and also considering their connection to the network.
How to make a rack for seedlings with your own hands?
When developing a drawing, you need to think about what features will characterize the design. She may be:
- stationary;
- collapsible;
- mobile.
Stationary varieties are fixed to the wall or ceiling. This is a strong and therefore durable design. This type of shelving is suitable for a large apartment.
Stationary varieties are characterized by significant dimensions. After transplanting the seedlings into the garden or vegetable garden, the rack can be used to store household items.
Here you can arrange a flower garden or place children's toys.
Mobile structures are equipped with wheels. They can be moved around the room and rotated if necessary.
Collapsible structures are dismantled in the spring, when plants are planted in open ground or in a greenhouse.
There are other types of racks. They can be located directly on the windowsill. The dimensions of such a product must correspond to the size of the window opening. The advantage of a rack for seedlings on a windowsill is its compactness.
It will not take up much space in the room. Therefore, this type of shelving is most often chosen by owners of apartments and private houses. But at the same time there will be less light in the room. Therefore, you need to think about in which room it is best to arrange such a rack.
Materials
A do-it-yourself rack for seedlings with lighting can be made from different materials. The most popular options are wood, metal and plastic. Each option has its own advantages and disadvantages.
Wood is one of the suitable materials for shelving. It does not release harmful substances into the environment and is easy to process. Even a novice craftsman can assemble a structure from wood. This does not require the use of special equipment. The disadvantage of the material is its insufficient resistance to moisture, which is why it can begin to rot.
Wood is also easily destroyed by insects. Therefore, it needs pre-treatment with an antiseptic. Wood is a fire hazardous material. Since electrical wiring will run in close proximity to the rack, all structural elements need to be impregnated with fire retardant.
We suggest you familiarize yourself with How to make a water well without a drilling rig
Assembling a rack from metal is somewhat more difficult. Structural elements are mounted using bolted connections or welding. In this case, you need to use special equipment, which not every master has.
You can assemble a rack from plastic pipes. Installation in this case will not be difficult. They purchase a sufficient number of pipes and fittings, which are simply assembled, like a construction set.
Such shelves will not complement every interior. But the material is resistant to negative influences. Even a child can assemble such a structure.
To improve the appearance of such a rack, it is painted in a suitable color.
Wooden rack
There is a simple technology that allows you to make a rack for seedlings. If you plan to use wood for these purposes, it is best to choose a stationary type of structure. This will be a fairly heavy rack. If necessary, you can attach small wheels to its legs. You need to prepare the necessary materials and tools:
- timber with a section size of 4.5 x 4.5 cm, length 3 m;
- timber with a cross section of 3 x 6 cm;
- sheet of plywood or plexiglass;
- self-tapping screws with a length of 4 cm;
- a grinder with an appropriate attachment or a jigsaw;
- screwdriver;
- hammer;
- chisel;
- tape measure and pencil.
A beam with a cross-section of 4.5 x 4.5 cm is used to create support pillars for the structure. From it you need to make 4 stands of equal length. Using a grinder, you need to properly align the cut locations. Otherwise, the rack will not be stable. The transverse strips on which the shelves will be attached are cut from the second type of timber. The number of crossbars is calculated using the drawing.
Markings must be made on the support posts. Indicate the places to which the transverse strips for the shelves will be fixed. Here you need to cut out the recesses. To do this, use a hammer and chisel.
Deciding on design and construction
First you need to choose the raw materials from which you want to make a rack for seedlings with your own hands. The most popular are wood, iron, and plastics. When choosing a material, rely on your financial capabilities.
Plastic is the cheapest, but not very durable.
Iron structures are quite reliable and durable; it is better to make racks from them that will always be in the same place.
Naturally, the product will cost more and will be difficult to manufacture, since skills in working with metal are required.
The best option is wooden racks.
They are highly durable, do not require special skills, and are affordable.
If you prefer wood, choose varieties that do not absorb moisture well. If it is metal, it is desirable that it be stainless steel, it prevents the formation of corrosion. For shelves, you can use plastic or plexiglass - they will retain their appearance for a long time.
You can also use plywood, but it must be covered with oilcloth to avoid damage.
Structures are divided into the following types.
Such designs ensure reliability and durability.
- This kind of rack is more difficult to make, but it is ideal if you have limited space.
- If desired, for greater stability, the structure can be additionally secured to the slope or frame.
A few ideas for making your own shelving
Wooden shelving made from beams
Before starting work, make a design drawing, this will make it easier to navigate the dimensions and the required amount of materials. After the sketch is ready, prepare the following materials and tools:
- Three-meter wooden beam 45*45 mm;
- Wooden beam 30*60 mm;
- Plywood sheet;
- Self-tapping screws at least 4 cm long;
- Tape measure, pencil;
- Saw (preferably circular);
- Hammer, chisel;
- Screwdriver.
Wooden beam with a cross-section of 45 by 45 mm.
Manufacturing process: from a 45*45 block, make 4 identical stands of the required height, trim the lower edges with a circular saw to ensure stability of the product. Next, you need to make transverse strips on which the shelves will be attached. From a 30*60 block, cut the required number of planks.
To cut wood, you can use a circular or hand saw.
On the racks, use a simple pencil to mark where the cross bars will be located. In these places, using a chisel and a hammer, it is necessary to construct grooves for attaching the crossbars. When the required number of grooves are made, screw the cross bars to them with self-tapping screws.
Marking places for fastening bars.
All that remains is to make the shelves: the simplest option is to cut the original block into boards of the same size and secure them to the transverse planks between the two posts. If you decide to make shelves from plywood, then you need to cut it to the required size and secure it between the posts in the same way.
We make grooves for fastening the crossbars.
The wooden rack is ready. Finally, you can cover it with paint. Remember - to prevent it from cracking, you need to choose latex or acrylic paint, as they have moisture-resistant properties. The rack will look beautiful if you use self-adhesive film as decoration.
The wooden rack for seedlings is ready.
Manufacturing of metal collapsible rack
To create such a design, calculate the required amount of material based on the required height of the product and the length of the shelves. The metal corner will be used as racks, cross bars and shelf sides.
Calculate the amount of material based on the height of the racks and the length of the shelf.
To work you will need the following materials and tools:
- Metal corner measuring 3*3 or 4*4 centimeters;
- Thick glass or plywood for shelves;
- Bolts;
- Metal drill;
- Welding machine;
- Electric drill;
- A saw if the shelves are made of plywood or a glass cutter if the shelves are glass.
The height of the racks depends on the vertical distance between the crossbars.
Cut the metal corner into 4 equal posts, then cut the required number of cross bars (usually 6 or more are needed).
We make racks for the shelving.
Then you need to cut the horizontal load-bearing boards for the shelves, their number is multiplied by 2, that is, if you want to make a structure for 4 shelves, then the number of load-bearing boards is equal. Drill holes for bolts at the joints.
Assembling the structure using bolts.
Connect the uprights and crossbars with bolts; by welding, you need to weld the areas connecting the crossbars with the side bars for future shelves.
The frame is ready and the metal shelving is ready.
The frame of the structure is ready. Now cut the shelves to the appropriate size and place them on the base of the rack.
We place the glass sheet on the base of the metal shelving.
Note! It is possible to make a rack without shelves, but it will be necessary to make the crossbars so wide that the boxes with seedlings fit tightly between them. You can use lighting as decoration for a metal shelving, this will also have a positive effect on the plants. And if the structure is located in a poorly lit place, the presence of lighting is mandatory. In order not to harm the plants, it is recommended to use LED, fluorescent or phytolamps.
Do not use regular incandescent lamps - they generate too much heat and can damage the plants.
Any lighting component must be attached to the bottom of the top shelf so that it illuminates the bottom. For fastening, you can use a variety of fastening methods that are convenient for you - metal wire, cutting tin tape and others.
Features of creating shelves for seedlings
In appearance, a rack for growing plants for planting on the ground is no different from a garage or warehouse set of shelves. But this is only at first glance. To the standard characteristics, such as the stability and reliability of a frame made of several shelves, at least three more conditions are added:
- The height between the horizontal surfaces in one rack is chosen to be at least 50 cm; if the width of the shelves is more than 30 cm, then it is advisable to make the supporting surface transparent;
- The depth or width of the shelf should not be more than 65 cm, otherwise it will be almost impossible to care for the seedlings;
- If the shelves are made of a more plastic material, for example, plastic or perforated aluminum, then in order to avoid deformation of the racks under the weight of trays with soil and seedlings, you will need to make side supports on the walls.
These could be the slopes of a window opening, if you plan to make a shelf for seedlings on the window with your own hands, like the photo below. In this case, you can safely remove pots and trays with seedlings in any order, without particularly worrying about the structure tipping over.
Thanks to the slopes, the frame is quite stable
It is clear that window options for growing seedlings are not the most convenient and productive, so most often preference is still given to full-fledged racks. If you make shelves on the balcony, then the bottom row will need to be raised to the level of the railing or the lower edge of the glazing frame.
Advice! Growing seedlings only takes a few weeks, so it may be wise to build a collapsible shelving unit with removable shelves. You need to decide in advance what is the easiest way to bring it into a house or apartment and assemble it without using a welding machine.
In addition, you will need to plan for effective lighting of the seedlings. You can count on daylight only from mid-April, not earlier. Plants will grow confidently only if there are few of them, and they are on the windowsill around the clock. Therefore, making a window shelf for seedlings with your own hands makes sense only for the most capricious varieties, which require sunlight, and not ultraviolet or fluorescent lamps.
A rack is several rows of shelves mounted one above the other. The design can be single-level or multi-level.
Illuminated shelves
A stand for seedlings at home is necessary in the following cases:
- there is not enough light in the apartment, even on the window sills;
- the drawers leave dirty stains on the windowsill;
- air temperature in the rooms is below 20⁰C;
- There is not enough space on the window sills to install boxes.
Drawing of a rack for a balcony
If light is poor, try raising your plants higher by constructing a single-stage seedling stand. Make it in the form of a bench, securing a long board to two or three wooden posts. You can also make a shelving unit with lighting.
If a container with seedlings is placed on a windowsill, during the cold season it transfers coolness to the soil - excess moisture forms in the pot. On a window stand or multi-tiered shelf for seedlings, plants are raised above a cold surface, and warm air from the radiator circulates freely between the bottom shelf and the window sill, providing additional heating.
Stationary stands are more durable, but are only suitable for multi-room apartments, where a large stand for seedlings, standing in the room all year round, does not cause discomfort or irritation.
Collapsible and folding racks are removable shelves for seedlings installed on universal bases. They can be removed at the end of the season - this is a plus for growing seedlings in small spaces.
Advantages of collapsible structures:
- you can adjust the number of shelves, as well as the height and distance between them;
- do not interfere with moving around the apartment all year round.
Pot stand
Possible shelving designs: stationary, “tightly” fixed at the installation site; folding; portable, collapsible.
Reasons why you should make a rack yourself rather than buy it in a store:
- inexpensive ready-made racks are unreliable - they are made from low-quality materials;
- durable models made of high-quality materials are expensive - from 5,000 rubles;
- It is difficult to select a ready-made model if the window sill is of non-standard size, but a hand-made support can be of any shape and size.
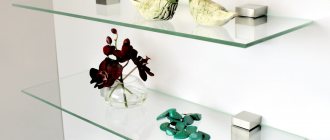
Glass shelves in holders
Make sure that any plant stand design meets quality requirements. She must:
- be durable and moisture resistant;
- ready for repeated use;
- provide quick access to plants;
- look aesthetically pleasing.
Purchased stand
The optimal number of shelves is 3-6 pieces; width – up to 60 cm for floor structures and up to 40 cm for window structures. Length – such that fluorescent lamps can be attached to the bottom
Materials suitable for making frames and shelves:
- wood, timber;
- metallic profile;
- plastic pipes.
Collapsible metal stand for seedlings
Metal is popular among gardeners due to its high strength, and wood – due to its naturalness.
To manufacture a multi-tiered metal rack, start with preparatory work, namely drawing up a drawing, calculating dimensions and load. Prepare tools and materials for assembly.
Equipment required for making shelves:
- metal saw, grinder;
- tape measure, pencil;
- drill;
- level;
- a set of nuts and bolts or a welding machine.
Metal structure made of profile
Materials needed to make your own rack for seedlings from a profile:
- metal profile with a diameter of 20x20 or 40x20;
- corners No. 25;
- sheets of chipboard or plywood with a thickness of 1 cm - for shelves; alternative - metal sheets;
- nuts and bolts for installing shelves;
- anchor bolts for attaching the stand with shelves to the wall or floor;
- fluorescent lamps for heating and lighting plants;
- lampshades and wires for lamps.
Drawing of a stand for seedlings from a profile
The amount of materials is calculated and depends on the size of the plant stand.
Assembly order:
- Determine the dimensions of the rack for seedlings: overall dimensions, length and width of the shelves, distances between them. If you plan to make the structure non-demountable, bring all the materials into one room in advance.
- Make two rectangles from a profile pipe - the sides of the rack. They can be welded or bolted.
- Leave some distance from the bottom of each rectangle (10-40 cm, depending on the height of the product) and weld a connecting cross beam for greater strength.
- By analogy with the previous point, weld the cross beams into the upper parts of each rectangle.
- Connect the rectangles together by attaching four pieces of profile pipe at the top and bottom so that the top front, top back, bottom front and bottom rear corners are connected to each other.
- Drill holes in the long vertical pipes at a distance of approximately 25 cm from each other to attach the shelves. The number of holes in one pipe depends on the height of the future shelf.
- Measure the width of the shelves and cut the corner profile. Attach the angles to the pipes in the areas where holes were previously drilled.
- Cut plywood or chipboard to size and place it on the corners.
Complicated design
A collapsible plastic rack is made by analogy with a metal one. The difference lies in the use of other materials and fasteners. The design is light and easy to move.
Materials and tools:
- PVC pipes;
- fastenings: corners and tees;
- hot glue;
- hacksaw.
Rectangles – sides of the stand
How to make a rack for seedlings from PVC pipes with your own hands:
- Make the sides. Cut the pipes, two long and two short, and combine them into two rectangles using three-pin corner fasteners.
- Connect the rectangles together by inserting long pipes between the parallel top and bottom corners. The result should be a frame made of pipes in the form of a parallelepiped.
- Even during manufacturing, on each rectangle on the long side, put several T-shaped fasteners for installing shelves. Choose the quantity depending on the height of the structure - for example, three pieces on each side.
- Attach short pipes to T-shaped fasteners and install shelves cut from plywood or chipboard on them.
We invite you to familiarize yourself with a DIY paper umbrella: how to make an unusual one step by step
Mini-greenhouse with lighting and heating
When making a rack for seedlings at home, you can use screws instead of fasteners and fittings. The appearance of the rack will be less aesthetic, but the savings will be significant. If necessary, the design can be complicated by using one of the proposed schemes.
Wooden plant stands are usually made with 3-6 shelves, each up to 70 cm high. The length of the shelves is selected in accordance with the size of the lampshades in order to reduce heat loss and ensure uniform illumination of the seedlings. The standard width of the shelves is up to 60 cm.
Before you begin construction, study various plans for planting racks. Adjust the size and number of shelves if necessary. Be especially careful with window shelves - calculate the load, height and width so that the structure does not fall.
Entirely made of wood, dismountable
To make a simple wooden rack you will need:
- drywall;
- wooden beam;
- corner profile;
- tools - saw, hacksaw, drill or hammer, screws or nails.
The procedure for making shelves for seedlings with your own hands:
- Make the first side of the future rack. To do this, attach four crossbars to two vertical bars that will hold the shelves. The distance between them is up to 60 cm. The distance from the floor to the first crossbar is 15-20 cm.
- Assemble the second side in the same way.
- Nail a sheet of drywall or 3-4 pieces of wood between the supports to create shelves.
- In the upper part, instead of a sheet of drywall, fasten two crossbars - you will subsequently attach backlight lamps to them.
- Cover the inside surfaces of the shelving unit with foil for better light output.
- Install a pair of LED lamps above each shelf.
Wooden structure for a loggia
The practical rack is ready. Its only drawback is the inability to move the shelves or change the distances between them.
Homemade racks for seedlings can be compact. For a small apartment, a narrow vertical structure made of pallets, mounted on one of the walls, is suitable.
Why do we need racks at all?
Movable rack welded from a 40 by 20 profile pipe
This question could probably only be asked by a person who has never encountered the problem of growing seedlings at home.
Of course, there are always window sills in the house, on which you can place all sorts of jars, cones and drawers, but this location has a number of disadvantages:
- The most important point is the lack of natural light. Planting seedlings begins in February-March, and in many regions of our country, at this time there is very short daylight, and the sun's rays have not yet gained sufficient power to fully warm the soil.
- Jars and boxes on the windowsill are constant dirt and debris, which will only increase as the seedlings grow, and it will become increasingly difficult to deal with them.
- Insufficient temperature. The optimal soil temperature for seedlings is considered to be 20-25 degrees, and the cold coming from the window can prevent this, and given the location of the radiator under the windowsill, the soil will constantly become damp, which will also negatively affect the seedlings.
- Lack of space. As a rule, a rack for seedlings on a windowsill is made in several levels, which can significantly save space. If you just place the boxes on the windowsill, then even with a large number of windows in the house, there will only be enough space for a couple of planted beds.
Of course, these are not all the disadvantages of placing seedlings directly on the windowsill, but even they are enough to think about making reliable racks with your own hands.
Window shelving
Excessively limited living space forces us to turn to the window option for growing seedlings. Usually the frame is attached to the window in such a way that the racks expand between the window sill and the top of the opening. The disadvantage of a window rack is the height limitation; usually it is possible to install only three shelves.
The choice of design depends on many factors, and the final decision rests with the person who likes to grow seedlings.
Two options for shelves made of plastic boxes
Depending on the crops grown, seedlings can be large or small. Shelves for low plants can be made from plastic boxes stacked on top of each other. But first the containers need to be prepared. Using a sharp knife, cut off most of the side walls of the boxes. There should be a low side. The corner legs are left untouched. The prepared containers are placed on top of each other to create a rack with shelves.
The solution to the question of how to make a shelf for seedlings with lighting is to use LED or fluorescent lamps. Light sources are attached to the bottom of the box next in height to the tier.
For tall seedlings, the distance between the shelves is increased. Plastic boxes are prepared using a similar technology. To lengthen the racks, cut pieces of metal rod. The rods are inserted into the recesses of the drawer legs. A piece of hose is put on each rod. These will be limiters that prevent the upper tier container from settling. The rod should protrude from under the hose. When the next box is placed on top of the pins, its legs will rest against the stop.
Steel structure
A metal shelf for seedlings on a window is suitable if there is a wooden window sill. The structure will be heavy, plus the weight of the boxes with soil and seedlings. The plastic window sill may have dents. The design diagram with shelves is shown in the photo. For example, we take a metal bookcase, differing only in size. You can leave the width according to the diagram, and calculate the height according to your window opening.
Steel shelves for seedlings are made dismountable with a bolted connection or welded into a single structure. Although, in the second option, only the frame is solid. The shelves themselves can be easily removed from the crossbars. For the frame, a profile with a section of 20x20 mm and a corner with a side width of 25 mm are used. The shelves are cut out of chipboard, multi-layer plywood or other similar boards. The exact amount of materials depends on the size of the structure, which is usually adjusted to the dimensions of the window opening.
Let's look at how to make shelves for seedlings on a windowsill from steel blanks:
- The dimensions of the structure are calculated so that there is a gap of 50 mm between the frame, the side walls of the window opening and the glass. It will not be possible to place more than three shelves on top of the window sill. On average, the height of the tier will be 500 mm.
- Two rectangles are assembled from the profile. These will be the side elements of the frame. Stepping back 100 mm from the bottom and top, attach the jumpers. The elements will play the role of stiffening ribs, reinforcing the rectangular frames.
- The rectangles are placed in a vertical position, the lower and upper corners are connected with jumpers.
- The frame is ready. Now all that remains is to equip it with shelf holders. It is better not to weld them, but to make them with a bolted connection. This will allow you to change the height of the shelves in the future. To fix the holders, holes are drilled at the side posts of the frame.
- The holders themselves are made from angle steel. The blanks are cut to a length corresponding to the width of the frame. Holes are drilled at the ends of the corners. Here it is important to ensure that the holes on the holders and frame posts match.
- The drilled corners are connected with bolts to the side posts of the frame.
It is advisable to paint a metal rack for aesthetics and protection against corrosion. The shelves are cut to the appropriate size for the frame and placed on holders made from corners.
Advice! If the material of the shelves is afraid of moisture, then before installing the boxes with seedlings, they are covered with plastic film or rubber mats.
DIY drawings of racks for seedlings
The simplest version of the design with shelves can be assembled with your own hands from ready-made parts used in arranging storage areas in warehouses. For example, you can make a rack from profiled steel racks, in which the shelves are assembled from ready-made metal cassettes.
Since the frame is assembled from standardized parts, it is possible to make shelves of unlimited sizes and number of places for arranging seedlings. The second advantage of using ready-made cassettes and racks is the ease and speed of assembly.
Designs made from prefabricated parts are convenient and easy to assemble
Important! As the shelves with trays and pots with seedlings are filled, the rigidity of the frame can be increased using cable braces stretched from the back.
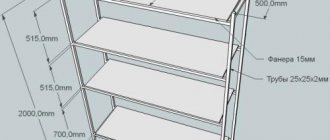
If you plan to make a stationary rack of maximum strength, then the best option would be a project from a 25x25 mm profile pipe, with a wall thickness of 2 mm.
Shelves measuring 50x150 cm can be made of waterproof plywood or metal if the seedlings are planned to be grown not on the ground, but in hydroponics.
If you make the shelves not from a pipe, but from a corner, then the supporting plane can be made of glass or thick monolithic polycarbonate.
Glass shelf cover improves illumination