How to make shelves in a pantry with your own hands?
A utility room is necessary in every home, because many things, such as seasonal clothing, household appliances, canned goods and just various little things, need to be stored somewhere. Most apartments have small rooms for such purposes, but, as a rule, they have yet to be equipped. How to make shelves in a pantry with your own hands and adequately optimize a small space is a burning issue in many families.
How to choose a wardrobe system for your closet
A dusty and dark utility room can be transformed with modern furniture design for convenient storage of items. The Swedish company Elfa has a huge selection of high-quality, comfortable and aesthetic wardrobe systems for storing household items.
To avoid clutter and chaos, you should install suitable shelving in this area. This is a structure mounted on a durable frame and consisting of many open shelves. It is very roomy, despite its modest size.
Pantry shelving is simpler than other rooms, but it is very functional. Every thing will be in its place, and finding all the little things will be very easy. The main part of the structure will be open. You can even choose models with glass shelf fronts and pull-out drawers. This shelving ensemble resembles a kitchen set.
Layout
Calculating space is an important point that helps to draw up a plan for the rational placement of racks or shelves for further comfortable use. The compactness of mezzanines allows even a small room to be used with maximum practicality, and then it will be possible to store a large number of necessary and temporarily unnecessary things.
Some modern housing plans do not provide a storage room at all, but savvy owners manage to solve this problem in the most extraordinary ways. For example, they place racks in a niche, a closet or a dead end of a corridor, making partitions from plasterboard and providing original storage with doors. And for those who have this premises, all that remains is competent organization, taking into account the purpose of the shelves being built.
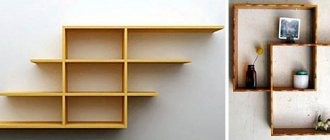
The purpose of the structures being installed is of great importance. Hanging structures are more suitable for books and collectibles. Boxes are placed down or on shelves of considerable depth.
There are several layout options:
- you can place mezzanines at the ends of the room;
- wide shelves are suitable when arranged in the letter “G”;
- if space allows, placing the racks in the letter “P” remains ideal - then there is a convenient passage in the middle.
For conservation, you need wide and strong racks made of wood or metal, stable and ready for heavy loads. If you plan to store valuable products, it is recommended to make shelves with glazing. It will reliably protect objects from dust and dirt. A wooden rack is pre-coated with stain, paint or varnish - this way it will be protected from rot, mold and other negative influences.
Types of storage structures
To choose the right type of design, you need to consider common options:
- traditional monolithic shelves without any additions or perforations - they are suitable for storing small household appliances and other items of medium weight;
- for heavy things they make devices with stiffening ribs;
- fragile, round and small objects are provided with shelves with sides;
- models with holes are necessary for natural ventilation and are used for storing seasonal clothing.
It is important to choose the right material:
- natural wood is safe, environmentally friendly, but susceptible to moisture and pollution, and therefore requires additional processing;
- Metal produces stable and durable structures suitable for high loads, but their main drawback is their tendency to corrosion, so it is better to choose galvanized steel products;
- polymer shelving is a good alternative to metal and wood; plastic is resistant to many external influences, but over time it can lose its original appearance and turn yellow.
Based on the expected load, you should think about the thickness of the boards in advance. The standard size for medium weight is 3 cm, although for lightweight items you can build a structure from plywood.
Different types of material require different fasteners, but, in any case, metal ones are the most durable and reliable. For long shelves, a sufficient number of fasteners must be used.
Materials
Despite the wide range of materials used in the production of pantry racks, only the most reliable ones remain a priority. This is because each shelf must be able to support heavy objects. Therefore, glass as crossbars and facades is undesirable. It is preferable to buy wooden and metal structures. They are durable and not subject to sagging under the weight of objects, if the weight of things is within normal limits.
Often buyers give preference to wood derivatives , buying structures made from fiberboard and particle boards. Such raw materials are not designed for long-term use. On average, it lasts no more than 5-7 years of service with a relatively light workload. It is significantly inferior to its metal counterparts and is more susceptible to damage from an accidental mechanical shock.
As a practical option, some companies offer the buyer combined models made of wood, tongue-and-groove boards and iron materials. At home, everything that is at hand is used. The craftsman can make a rack from plywood, wood, or metal.
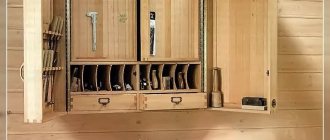
Each type of material is subject to operating characteristics. If a rack is needed to store canned goods, wood is needed. If these are shelves for bulk products, MDF or laminated chipboard will do. When a pantry is used as a tool storage area, a metal frame and durable metal shelves are indispensable. Sometimes plastic is used to make shelving.
Preparatory stage
Due to the fact that metal shelves are more suitable for greenhouses and garages, the use of wood in a residential building will be more aesthetically pleasing.
Tools you will need:
- drill (perforator);
- hand saw for wood;
- hammer;
- screws, dowels and self-tapping screws;
- Phillips and straight screwdrivers;
- ruler or tape measure;
- building level;
- drills for concrete surfaces;
- connecting flanges;
- abrasive paper;
- varnish, paint, stain of a certain color.
Metal pipes, brackets and wood for shelves should also be prepared. The boards should be 25-30 mm thick, cut to length, sanded with a grinder or sandpaper. Bars with a cross section of 20x30 mm are cut according to the depth of the shelf.
Before installation work, you should clear the room of things, dust, dirt, in a word, carry out a thorough cleaning.
It is necessary to repair the pantry, perhaps re-glue the wallpaper or re-tile the walls. It is advisable to treat the room in advance with preparations against fungus, mold and other microbes. For such a small room, it makes sense to use light-colored coatings.
If possible, you can install a ceiling fan for ventilation, or make lattice or sliding doors to the utility room. It is better to illuminate such a room with fluorescent lamps.
Assembly of racks
First, using a level, mark the location of the shelves on the walls. The reliability and stability of the entire structure depends on their accuracy.
Work should be carried out in a certain order:
- The prepared bars are attached to the ends, back and sides of the room. Depending on the load, you will need 2-3 self-tapping screws.
- The boards are laid on top of the beams and secured with long self-tapping screws (40 mm).
- To strengthen the structure you will need metal pipes. They prevent the rack elements from moving and sagging. The size is determined by the height from the floor to the first shelf.
- The pipe is cut, placed between the floor and the shelf, then fastened with flanges, and the pipes are installed between the shelves. It is important that the metal supports are strictly vertical to ensure optimal stability.
To create a hanging shelf, you will need the same tools and boards, 25 cm wide and about 2 cm thick. It is better to choose pine or larch as wood for mezzanines in the pantry:
- To work, you need two boards 80 cm long and two 25 cm long. They are sanded with a grinder until completely level and smooth.
- Four boards are connected into a box, perforations are made for self-tapping screws, and furniture hooks are secured on the back side with screws.
- After this, the wood is stained, painted and covered with a layer of varnish. All layers must be completely dry before use.
When making and placing shelving, it is recommended to leave a sufficiently large distance between the floor and the first structural element, since bags, large boxes and other large items can be stored in the lower part of the utility room.
Shelves in the pantry help to save free space in the living room, hide unnecessary things, and, thanks to their practical placement, make it possible to quickly find the necessary items. In addition, self-made structures allow you not to spend the family budget on the services of professional builders.
For an example of a pantry and dressing room design, see the video below.
Pantry shelving - high-quality and beautiful furniture from the home workshop
You can place a lot of things on this rack
A shelving unit is an extremely useful thing in everyday life, and sometimes simply irreplaceable. This piece of furniture, which can be called the simplest, allows you to effectively use the space inside residential and utility rooms, and in some cases it is an excellent decor and even a zoning partition.
Today we will look at how shelving for a pantry is assembled - how to make a useful thing with your own hands that will make your owner happy.
Stylish examples in the interior
To evaluate the capacity of a pantry rack, you can pay attention to the examples presented in the photo gallery:
- The U-shaped rack fits well into the allotted space, allowing you to place a maximum of kitchen and household items, including groceries.
- Two linear shelving connects to each other, creating space in the pantry for storing construction tools and work clothes.
- If less than a meter of space is allocated for a pantry, it is enough to install shelves, giving the space a clear organization.
- The original model with a functional angle will appeal to many: due to the use of round-shaped platforms, it allows you to place a lot of small objects on the planes.
Wooden rack
Professionally assembled furniture
You can choose anything you want as the material for your shelving. By the way, metal pantry shelving can withstand an impressive load.
However, neither metal, nor composite materials, nor concrete, nor plastic can be compared with wooden products, due to the ease of working with the material and its beauty. Let’s not forget to mention that the price of such a solution will be lower and the work will take less time.
Metal shelving for the pantry looks a bit rough
Materials
The structure of the rack is very simple. It consists of vertical racks, the number of which is determined based on possible loads, horizontal jumpers and, in fact, shelves.
Wooden beam
- For racks and lintels, timber with a cross section of 45*45 mm or slightly larger is perfect. This thickness will be quite enough to withstand a lot of slender rows of twists.
- You can also use slats for jumpers that are half as thick - if you have a circular saw, they can be cut from the same beams.
Planed boards 20*95 mm
- You can use any sheet material as shelves, be it plywood, chipboard or MDF and other analogues. But if you want the rack to look good at the same time, it is better to purchase edged boards, the thickness of which is 20 centimeters.
- Such a solution will be even stronger.
Polyvinyl acetate wood glue
- Any self-respecting carpenter tries not to use metal fasteners in his work, but connects everything with wood glue and wooden elements, but this approach requires some experience and more time. We offer you a middle solution.
- Self-tapping screws will be used, but only in combination with adhesive joints.
Dowels of different sizes
- The main connections will be made using dowels. They are purchased ready-made in stores.
- Well, and, naturally, the galvanized screws that we have already mentioned.
We will not list the working tools separately - you will see everything as we describe the work.
Review of manufacturers
The modern furniture market is filled with a lot of offers. Among the wide range of companies whose products are most often discussed are:
- "Akapari" - metal structures, mainly with four shelves without compartments and stable supports, having different heights of legs.
- "Dimax" - universal economy class designs with 3, 4, 5 shelves in one row.
- “Promet” are metal racks that are especially strong in terms of weight load, each shelf of which can support up to 500 kg per place.
Assembling the rack
A simple drawing of the product with dimensions will greatly simplify the work.
So, the rack itself will be assembled in the following sequence: first, the side racks with partitions are made, and then the shelves will be mounted on them. In order not to get confused about the sizes of the elements, be sure to make a preliminary drawing at least on a piece of cardboard.
Advice! Don’t forget to consult with your owner to clarify the height of the shelves, in case she wants to keep something specific there. But usually the shelves are made a little larger than a three-liter jar.
Side racks
The beams and boards most often have a length of 3 or 4 meters - buy this option so that when cut in half you get 2 racks at once.
Adjustment of racks to one size
- So, we take the purchased beam and cut off four absolutely identical pieces from it using a circular pendulum saw, which is also called a miter saw.
- Trimming helps to make the cuts strictly perpendicular, which is important for the stability of the rack. If this is not available, you can use a miter box and a hand saw.
Advice! To make the edges of the cut more even and smooth, the timber can be pre-wrapped with masking tape.
Sawing timber lengthwise
- We make jumpers from the remaining timber, dissolving it into two identical parts. For such work you will need a circular saw; if you don’t have one, then buy a ready-made solution right away.
Marking the slats
- Using a tape measure, we mark the resulting blanks, for example, 50 centimeters each - this value will correspond to the depth of our rack. We clearly draw the marks using a carpenter's square so that we can see the cut lines.
- Next, using the same pendulum saw, we cut the slats.
Marking the racks for the crossbars
- At the next stage, you need to mark the racks according to the height of the planned shelves.
- We take one of them, place it on a flat horizontal surface and draw a line at the required height. Then we apply a strip to it and, in order not to make a mistake in the measurements, we simply make an outline. We draw horizontal lines on the sides, indented from the edge to a slightly smaller thickness than the lintel.
- The design of the side post will be such that the lintels will be recessed into the beams - this will be more beautiful, and everything will hold much stronger.
- Next, we take all the other racks, lay them all side by side, resting their ends against something flat, and transfer the marks with a square to all the elements.
Grooves for jumpers
- We take a miter box, preferably a professional one, of course, and according to the markings we make cuts in the timber, without going beyond the horizontal line, repeating the manipulation the required number of times for all the grooves.
Grooving
- Next, the unnecessary part between the cuts is selected with a chisel and hammer. You need to work carefully so as not to go beyond the intended boundaries, and the resulting groove should have a clearly rectangular shape. If necessary, you can use a file or sandpaper to bring the geometry to perfection.
Connecting racks with jumpers
- We check how the rail fits into the prepared recess; if everything is in order, then we make a major fastening.
Drilling holes on the connection
- First of all, in the pre-assembled sidewalls, at the joints, we drill two holes. They are needed so that when tightening the screw, the wood does not crack.
Coat the joints with glue
- Then we remove the jumpers and apply a layer of glue on the bottom and sides. The groove also needs to be coated.
Fastening with self-tapping screws
- We return the jumper to its place and tightly tighten the connection points with self-tapping screws. In this case, the parts will be pulled towards each other, which will allow the glue to set properly.
- Remains of squeezed out glue must be immediately removed with a sponge soaked in water.
Pantry rack: finished side panel
As a result, we got these two absolutely identical ladders, which, if necessary, can be used exactly like this. But that’s not why we started assembling furniture. To slightly reduce this direct resemblance of the rack, you can decorate it using a hand router.
Milled counter corner
Installing shelves
We continue to make a shelving unit for the pantry with our own hands! The next step is to manufacture the shelves and assemble the entire structure into one whole.
- We make blanks for the shelves - we take the boards, mark them on a tape measure to the required length and cut them on the already familiar miter saw. Calculate the number of boards for the shelf so that when laying there are small gaps between them for better ventilation.
Pantry shelving: decorative edge
- To make the shelves look more attractive, the edges of the resulting blanks can also be processed with a router, well, at least those that will be at the top.
- Before starting assembly, we take a grinding machine and carefully process all the parts so that there are no burrs left.
First shelf board
- Those boards that will be installed at the edge are trimmed in such a way as to create a rectangular recess for the racks.
- Please note that the workpiece has a self-tapping screw screwed into a pre-drilled hole. We will use this solution as a temporary fixation. Subsequently, the screws will be unscrewed and replaced with dowels.
Shelving for storage rooms: the connection is also coated with glue
- We take the board and coat it with glue along with the place on the crossbar where it will lie. Afterwards the element is fixed using self-tapping screws.
- The manipulation is repeated with all boards.
- The structure is left to dry, after which we will make major, very strong connections on the dowels.
Masking tape limiter
- We take dowels - the 8x40 mm option will be enough, and a wood drill of the required diameter. We put electrical tape or masking tape on the drill, which will serve as guides when drilling.
- Next, we unscrew the screws and drill new, wider holes in their place.
Advice! Don't forget to blow the dust out of them.
- We fill the resulting holes with glue - not all at once, but as the dowels are installed. Lubricate the dowel itself with glue.
Dowel installation
- Well, and, in fact, we hammer in the dowel, removing the squeezed out glue with a damp sponge.
- That's it, the connection is ready, and after the glue has dried, you can bring it to perfection - sand it, putty.
Shelving in the pantry: the result of the work
In the photo above you can see the finished rack. Agree, he looks very interesting. In order for the product to last longer, it must be coated with protective impregnations, laid with oilcloth, or used liners for shelving.
So, we figured out how to make a shelving unit in a pantry. The procedure took a little time due to the use of glue, but the result was very high quality, able to withstand quite good loads without deflection. Be sure to also watch the video in this article, where the master shares another way to assemble such a structure.
A self-made shelf is the best option, ideal for storing specific items with certain parameters. Making shelves in a pantry with your own hands is quite possible, you just need to decide how it will look and choose a building material. This piece of furniture will allow you to rationally use the space of the room. If preserves are stored in the pantry, then you need a structure with wide, durable shelves on metal supports or a rack. Hanging shelves are suitable for arranging lighter items.
Types of designs: options for installing shelves with your own hands
Markings for installing shelves on the wall are made using a building level. The board is cut to the required length, the bars are cut to match the width of the shelf. The wood must be sanded and treated with stain. The board shelf is mounted using:
- boards;
- bars with a cross section of 20×30 mm;
- chrome pipe;
- edges;
- self-tapping screws (screws);
- drills;
- electric screwdriver;
- building level.
Installation of the product does not require special skills; it is performed in the following order:
- The bars are attached to two self-tapping screws.
- The treated boards are placed on bars and fastened with screws.
- Reinforce the shelf with a pipe using edges from the floor to the canopy.
The hanging product for the pantry is not difficult to assemble; for this you need:
- board 2 centimeters thick;
- screws;
- electric jigsaw with high-quality files;
- drill;
- Bulgarian;
- roulette;
- screwdriver
The boards are cut with a jigsaw, two pieces of each, in lengths of 80 cm and 25 cm. The parts are sanded and treated with stain, and given the desired color with varnish. Afterwards they are assembled into a rectangle shape. The finished hanging product is mounted on the wall.
Furniture made from pipes is affordable and has a simple design. The shelves themselves are placed on pipes. A simple figure is assembled from water, gas, and copper pipes. All parts for such a product are purchased depending on the desired dimensions. You will need:
- flanges;
- clamps for the pipe (metal clamp);
- stubs.
Furniture is assembled using the compression method. The pipe is fixed between the floor and ceiling of the pantry. They begin to assemble the shelf from below.
The pipe is cut to the required length, taking into account the width of the clamp. It is convenient to cut the holes for the pipe, if you put the shelves one on top of the other - this way you will definitely not be mistaken with the size. The assembly is as follows:
- Cut the boards to the required length, their ends should extend 10 cm beyond the pipes.
- The wood is sanded and treated (with stain, followed by varnish).
- Chrome-plated pipes are assembled.
- The flanges are attached to the wall according to pre-drawn markings.
- Fix the joints of the structure.
An excellent option is a self-assembled floor rack made of chrome pipes. This non-boring designer item will highlight the originality of the renovation in any apartment. To make such an item you will need the following:
- hacksaw for metal;
- screwdriver;
- roulette;
- chrome-plated pipes with a diameter of 22 mm, 3 meters each, 6 pieces;
- three-way corner clamps 8 pieces;
- self-tapping screws;
- sheets of plywood.
Advantages of simple designs
A handmade product is a source of pride for any owner. In addition, by making shelves yourself, you can achieve both beauty and the required functionality. Based on personal requests, the necessary structure is assembled, which helps to increase the free space in the apartment. After all, the space in the pantry is rationally used if there is a rack or shelves in it, while in a closet without shelves, where everything is piled up, it is simply impossible to find anything.
This fruit of inspiration will save space in an apartment or house: canned goods, empty jars, necessary tools, household supplies, and out-of-season items will be placed in an orderly manner on the shelves. This design will hide unpresentable household items from prying eyes, while at the same time allowing you to quickly and conveniently get what you need. So, by taking the risk of doing a little handicraft, you will “declutter” the apartment and at the same time save things you don’t need now from the sad part of being lost forever somewhere in the dusty depths of the pantry.
How to do it yourself?
Making a rack with your own hands does not require any special skills. Today, if you wish, you can do anything, armed with simple and accessible instructions. The most popular among home craftsmen are prefabricated metal structures and varieties using laminated chipboard. Initially, a sketch of the model is drawn up, depending on the type of pantry, choosing a linear, angular or U-shaped model of the rack.
Tools you may need:
- saw (electric jigsaw);
- screwdriver with linear and cross-shaped profile;
- hammer;
- construction tape;
- screwdriver;
- nails (screws).
The principle of creation is based on the weight of the material: it is preferable to fix lightweight structures to the wall, massive products should stand on the floor. In the process of creating a sketch, they estimate the width of the shelf (50-55 cm is enough), the height of the compartments for different boxes made of plastic or cardboard. You can take care of additional fastening of the rack to the wall using metal ears and self-tapping screws.
When making a small rack mounted on the wall, you can rely on simple instructions. You can take the proposed drawing as a basis, which clearly explains the manufacturing process of the structure. You can use wood for supports, chipboard for shelves.
Production stages:
- In long support beams of identical size, we make through grooves along one side at equal intervals (this will be a system for adjusting the height of the shelves).
- The height of the supports should be about 2 m. In this case, the grooves are made at approximately a distance of 127-130 mm. The width of the recesses is 20 mm.
- For the bottom and top, stretchers are made: for each of them, 4 blocks of wood are knocked together, covered with a sheet of plywood, making the upper and lower shelves, through which the rack will be held.
- All that remains is to cut the sheets of plywood to the required size and insert them at the desired level. In this case, the number of shelves can be any, but not too large.
- This rack does not need to be mounted on the wall: due to its strong supports, it will be firmly located on the floor. If necessary, it can be removed or moved.
- To give the product an attractive appearance, it can be painted to match the walls or simply varnished: this will protect the material from moisture and dampness.
If you have a sheet of fiberboard available, you can make the structure more reliable by sheathing it on one side with a solid sheet of material using nails.
Materials and tools
In order to make shelves for the pantry, we will need:
- Bars of the required sizes;
- Boards or slabs for shelves;
- Building level;
- Drill-driver;
- Hammer;
- Hacksaw or other saw;
- Tape measure, pencil.
The materials most often used are wooden blocks measuring about 50*50 millimeters. Any boards will do - the main thing is that they are of sufficient length and can withstand the expected load. In addition to boards, you can use particle boards, plywood and other suitable materials - even plastic sheets or fiberboard (for small and light objects).
↑ back to contents
Planning the shelving
In order for a pantry to be equipped with shelving, it must have enough space. Clean it first and then plan your shelving placement.
Consider factors such as:
- The dimensions of the items that are supposed to be stored - for example, various boxes require more space than, for example, jars of canned cucumbers;
- The remaining amount of free space - if the racks take up too much space, then it will be uncomfortable for you to walk in the pantry;
- Gaps between individual sections - if they are too large, the shelves will sag under load, so they should be sufficient to ensure that the shelves hold the items placed on them well.
There are two options for shelving layouts:
- The first involves direct fastening of the side elements of the rack to the walls - the shelves go from wall to wall. Such racks are more stable and somewhat easier to manufacture, but moving them will be difficult - to do this you will have to completely remove them from the wall and disassemble them. In addition, the option is not suitable for long walls - shelves that are too long will sag too much. However, pantry shelving rarely needs to be moved - you only need to assemble the shelving once and it will last for a long time after that, so this option is likely to work.
- The second option involves making the rack independently of the wall, in the shape of the letter “P” - the rack will stand on the floor like a table or stool, and can be easily moved to another place. Such racks can have an unlimited length and are suitable for any room. Choose any option that suits you.
Placing shelves in the pantry in the shape of the letter “U”
After completing the planning, calculate the required amount of materials. Then you can start making the shelves. Read a separate article on how to make bookshelves with your own hands.
↑ back to contents
Types of structures
The entire range of products offered for sale can be divided into 2 types: linear shelving and corner variety. The storage system can be very different. This depends on the parameters of the pantry itself.
In most cases, it is the design features of the pantry that are the main selection criterion: the rack must fit exactly in a small space. Therefore, every shelf of the model matters.
The dimensions of the shelves and the rack itself may vary. It depends on the manufacturer's model and the buyer's needs. Today, shelving can have two to four closed roll-out drawers or lockable doors. It resembles a display cabinet with the difference that a small part of the shelves are closed.
The most modern designs, in addition to common shelves, may have:
- open shelves with roll-out drawers;
- compartments for cans of different heights;
- closed showcases with glass facade;
- shelves with roll-out baskets for storing onions and apples;
- compartments with metal fastenings for wine, seasonings, spices;
- low shelves for small items;
- compartment for outer (work) clothes;
- boxes for potatoes.
To allow air to circulate freely in the space, manufacturers produce models with a free lower part and high legs. There is enough space at the bottom to fit a basket, shopping bag or small box if necessary. The adjustable shelves attract attention: this allows you to change the height if the size of the stored item requires it.
Often, wall-mounted prefabricated varieties are used in the arrangement, fixing the rack to the wall. In this case, you need to understand that filling the model cannot be thorough. You can fill it with different items, for example, use the space for linen, bulk products, without compacting each shelf.
The built-in varieties are worthy of attention. These racks look like shelves with or without drawers, recessed into a deep niche with a door. The models are interesting because, in fact, they are a collapsible construction set.
If desired, the drawers can be removed, freeing up space for more necessary purposes.
Shelving manufacturing technology
The technology depends on the rack option you choose.
Let's consider an option where the frame is rigidly fixed to the wall. First of all, beams are attached horizontally to the wall - a section of 50*50 is sufficient. The beams are fixed in pairs - on each pair there will be one tier of the rack. The distance between them will determine the height of the shelves. After that, shelves are laid on them and attached. This completes the process.
Now let's look at the design of a U-shaped rack.
"U-shaped" rack layout
To begin with, bars for the racks are selected - the cross-section is suitable 50*50, and the length can be taken 20-40 centimeters less than the height of the room - there, on top of the rack, it will be possible to arrange another shelf.
If necessary, beams are also installed in the middle so that the shelves rest on them and do not sag under load. The length of one span is selected for the required load. As a rule, one meter is enough.
Frame made of beams
Jumpers are installed on the side of the bars on which the shelves will rest. Their number depends on the desired number of shelves, and the distance between them determines the height of the shelves.
In principle, the assembly of the rack is almost complete - if you attach the shelves to the jumpers, you will get a fairly rigid structure. If necessary, you can strengthen it further. You can also make sides on the sides of the rack - in some cases this is more convenient.
Hanging shelves in the garage
Shelves for the rack can be made from ordinary wooden boards. If you plan to use chipboard, keep in mind that such boards are not very resistant to moisture.
It is better to place shelves with a greater height at the bottom - things that have large dimensions are more convenient to store in the lower part of the rack.
Frame for shelves on the balcony
The thickness of the shelves ranges from 10 mm to 30 or more - it depends on the weight and number of items that are supposed to be stored in the pantry.
After installing the frame, boards are mounted on it. If necessary, they are sanded and painted. The technology is similar to making a frame for a podium. This completes the production of the rack.
↑ back to contents
We make racks and shelves for the pantry - the secrets of rational arrangement
A utility room is a very good help for storing a wide variety of things, but for the most efficient arrangement of a pantry, it is necessary to equip it with shelves. Some try to do without them by piling mountains of boxes and boxes in the corners, or hanging objects on nails driven into the walls. However, such storage methods are more than impractical, and to solve such problems in this article we will look at how to equip a pantry with shelves and racks. Materials and toolsIn order to make shelves for the pantry, we will need:
|
The materials most often used are wooden blocks measuring about 50*50 millimeters. Any boards will do - the main thing is that they are of sufficient length and can withstand the expected load. In addition to boards, you can use particle boards, plywood and other suitable materials - even plastic sheets or fiberboard (for small and light objects).
↑
back to contents
In order for a pantry to be equipped with shelving, it must have enough space. Clean it first and then plan your shelving placement.
Consider factors such as:
- The dimensions of the items that are supposed to be stored - for example, various boxes require more space than, for example, jars of canned cucumbers;
- The remaining amount of free space - if the racks take up too much space, then it will be uncomfortable for you to walk in the pantry;
- Gaps between individual sections - if they are too large, the shelves will sag under load, so they should be sufficient to ensure that the shelves hold the items placed on them well.
There are two options for shelving layouts:
- The first involves direct fastening of the side elements of the rack to the walls - the shelves go from wall to wall. Such racks are more stable and somewhat easier to manufacture, but moving them will be difficult - to do this you will have to completely remove them from the wall and disassemble them. In addition, the option is not suitable for long walls - shelves that are too long will sag too much. However, pantry shelving rarely needs to be moved - you only need to assemble the shelving once and it will last for a long time after that, so this option is likely to work.
- The second option involves making the rack independently of the wall, in the shape of the letter “P” - the rack will stand on the floor like a table or stool, and can be easily moved to another place. Such racks can have an unlimited length and are suitable for any room. Choose any option that suits you.
Placing shelves in the pantry in the shape of the letter “U”
After completing the planning, calculate the required amount of materials. Then you can start making the shelves. Read a separate article on how to make bookshelves with your own hands.
↑
back to contents
The technology depends on the rack option you choose.
Let's consider an option where the frame is rigidly fixed to the wall. First of all, beams are attached horizontally to the wall - a section of 50*50 is sufficient. The beams are fixed in pairs - on each pair there will be one tier of the rack. The distance between them will determine the height of the shelves. After that, shelves are laid on them and attached. This completes the process.
Now let's look at the design of a U-shaped rack.
"U-shaped" rack layout
To begin with, bars for the racks are selected - the cross-section is suitable 50*50, and the length can be taken 20-40 centimeters less than the height of the room - there, on top of the rack, it will be possible to arrange another shelf.
If necessary, beams are also installed in the middle so that the shelves rest on them and do not sag under load. The length of one span is selected for the required load. As a rule, one meter is enough.
Frame made of beams
Jumpers are installed on the side of the bars on which the shelves will rest. Their number depends on the desired number of shelves, and the distance between them determines the height of the shelves.
In principle, the assembly of the rack is almost complete - if you attach the shelves to the jumpers, you will get a fairly rigid structure. If necessary, you can strengthen it further. You can also make sides on the sides of the rack - in some cases this is more convenient.
Hanging shelves in the garage
Shelves for the rack can be made from ordinary wooden boards. If you plan to use chipboard, keep in mind that such boards are not very resistant to moisture.
It is better to place shelves with a greater height at the bottom - things that have large dimensions are more convenient to store in the lower part of the rack.
Frame for shelves on the balcony
The thickness of the shelves ranges from 10 mm to 30 or more - it depends on the weight and number of items that are supposed to be stored in the pantry.
After installing the frame, boards are mounted on it. If necessary, they are sanded and painted. The technology is similar to making a frame for a podium. This completes the production of the rack.
↑
back to contents
↑
back to contents
In addition to shelving, you can install removable shelves in the pantry.
To make such shelves, removable rectangular brackets are most often used - they can have a wide variety of designs, and it is better to choose those that best withstand the load and distribute it evenly over the surface of the pantry wall.
Both boards and particle boards are suitable for the shelf itself. You will need to make a shield of the required dimensions from the boards: the main part of the boards goes along, and two or three go across, fastening the main boards together. In this case, the legs of the brackets will pass between them. The slab can simply be cut to size.
Draw a strictly horizontal line on the wall - the brackets will be installed on it. Install the brackets using self-tapping screws or anchors. After attaching the brackets, install the shelf on them, securing with bolts or self-tapping screws.
At this point, the manufacture of the shelf can be considered completed. We have prepared a separate review about making a bar counter with your own hands.
Swivel round shelves are very easy to use
We looked at ways to make shelving and pantry shelves. As you can see, there is nothing particularly complicated about this, and after installing racks and shelves, you will be able to store items in the pantry in the most efficient and convenient way.
In the next article, read how to make a dressing room with your own hands.
| The use of any information from the site is possible only with the obligatory indication of the author and a direct, active link to the site. |
chas-remonta.com
Wall shelves for pantry
In addition to shelving, you can install removable shelves in the pantry.
To make such shelves, removable rectangular brackets are most often used - they can have a wide variety of designs, and it is better to choose those that best withstand the load and distribute it evenly over the surface of the pantry wall.
Both boards and particle boards are suitable for the shelf itself. You will need to make a shield of the required dimensions from the boards: the main part of the boards goes along, and two or three go across, fastening the main boards together. In this case, the legs of the brackets will pass between them. The slab can simply be cut to size.
Draw a strictly horizontal line on the wall - the brackets will be installed on it. Install the brackets using self-tapping screws or anchors. After attaching the brackets, install the shelf on them, securing with bolts or self-tapping screws.
At this point, the manufacture of the shelf can be considered completed. We have prepared a separate review about making a bar counter with your own hands.
Swivel round shelves are very easy to use
We looked at ways to make shelving and pantry shelves. As you can see, there is nothing particularly complicated about this, and after installing racks and shelves, you will be able to store items in the pantry in the most efficient and convenient way.
In the next article, read how to make a dressing room with your own hands.
Popular posts
- Chair for dressing table Chairs for dressing tables in Moscow - 189 Products Company from Moscow, delivery 29643 a In…
- Silicone sanitary sealant Silicone sanitary sealant white in Moscow - 1491 products Company from Moscow, delivery (tomorrow) 140...
- Shelf in the hallway Currently, there are a huge number of different options for shelves in the hallway, and this is directly ...
- Insulation of the floor in a wooden Insulation of the floor in a wooden house from below: materials and installation technology SHARE ON SOCIAL NETWORKS One of the common…
Peculiarities
The rack is a set of shelves united by a common box. Varieties for the pantry are compact in size. This approach is convenient because with a small space occupied, the rack allows you to accommodate a lot of things, freeing up the visible space of the apartment from them. This type of furniture is appreciated by many: a shelving unit in a pantry is a convenient storage for food, dishes, and home preserves.
This piece of furniture is convenient due to its clear organization. Each shelf of such a rack is used to the maximum and allows you to easily find the desired item, saving time on searching. Almost everything is visible in it. The box can be open on both sides or have a back wall.
The openness of such furniture is its main disadvantage. Due to the fact that the shelves do not close, dust settles on the surface of the rack and its contents. Other disadvantages include the ill-conceived nature of some designs, for example, sometimes the manufacturer provides roller legs for creative models, which is completely inappropriate for using a rack in a pantry. You have to choose between compact size and unnecessary function.
The color scheme of the product may vary. More often it depends on what exactly is offered in the store. These are shades of wood or white and light gray.
If necessary, the rack can be painted: this helps extend the service life of the material and allows the product to look most harmonious in a small space.