Glowing and neon wallpaper will allow you to create an original design of ceilings and walls without much effort. During the day, the material looks like ordinary wallpaper, but at night it fills the room with magical light.
Peculiarities
Luminous wallpaper can be made from high-density paper, non-woven polymer or non-woven material. Initially, a drawing is applied to the base. Then its contours are coated with powder, creating a 3D effect in the dark.
The sizes of neon wallpaper may vary. The construction market offers a wide range of models: from compact panels to large canvases covering the entire wall. Among the variety of wallpapers, there are two types:
- roll;
- plot.
The first type is used for walls as decoration. Most often, one of the walls of the room is decorated with such wallpaper, the rest are made in a neutral color tone.
Based on roll wallpaper, a panel can be created and framed. Decorating a wall with 3D coating can zone a space , dividing, for example, a living room and a bedroom. The price of roll wallpaper is about 8,000 rubles per piece.
Thematic wallpapers are created from luminous fragments. They can be used not only in decorating walls, but also ceilings. Canvases with patterns in the form of landscapes, underwater depths, space, architecture, soaring birds, and fantasy images are in great demand among buyers.
Thematic wallpaper for a children's room must be chosen taking into account the gender and age characteristics of the child. Young ladies will like options with stars, hearts, and fairies. Boys will love stories with cartoon or fantasy characters.
Quite often, theme wallpaper is used as bathroom decor. They depict the underwater world.
Location of lamps on the ceiling
If the effectiveness of a chandelier or pendant lanterns with lampshades practically does not depend on their installation location on the ceiling, then with recessed lamps the situation is more complicated. A lighting system made from ceiling lanterns and LED strips can effectively fill a room with light and successfully fit into the finishing design only if several conditions are met:
- Built-in lights and LED strips are divided into several groups, each of which provides illumination in a certain sector of the ceiling;
- Each group of lights turns on and off independently of other ceiling lighting elements. In this way, it is possible to solve the problem of stepwise regulation of the level of lighting in the room;
- In each group it is necessary to place lamps on the ceiling in a certain logical combination or pattern.
As a result, with any combination of switching on groups there will be no clutter and chaotic layering of lamps and lanterns. The entire lighting system will be presented in the form of several drawings or outlines.
Advice! You can use a ready-made standard layout of lanterns, but it will be more convenient to make LED ceiling lighting yourself.
Thus, it will be possible to take into account the direction of the light flux from the window opening and correctly plan the location of the lanterns above critical places in the room.
How to place spotlights on the ceiling
There are quite a lot of options for placing backlights on the ceiling surface. To understand the logic of placing spotlights on the ceiling, just look at the typical diagrams below.
It's quite simple:
- Lamps from different groups should not interfere with each other;
- For any switching combination, the ceiling lighting should be uniform.
If spotlights are used as the main light source, then the places on the ceiling above critical objects - a TV, home theater, desk - should be illuminated only by a reflected stream of light. This means that no matter the position of the person, the flashlight or backlight should not be in the field of view.
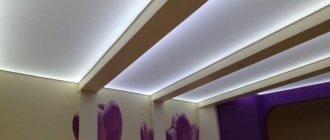
In addition, it will be comfortable to perceive if the lighting elements on the ceiling surface are located in some kind of pattern or geometric structure. For example, as in the photo below.
Two lines of lamps make it possible to separately highlight the desired part of the space
Two arcs of spotlights fit perfectly into the design of the ceiling surface, while providing high-quality illumination of the ceiling space and part of the walls of the room.
In practice, owners usually take the simplest route and install lighting on the ceiling surface along one of the walls or along the perimeter of the ceiling.
Arrangement of large ceiling lights and chandeliers
Monumental light sources are most often installed in the center of the ceiling. Such a decision is usually dictated by the design of the ceiling trim. A chandelier or a group of pendant lighting systems is always considered the central element of any composition, so they are placed in the center or above the main place in the room.
In this case, the chandelier is just an element of the interior
For example, in the case, as in the photo below, the pendant lamp is installed above the dining table, regardless of the location of other lighting systems.
Functional lighting planning
The panels can be arranged in a checkerboard pattern, along the line of any trajectory. The main thing is that there is orderliness in their arrangement
Panel LED lights can successfully replace a chandelier, however, in this case it is necessary to use several light sources, since due to the lack of a suspension, like a chandelier, the illumination area is significantly limited.
Particularly large lighting structures can be installed on the ceiling in a so-called window design, this ensures an even flow of light at any illumination level. Despite the apparent complexity, this is one of the most promising and popular methods for offices and workshops, where uniformity of illumination is crucial.
LED ceiling light placement
Most often, LED strips are used to illuminate fairly complex multi-level structures. Strip lighting is traditionally installed around the perimeter of the ceiling trim.
LED option with chandelier
This could be a coffered version with a chandelier, as in the photo below.
LED strips with spotlights
In addition, LED strips can be used to form illuminated areas in the form of curved lines and patterns. In this case, LEDs play the role of only a decorative addition to the main lighting system with built-in lanterns.
Varieties
According to the production method, neon wallpapers are divided into:
- phosphor;
- fluorescent.
Models with phosphor coating do not contain phosphorus. Among the features of this type of material, the following points can be highlighted:
- During the day, the wallpaper accumulates natural light, and at night it releases it in the form of a soft glow;
- The color emitted by phosphor wallpaper can vary from green-blue to orange;
- The phosphor coating serves as auxiliary lighting at night and creates a cozy romantic atmosphere due to its muted glow.
According to manufacturers, the paints do not harm the environment and the human body.
There is a wide range of neon wallpaper on the building materials market, but with initiative, time, diligence, stencils and the necessary paints, you can make exclusive options using standard wall coverings as a basis.
Fluorescent wallpaper with a 3D effect looks like a three-dimensional image during the day, and at night it looks like a fantastic backlit design.
The features of this type of wallpaper include:
- images are applied with fluorescent powder;
- For maximum effect, it is recommended to use a Wood's lamp. Reflecting on the paint, its waves make the glow even brighter and more beautiful.
- In order to maintain the glow of the fluorescent coating for a long time, you need to protect it from the sun.
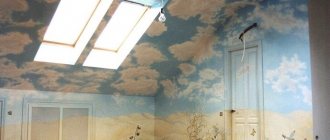
For ceiling decoration, the most popular are 3D wallpapers in the form of the starry sky, space and planets. Fluorescent wallpaper for children's rooms must be selected taking into account the child's tastes: spaceships, heroes of fairy tales or science fiction films.
Examples of such design
Despite all these shortcomings, such ceilings look great. In addition, in order to install such a luminous canvas in your home, you don’t need anything complicated - just order a special translucent film and additionally install a light source.
If you use such a canvas as a decorative decoration for your apartment, then there are no limits to your imagination - you can create luminous patterns of any shape and color. The shape will be determined by the location of the light sources, and the color of the LEDs can be adjusted and selected from the remote control. The most interesting solutions in terms of appearance are presented in the photographs below.
Application area
Wallpaper with a luminescent coating depicting a starry sky or beautiful landscapes is suitable for rooms of all types. In the bedroom they can be used to decorate the ceiling, the head of the bed or the wall opposite the sleeping bed. The soft glow will allow you to relax and sleep well. In the living room, luminous wallpaper will become an unusual interior accent. The most important thing is to choose the right location for them. By decorating a wall or ceiling in the living room with a photoluminescent coating that creates a luxurious three-dimensional image, you will give the room status and fill it with soft light.
In a children's room, neon wallpaper can be a three-dimensional panel with reflective elements or a canvas covering the entire ceiling depicting a starry sky. In the hallway, the ceiling is decorated with fluorescent wallpaper.
Wallpaper with a luminescent coating is quite expensive, but it is actively used by owners of both city apartments and country mansions. This decor will look great in daylight, delighting the eye with realistic 3D images, and emitting an incredible glow in the dark.
Glowing wallpaper can be used to decorate cafes, clubs and even office premises. Thanks to the material’s ability to change appearance depending on the time of day, the room will look varied, which means it will have a beneficial effect on the results of the employees’ work.
Positive sides
Like all suspended structures, the tension fabric will allow you to hide the unevenness of the existing ceiling and install a perfectly smooth covering. Considering that suspended ceilings are now almost equal in cost to other high-quality leveling methods, this solution will be very practical.
By placing several LEDs in the ceiling space, you can make it glow. It is not necessary to completely abandon the main lighting. The luminous canvas can act as decorative lighting or simple interior decoration.
If you use another light source, there may be some problems with servicing these devices, so LEDs will become almost the only reliable solution. In addition, they provide fairly bright light with fairly low power consumption.
By arranging the light sources in the form of some kind of pattern, you can get a light pattern on the surface of the stretched fabric. This will give the design uniqueness. At the same time, if the brightness of the glow is not too high, then such a ceiling will be an excellent solution for night lighting, when you only need to lightly illuminate the room.
User manual
When buying luminous wallpaper, do not forget to purchase a Wood's lamp. It is selected taking into account the area of the photoluminescent sheet. The calculation is made as follows: to illuminate 3 m2 of surface, one lamp is required. It can be placed no closer than 1 m from the wall. If the ceiling is decorated with wallpaper, the lamps are installed in wall niches and behind the ceiling plinth. Lamps can be placed around the perimeter of the canvas or fixed pointwise. The basic rule is that UV waves must be directed towards the reflective pigment.
The starting price for Wood lamps is 300 rubles. They are equipped with a standard base that can be easily screwed into the lamp sockets.
Neon wallpaper is very easy to care for, has a long service life, does not deform, does not fade, is not afraid of moisture, has dust-repellent properties, and is not afraid of fire and mechanical damage. The reflective layer is covered with a protective coating, but when cleaning, you should avoid using aggressive cleaning agents. The material is environmentally friendly for human health and pets and does not cause allergies.
The paint contains substances of mineral origin. To buy a quality product, you need to choose well-known brands that have already successfully proven themselves in the construction market. For good luminous wallpaper, the emission time is proportional to the period of light absorption. That is, if they “absorbed” daylight for 8 hours, they will glow for the same amount of time.
Selecting a cable for a lighting system ↑
Installation of lighting in an apartment begins with drawings and calculations, with determining the location of lighting points, lamps and switches. After the ceiling plan with lighting has been drawn up, you should begin installing the wires for the lamps.
The typical cable cross-section is 1.5 millimeters square, representing a maximum load of 4 kilowatts. Of course, it is unlikely that the lighting in the house will reach this parameter, because in such a situation it is necessary to use 40 100 W bulbs at the same time. However, you should never give up; it’s possible that jupiters will be installed for professional video filming at home.
Power of light sources
When you don’t want to pay extra money for a wire, you can calculate what cross-section the cable will need in each case. If the lighting zone consists of three lamps with 60 W bulbs, then the total power of the lamps will reach 180 W. It needs to be divided by 220. Now let’s look at what the result can tell us.
If the number is less than 10, then a cable with a cross-section of 0.75 millimeters square can be installed to the lamps from the box. If less than 15, the cross-section should have a size of 1 millimeter square, and more than 17 – up to 2.5 millimeters square. In our case, it turned out to be 0.8, which means less than one. Whether to use a single-core or multi-core cable is a personal matter for each person.
Tips for choosing
Luminous wallpaper is best used as a design accent in a particular room. This will give the room more expressiveness. It is important to consider the purpose of the room for which they are selected. Small drawings glow dimly, but a large-scale painting emitting a powerful glow, installed, for example, in a bedroom, can interfere with restful sleep, especially for sensitive people.
For decoration, choose one wall, since it is very difficult to be in a room where all the walls are glowing. It happens that not the entire image glows, but its individual fragments.
A universal 3D decor solution for all rooms (children's, living room, bedroom) - starry sky.
If panoramic luminescent wallpaper is your dream, keep in mind that they are only suitable for large rooms, since a certain distance is necessary for the correct perception of the image. It will not be possible to appreciate all the beauty of the canvas within the confines of a small room. The way out for small rooms is to decorate the ceiling with luminous images. The sizes of panoramic canvases can be different: from 1.3x1.8 m2 to 3x5 m2. Cost varies depending on size. The average price on the market is 1,500 rubles per 1 m2.
When choosing a theme for wallpaper, keep in mind that the same composition can quickly get boring. But you won’t be able to change the covering as regularly as paintings and other wall accessories. It is best to choose for the image motifs that surround us in everyday life: the sea and its inhabitants, celestial phenomena, nature. Psychologists are sure that the brain perceives such images best.
You should not choose wallpaper with images of popular people (actors, politicians), film stills, architecture, as these pictures will quickly get boring.
If the room is spacious enough, you can use a removable luminescent image or install the composition on eyelets , which will allow you to update the panel from time to time or remove it if necessary.
Disadvantages of such a solution
By incorrectly calculating the distance from the mounted strips of LEDs to the stretched film, you can get uneven illumination of the coverage area. A luminous stretch ceiling requires very careful preparation and calculations before installation. After stretching the film, nothing can be changed, at least not without dismantling the covering, which means paying for its re-installation.
The distance from the diodes to the canvas required to obtain uniform illumination is determined by their power and the quality of the coating. Typically, it is about 10 - 15 centimeters. This means that you will have to lower the ceiling this distance. For rooms that are not too high, this is unacceptable.
It will be almost impossible to maintain hidden lighting, therefore, it is necessary to install LEDs, which are quite expensive. In addition to the diodes themselves, you will need to purchase a transformer, which has limited power, which leads to the need to install several such converters in large rooms. All this affects the final cost of registration.
It is possible to use a luminous stretch ceiling as the main lighting, however, you will need to use a very large number of diode strips and it is very desirable to add a special device to the lighting scheme - a dimmer, which allows you to adjust the brightness of the glow. The cost increases again.
If the power of the installed light sources is insufficient, the room will be uncomfortable and dark. Additional local lighting will be required. In the most common variants of this design, the lighting is planned this way - part of the light is provided by the ceiling, and additional lighting fixtures are used for local illumination.
A typical disadvantage of tension or suspension systems is a reduction in the height of the room. It is impossible to get rid of this drawback, since to install such a ceiling it is necessary to install special fasteners on the wall or ceiling.
How to glue it?
The process of covering a room with neon wallpaper will not be difficult, since it is no different from working with vinyl material. Before gluing luminous images, it is necessary to make the walls absolutely smooth and even, remove all roughness and bumps. Wallpaper does not require impregnation with glue, so the latter is applied directly to the wall. For luminescent models, the same glue is suitable as for regular ones.
Neon wallpaper will appeal to creative individuals who want to become owners of everything new and unusual, dreamy and romantic people, and practical people who want to save on electricity.
To learn how to paint with luminous paint, watch the following video.
Rules for installing switches ↑
Switches of any type are always placed on the phase wire. There is only one cable suitable for the switch, which opens and closes inside the switch. From the outside it may seem like there are two wires. However, the phase conductor forms a loop that rises or falls towards the switch. The loop is cut at the top and the ends are connected to the dimmer or switch contacts.
Switch installation diagram
If you install a dimmer as a switch, you should take a closer look at its power. If the device is marked 300 W, then it is designed for a chandelier, which consists of five light bulbs, each 60 W. There are 1000 watt dimmers available for home use. With the help of such a dimmer, the lighting level can be changed in several rooms at once. The dimmer is installed in the same way as a simple switch, only on the contacts of the dimmer there is an inscription indicating which wire to connect to which contact.
How to make a ceiling with lighting yourself
The easiest way to organize the illumination of the ceiling surface is to use a ready-made LED strip. This is an ordinary strip of transparent plastic on which point sources of radiation or LEDs are printed. All that is needed to make the backlight is to lay a strip LED around the perimeter of the surface.
Just stick the tape and hide it behind the screen
For complex structures, closed niches are traditionally used, into which, in fact, the lamp is placed.
The brightness of the lamp is very high, so the backlight will be clearly visible even against a white background on a sunny day.
The second method involves the use of special ceiling-mounted baguettes with a built-in niche for laying the tape. The lighting strip can be glued separately or placed in the baguette body. Due to the presence of a gap between the ceiling and the upper edge of the baguette, the flow of light is directed parallel to the plane of the ceiling surface.
Instead of strip systems, you can use spotlight LEDs; in this case, the ceiling lighting takes on the characteristic appearance of a crown.
How much does it cost to organize a luminous ceiling?
The most affordable technique of this kind is the application of luminous stickers. Ready-made sets with stars cost about 200-300 rubles. This is quite enough to decorate one children's room. The most expensive thing will be to provide electronic backlighting that imitates the starry sky. Typically, work on organizing this kind of visual effects is carried out at the stage of installing the tension structure and increases the price tag of the estimate by 5-7 thousand rubles. A luminous ceiling, the design of which uses paint or wallpaper, is more attractive in cost. A room with an area of about 30-40 m2 can be decorated in this style for 1.5-2 thousand rubles. Of course, this only applies to the purchase of material, but since installation techniques differ little from classical finishing, it is quite possible to limit yourself to your own efforts in painting and pasting.