Types of gazebos
Before planning a gazebo, you need to understand what building options exist. All buildings can be divided into two main groups:
- open;
- closed.
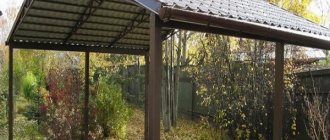
The open type is the most common. It is much easier to build than a closed one and requires significantly less materials. Its structure consists of a floor, load-bearing supports and a roof. Closed buildings are becoming increasingly common. They are also called pavilions. In addition to load-bearing supports, they have panel walls and large-scale glazing.
The choice of a specific type depends on the client’s wishes and preferred rest time. Open gazebos are most suitable for warm and dry weather. In the second case, comfort does not depend on weather conditions.
The company can offer any of the types at the client's choice.
Safety requirements for barbecue ovens
Having conceived the idea of equipping a recreation area with a barbecue on your site, first of all you need to choose a place to place it. At the design stage, it is important to take into account building codes and fire safety requirements for this structure.
To lay the furnace, refractory bricks are used, which are resistant to prolonged exposure to high temperatures and conduct heat.
The oven gets very hot, so wooden structures are not allowed near its back wall. The buildings on the site must be at least 5 meters away from the future installation of the stove.
There should be no flammable materials or substances near the barbecue area.
When arranging a recreation area or summer kitchen, it is recommended to use bricks, tiles, and impregnate wooden structures with a special fire-retardant solution.
The design of the recreation area must be provided with an exhaust hood, and the stove itself must be provided with a well-designed chimney.
The barbecue oven should have an optimal height of the countertop and work areas for ease of cooking on it, and should not have sharp corners or protruding parts.
A little about materials
We propose to build a place to relax from the following materials:
- tree;
- metal;
- brick.
The most common and popular structures are made of wood. They look aesthetically pleasing and natural. It is possible to order a gazebo made of logs, timber, plywood, chipboard and boards. Before construction, it is necessary to treat the material with special primer mixtures and coat it with varnish or paint. This will extend the life of the structure.
Brick is used quite often. It is characterized by high strength and durability. Decorative brick looks especially good. In addition, in this option it is possible to build a barbecue or stove inside. Good brickwork is not affected by weather conditions and retains its original appearance for a long period of time.
Several materials are used in the construction of combined gazebos. The most common combinations are with brick bases and a wooden top. Metal can also be used in the manufacture of the frame. It is sheathed with sheets of plywood or chipboard. The only disadvantage of this material is its susceptibility to corrosion.
Additional tips for working
The most important thing when performing this work is to strictly follow all the rules for constructing furnaces. We understand that it is difficult to lay a stove without some experience, but this stove is very simple in its design.
Lining - special attention
The main attention when laying bricks must be paid when the firebox is formed and the lining is made.
- The thickness of the seams in the lining should not exceed 3 mm .
- In this case, your stove will serve you for a long time without the need for repairs.
But since the combustion part itself is relatively small in size, we think that following these recommendations will not be difficult for you.
Installation of floors - it’s easier this way
As for the floors. It is clear that it is unlikely that it will be possible to complete the ceiling the first time using only bricks without some preparation.
This applies not only to the frying chamber, but also to all ceilings including the oven stand.
- But at first glance, a difficult task can be greatly simplified if you make a supporting frame from wood.
- The frame must be collapsible.
- Use self-tapping screws to secure it. When the solution is completely dry, it will be easy for you to disassemble and remove the frame.
Compliance with masonry parameters is the main principle of excellent results
To avoid problems with geometry during laying, use a building level, a plumb line and a protractor when laying.
- Having laid out the first row of the chimney, carefully lay out all subsequent rows. The cross-section of the smoke channel should not change along its entire length.
- Carefully monitor the filling of the seams between the bricks. The solution must completely fill the seams; excess must be removed immediately.
Plumbing is an added convenience
At the beginning of our article, we talked about the possibility of installing water supply and sewerage systems. If you decide to install a sink in the area of the cutting table, you will need to supply water to it.
- It is best to do this right away, before pouring the foundation.
- Carefully calculate the place where your sink will be located and connect water supply and sewerage to it.
- If you make water supply from plastic pipes, it will not be difficult for you to make connections in the future.
Our advice is that since the water supply in the gazebo will only be used in the summer, consider turning off the supply and drainage of water from the pipeline system. Otherwise, in winter your pipeline will become unusable due to residual water.
Choosing a stove
There are also several types of ovens. These include:
- stove;
- B-B-Q;
- grill
For small recreation areas, it is recommended to use one of the options. His choice will depend on the material from which the structure is made and preferences in dishes. For a wooden structure, it is recommended to use a grill or barbecue that will be located outside. As for brick ones, their undoubted advantage is the ability to build cooking surfaces inside. In this case, you can even build a small stove.
All three options will fit perfectly in large stone gazebos. With a good layout, they will not take up much space and clutter up the space.
Stages of creating a building
The masonry of the stove for the gazebo is made of red refractory brick. The work on creating the structure is carried out in several stages:
- First, a foundation is created, the dimensions of which are calculated in accordance with the dimensions of the future structure. For a brick barbecue, it is best to create a slab foundation. A hole 35 cm deep is dug in the ground under it. It is worth noting that it should be wider than the woodshed by about 10 cm on all sides. Formwork for the foundation can be made from plywood or boards. It must be remembered that the bottom of the pit must be carefully leveled. After this, sand is poured into it to a height of at least 5 cm. Then the sand is filled with a weak concrete solution about 3 cm thick.
- At the next stage, the furnace is laid. The first and second rows determine the shape of the structure and dimensions. It is worth remembering that before starting work it is necessary to outline the outline of the future structure on the foundation. During masonry, a solution is used, which includes components such as clay, sand and cement. In a similar way, 6 rows are created.
- When creating the seventh row, the furnace ceiling is arranged. To do this, it is necessary to use metal corners, the dimensions of which depend on the size of the future furnace.
- After this, two rows of bricks are laid on the floor.
- The next step is to create a brazier for the grill. For such work, fireclay bricks are used. At this stage, the second row in the grill moves inside, which creates a protrusion used for laying skewers.
- At the last stage, another overlap is created. After all the work has been completed, the chimney is created.
Before building a stove for a gazebo with a barbecue with your own hands, you need to create an accurate drawing, which will indicate the number of rows and the location of the bricks. Thanks to this drawing, it will be possible to create a stove with your own hands in a short period of time without making mistakes.
Let's move on to construction
In order to complete construction as quickly as possible, several teams are sent to the site at once. They carry out preparatory work, which includes removing the top ball of soil. Next, the foundation is poured and the floor is constructed. Important! It is not recommended to combine the foundation of the gazebo with the foundation of the house.
The next stage is the creation of a frame or support (at this stage the construction of the furnace also begins). Then the strapping occurs and the roof is installed. In a closed structure, it is also glazed. Wiring and lighting must be installed. Next, work is underway to install a barbecue grill. It can be located both inside and outside. The necessary furniture is also placed.
In the final version, the client receives a completely finished place to relax. The gazebo even has firewood for your first fire.
DIY oven construction
To make this stove for a gazebo, we need solid brick. To line the firebox, you will need to use fireclay bricks. The firebox is small, so you will need very little.
Without lining there is no quality
Of course, we can do without it, but if we are going to build a major furnace, it is better to line the firebox with fireclay. In this case, your stove will serve you for many years.
It just doesn't mean carelessly
Of course, installing a stove in a gazebo is much simpler than installing a stove or fireplace in a house. But this does not give us the right to approach our work irresponsibly.
As you probably noticed, the oven we offer has several overlaps. They are constructed without the use of fittings and other metal products. Everything is done with brick and mortar.
Foundation – the complex needs it
And since our complex includes a place for cooking and cutting food, it has an elongated configuration. Therefore, soil settlement will lead to cracking and collapse of bricks.
As you probably understand, we will need to build a strong foundation and not just a concrete foundation, but with mandatory reinforcement (see article “Foundation for a stove - and not vice versa”).
Our reference is if the construction of the stove and gazebo occurs simultaneously. You can use one strip foundation for both the gazebo and the stove.
Foundation structure
If you already have a gazebo, then you need to decide on the location of the stove.
- After the location has been determined, it is necessary to dismantle the floor of the gazebo and arrange the foundation for the stove according to all the rules.
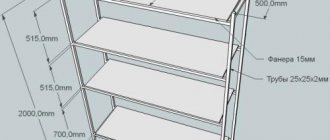
- 500 mm deep .
- Crushed stone or gravel is poured onto the bottom of the pit.
- Next, it is leveled to a thickness of 30–50 mm and compacted.
- Reinforcement rods or metal mesh are laid on the gravel.
- Formwork is installed along the edges of the pit.
Important - the level of the foundation should be 50 mm below the floor of the gazebo in the gazebo.
- Next, according to all the rules for preparing concrete for the foundation of the furnace, a solution is prepared and poured into the pit.
Foundation and waterproofing
We will not focus our attention on preparing the solution for the foundation of the furnace. This is written in sufficient detail on the pages of our resource. (See “Mortar for laying a stove - methods of preparation and preparation”)
- Let's wait twenty days for the foundation to harden.
- In the first week, be sure to moisten it with water, otherwise it may crack.
- When the foundation has completely hardened, a layer of waterproofing must be laid on it. Roofing felt is good for this.
Later, when you finish installing the stove, the bottom can be tiled. Do you remember that the level of our foundation is 50 mm ?
Lay out the stand
- When laying the tiles, level its level with the level of the gazebo floor, it will turn out well and beautifully.
Foundation for the stove.
- First, a stand is laid out for the oven itself. You can even use hollow bricks for this.
Stand for the oven itself
- Lay out the first row in order. Lay the brick carefully, measuring the corners and level of the masonry.
First row
- Next the second row is laid out. Keep an eye on the binding of the bricks.
In this way, six rows are laid out alternately. That's it, the oven stand is ready.
Six rows
As you can see, we have already formed a storage area for firewood, as well as a place where in the future we will place shelves for dishes.
Installation of the first floor
Overlapping device
- In the seventh row it overlaps under.
Seventh row
- The eighth row ties the ceiling and the bottom of the firebox is formed.
Lay out the firebox - do the lining
Firebox
- The next row begins to lay out the firebox.
- Install the door immediately. The door must be installed according to all rules.
You can read how to do this correctly on the pages of our resource.
Formation of the firebox
- Since we began to form a firebox in the ninth row, we need to use fireclay bricks to line it. All internal bricks adjacent to the firebox are fireclay.
Firebox
- In the tenth row we continue to arrange the firebox. Notice how the space above the kitchen cabinets is starting to shrink.
Cutting table device
Cutting table
In the future we will install a cutting table here. In our case, we used artificial stone to look like granite. But you can use any suitable material you have.
Our advice is to make a cutting table out of boards. Plan and sand them thoroughly. They can be treated with protective agents, or they can be left as is; they can be easily replaced in the future.
Furnace laying - completion
Firebox masonry
- In the eleventh row, the formation of the firebox ends. The firebox door is closed. Pay attention to how the bricks are tied. To cut bricks to a given configuration, use an electric cutting machine.
Firebox masonry
- Our barbecue grill will be installed on this row.
- If you have the desire and opportunity, you can install a grille with an elevator. It can be purchased in specialized stores.
In any case, whether you buy the grille or make it yourself, it should be easy to remove. In this case, it will be convenient for you to service it.
Lay out the frying space
Frying space
- The twelfth row begins to form an oven. Please note that the front of the cabinet is lined with one row of bricks, this is a kind of protection. You can successfully place skewers here while preparing barbecue.
Oven
- From the 13th to the 16th rows are similar to each other. A frying space is formed and the brick is tied. Watch this carefully.
Brick dressing
Brick dressing
- Row 17 we finish forming the walls of the frying chamber.
Frying chamber vault - how to do it correctly and simply
Chamber vault
- In the 18th row it is necessary to complete the arch of the fire chamber.
We understand that it is quite difficult to complete it without some experience. But not everything is as scary as it looks at first glance.
Proceed as follows:
- Make a pattern from thick cardboard.
- Cut it into pieces corresponding to the size of the brick.
- Place each piece on the corresponding brick and use a marker to mark it.
- Using a cutting machine, cut the brick to the marks.
- From the boards, make a mandrel that follows the shape of the arch and install it as the lid of the frying chamber.
- Once you have laid the brick and the mortar has set, the wood mandrel can be removed. Your vault is ready.
18th row
- Pay attention to how the inside of the 18th row is made.
- It is lined with cut bricks. This can be done easily with a trimming machine. Mark the brick in advance, apply marks and the result will be excellent.
Visor
- As you can see, the arch is moved forward by 50 mm. Due to this, a visor is formed over the frying chamber.
Frying chamber - continue laying
Masonry
- The 19th row is laid out according to the order. The brick at the junction of the vault is cut to size. In this row, preparations begin for covering the frying chamber.
19th row
- 20th row, continue to lay out as shown in the order. The walls are almost level with the vault.
20th row
- The 21st row completely covers the arch.
Lay out the visor
Visor
- In the 22nd row it is necessary to lay out a canopy around the entire perimeter of the oven. This is done by pushing out the outermost row of bricks.
Nomination
- Pay attention to the bandaging of the corners of the 22nd row. The brick is cut at an angle.
22 row
- This connection is performed only at the corners of the junction of the side and rear walls. The front corners are made as standard.
Covering the frying chamber
Overlap
- In the 23rd row, the masonry is carried out along a common vertical and preparation for the formation of the chimney begins, the smoke hole narrows.
23rd row
- In the 24th row, the frying chamber is completely blocked.
24th row
- Row 25, the formation of the frying chamber lid ends. The chimney is almost complete.
Chimney laying - completion of work
26th row
- In the 26th row, the construction of the chimney begins.
27th row
- In the 27th row, the first row of the chimney is bandaged.
- Further, all the work consists of erecting the chimney to the required height. Watch the dressing.
Our information is that the passage of a chimney through the roof of a gazebo must be carried out according to the rules for the passage of brick chimneys through ceilings. You can read about the cutting device on the pages of our resource.
Chimney
Do-it-yourself stove for a gazebo
ready.
Furnace laying procedures
Below are the procedures for constructing this furnace.
Orders from 1st to 17th row.
Orders from 1st to 17th row.
As you can see, everything is accessible and even a non-specialist can do it.
Orders 18 to 29.
Orders 18 to 29.
Price
The cost of work can be completely different. This depends on many factors, which include:
- type of structure;
- size of the building;
- material;
- the nature of the necessary preparatory work;
- presence of design features;
- the need to draw up an individual project.
In order to determine the cost of your gazebo, you need to contact a specialist. He will listen to all your wishes, help with the design of the idea and the choice of material. The final cost will include the development of the structure, costs of materials and work. We offer the best value for money.
Why do you need drawings of a gazebo with a barbecue?
Having a drawing of a gazebo with a barbecue in your hands, you can:
- decide on the style and appearance of the building - preparing the project will help to organically fit the future structure into the existing landscape;
- calculate the required volume of building materials - this, in turn, will show the required amount of financial expenses;
- speed up the construction process - design allows you to make construction work more orderly and efficient.
Advice! To reduce the time for developing drawings, you should use ready-made options. You can find them on our website.
Making the foundation
When making a base for a stove, you should not save money. A weak foundation can settle or crack. This will inevitably affect the condition of the hearth. The general rule for creating stove bases is to raise them above the ground level by 20 cm or more.
You can build the foundation inside the gazebo or right next to it. If the gazebo was built on a monolithic slab common with the house, then this simplifies the task. It is enough to remove part of the flooring and lay the brick directly on the slab. In the case where the gazebo does not have a solid foundation, it is necessary to make a separate foundation for the stove. It is first recommended to install a canopy or expand the roof of the building.
The construction of the foundation is carried out in the following sequence:
- conducting tracing;
- digging a trench, leveling and compacting its bottom;
- arrangement of a shock-absorbing cushion made of crushed stone and sand;
- installation of formwork, wetting or covering its walls with cellophane;
- assembly of formwork from reinforcement;
- preparing concrete mortar and pouring it into the formwork;
- installation of embedded parts, leveling the mortar with a spatula.
Depending on the ambient temperature, it takes 15-25 days for the foundation to completely harden. During this time, it should be covered with cellophane and moistened generously every day.
Firebox for barbecue oven
The next tier includes the combustion chamber and walls (partitions). The firebox is laid from two rows of bricks. The inside walls are made of refractory bricks, and the finishing bricks are on the outside.
The standard size of the combustion chamber is 600 * 700 mm. For a firebox with a rectangular opening, 9 rows of masonry are laid out; for an arched opening, walls 7 rows high are sufficient.
The combustion chamber is completed with 2 more rows of bricks. Then the length of the rows begins to be reduced to form a chimney. The side walls are reduced by 1/4 brick in each row, and the back and front walls are reduced by half a brick. 7 rows are laid out in this way.
Then the chimney is installed. The smoke exhaust pipe should not be made very high. It is recommended to lay 12-14 rows of bricks.
Without sufficient work experience, you can cope with the equipment of a brick barbecue oven of not only the simplest design.
With a careful approach, you can build a more complex version of a barbecue oven with your own hands.
Laying a stove with a cauldron
Installing a cauldron will allow you to cook both first and second courses at the same time.
There are many ready-made designs for barbecue ovens with a brick cauldron.
First you need to choose a place to install a barbecue oven and a suitable project. Or develop your own by studying photos of homemade brick barbecues.
During the process of laying bricks, it is necessary to control the width of the horizontal joints. It should be the same.
First, lay the main part, then attach a compartment under the cauldron.
On the barbecue side, the wall is laid out with 2 bricks.
At the base of the cauldron stove there is a firebox. Two doors are installed in the front wall: the main one and for cleaning.
The internal walls are made of heat-resistant bricks; a grate must be installed in the lower part of the compartment.
The oven dries for about 2 weeks, after which you can begin lining. You can use plaster or facing bricks for this.
Fireplace inside the gazebo. Brazier and barbecue - super sketch (project)
The best size for a gazebo with a fireplace will be 3 m by 3-5 m wide. What size you choose depends on your financial and design capabilities.
And lastly. In the well-known program “Dachny Answer,” a story was filmed about the construction of a gazebo on a garden plot. I suggest you watch it and good luck in building gazebos.
Author of the publication
offline 2 years