Home / Lighting devices / LED strip
Back
Published: 06/02/2020
0
215
LED lighting for curtains is often used by craftsmen to add originality to the interior of a room. Also, this method of decoration can often be seen in shopping and sports halls, and administrative buildings. This backlight serves as an additional light source, while LEDs consume a minimal amount of electricity.
Another advantage of the LED strip is that it can be installed in the cornice without the help of a specialist. The most difficult part of the job is installing and connecting the power supply for the LEDs.
- What are the advantages and popularity of curtain lighting?
- How to install backlighting with your own hands Choosing an idea
- Selection of power supply
- What you need for work
- Step-by-step installation instructions
- Where to direct the tape light
What are the advantages and popularity of curtain lighting?
By installing lighting for curtain niches using LED strip, you will see the following advantages:
- the room will have an original design. The effect of sunlight falling on the window is created, regardless of the time of day and weather;
- diodes emphasize the contours of the room and create an attractive view not only from the inside, but also from the outside of the house;
- Due to lighting, the living space visually increases.
Another undeniable advantage is that LEDs consume a small amount of electricity , especially when compared with incandescent lamps. They are also less dangerous and will last longer. Low voltage is sufficient for illumination, so LEDs do not have a detrimental effect on the appearance of curtain or blind fabric.
We recommend watching the video: DIY curtain rod lighting.
Idea No. 2 – Duralight
Another way to make hidden lighting for the floor under the bed with your own hands is to connect duralight (a special luminous cord) along the contour of the bed. In this case, creating decorative lighting will also take a little time, and the only materials you will need are duralight, an electrical cable for connecting to the network, special plugs, screws and fasteners.
So, you can independently secure duralight under the bed as follows:
- Select a suitable location for attaching the glow cord.
- Attach special plugs to one end of each duralight.
- Connect the electrical cable to the free ends.
- Attach the backlight to the bottom of the bed. Fasteners must be installed every 25 cm.
- Connect the cable to the network and check the finished decorative lighting.
As you can see, making a bed with lighting with your own hands in a children's room or bedroom is not very difficult. For inspiration, we recommend that you look through ready-made photo ideas:
By the way, another alternative option for creating lighting above the bed would be to use lamps behind the back. In the second case, the lighting will also be hidden, but the light will highlight the headboard area and not the floor, which will complement the interior of the room in an interesting way. This option looks something like this:
How to install the backlight yourself
Before you go shopping for materials and tools, you need to come up with an idea for the interior. First of all, it is recommended to choose the backlight colors. You can also choose curtains for a specific shade if you haven’t purchased them yet. One of the most important stages of preparation is choosing a power supply. Only after this does the process of preparing tools, materials, and, directly, installing the LED strip begin.
Idea selection
LED strip, which is used as a garland for curtains, comes in two types of glow - side and end. Due to its compactness, it can be installed even in a narrow window opening. The LEDs will not be visible when the backlight is off.
LED strip with side glow.
It is believed that the backlight is installed correctly if the LEDs themselves are invisible and only the light that comes from them is visible. For such curtains, it is recommended to hide the cornice in the ceiling niche. If this option is not suitable, the light source is hidden with a special polyurethane cornice.
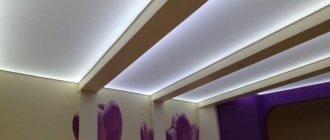
Decorative lighting using diodes can be installed in two versions - in front of the curtain or behind it. The first option is most often used. This way the light is directed down onto the fabric. To achieve this effect, the box is mounted next to the edge of the curtain and a diode strip is placed in it. As a result, the light will fall tangentially.
LED strip installed in front of the curtain.
To create a very unusual effect, sometimes not the entire curtain is illuminated, but only the lambrequin. Such a solution will provide the room with a special magical aura. Also, LED lighting does not have to be hidden in a box. This option is used to illuminate blinds. In this case, a tape with a dense arrangement of diodes is used.
LED lighting for blinds.
Selection of power supply
Before purchasing an LED strip, you need to calculate its power in order to select a power supply based on this data. For example, if the power of 1 m is 15 W, 3 m = 45 W. It is worth considering that the power supply must be installed only with a power reserve. Therefore, you should safely add about 20-30% to any obtained values. In our case, a power supply with a power of 60-70 W is suitable. It is better to find out the exact power of the tape from the seller when purchasing.
For reference: 1 amp = 220 watts.
Table of the dependence of the cable cross-section on the power of the Led strip.
What you need for work
To avoid problems with installing the backlight, it is recommended to install it during the repair process. But if the installation is done afterward, you need to be careful not to damage the finish. To make the installation process easier, you need to purchase the following:
- single-way switch. It will be used as a means of additional security;
- transformer. Recommended nominal values: voltage – 220 V, frequency – 50 Hz, output – 12 V (DC current). Such requirements are explained by the fact that LEDs will not work under standard network parameters. Chips require lower voltage and different quality of current;
- screwdriver (indicator) and nails;
- It is advisable to purchase plastic boxes for wires. The required length corresponds to the length of the wiring;
- heat shrink tubing or insulation tape. If you need to make a niche for which the tape will be mounted, you will need drywall;
- drill;
- glue;
- the wire. To find out the required length, you need to take measurements. The cross-section must be at least 1.5 mm2, and the product that will be connected to the tape must be 0.75 or 1 mm2. For these purposes, a wire with 2 cores of different colors is suitable;
- scissors;
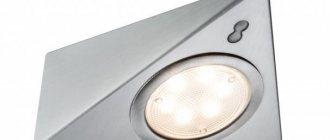
- LED Strip Light. Before purchasing it, you need to measure the distance required for lighting. It is also worth remembering that the operating parameters of the transformer must correspond to the nominal parameters of the tape;
- soldering iron;
Step-by-step installation instructions
Marking the transformer before mounting it on the ceiling.
At the first stage, you need to start installing the box along the window opening. It is along its edge that the cornice is subsequently attached. If the lighting is mounted under a suspended ceiling, the box will not be needed.
The next step is to install the transformer. It can be installed on the ceiling using standard dowels at the point where the LED strip begins.
When the transformer is installed, operating voltage is supplied to it. The nearest outlet or distribution box will do this. Next, you need to take a previously purchased wire with 2 cores. One of them (red) must be connected to the phase, and the other to zero. To determine the phase, you will need an indicator screwdriver.
Checking the phase with an indicator screwdriver.
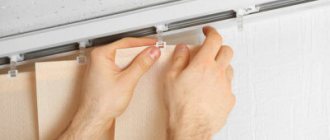
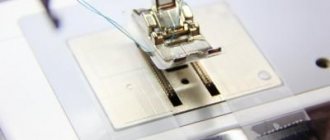
The next step is to start installing the LED strip. Here you will need construction adhesive applied to the back surface of the tape. It is important to thoroughly clean the surface on which the tape will be installed. If this is not done, it will disappear over time. When the glue is completely applied, the tape must be applied and secured with light pressure. Remains of the composition can be removed using a regular rag.
Installation of LED strip using glue.
Next you need to connect the LED strip to the transformer. To do this, it has 2 pins - “V-” and “V+”. From here, a wire with the above cross-section of 1.5 mm2 is connected to the same terminals on the tape. If these pins are mixed up, the tape may completely burn out when turned on. A switch is made to control the backlight. It is installed only per phase. Otherwise, even after the tape is turned off, dangerous voltage will remain on it.
Connecting the LED strip to the power supply.
Installation Tips
Before you begin installing the backlight, you should consider the following recommendations:
- Lighting must be selected based on the type and color of curtains. As a result, they should form an integral composition.
- To avoid a short circuit, you should ensure that the insulation is in good condition.
- It is not recommended to block the light flow with other decorative elements.
- Diodes should be located as far as possible from flammable objects.
- No need to choose cheap Chinese products and too bright LEDs.
Where to direct the tape light
Designers recommend directing the light along a tangent line in relation to the curtain. In other words, the LEDs “look” at the end of the curtain, parallel to the ceiling.
Illumination direction diagram.
A clear example of the direction of St. tapes when installed on a cornice
Types of Home LED Lighting
For home interiors, LED strip (LED strip) or duralight are usually used. They are energy saving and durable. But there are some differences between them. To make choosing easier, I suggest you understand their advantages and disadvantages.
Illuminating the bed using duralight
Duralight is a flexible cord with LEDs inside. Its main advantages include:
- protection from any damage;
- resistance to temperature changes;
- waterproofness and strength of the material.
Flaws:
- the price is higher than for LED strip;
- the glow is not very bright.
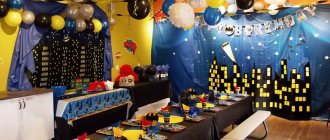
Ready-made options with photos
The result obtained directly depends on the idea. The above describes the standard installation option, which can be varied at your discretion. Below (pictured) are bold solutions, but at the same time difficult to implement. Therefore, if you do not have confidence in your own abilities, it is better to entrust the work to professionals.