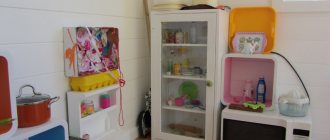
A niche for a TV made of plasterboard - simple instructions with photo examples and design tips
Recently, it has become relevant to hide equipment, in particular television equipment, in the wall area, especially if the interior of the room already has options for shelves or niches.
In this article, we will look at the most common options for hiding household appliances and offer basic instructions for creating them, namely, how you can build a niche for a TV with your own hands using drywall.
Design task: how to fit equipment into the interior
Now there are a huge number of options for depicting concepts, however, on the one hand, they represent a completely unusual design, and, on the other, the process of creating them is quite complicated.
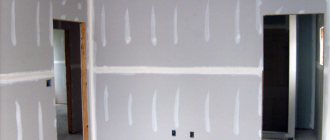
The simplest option for a plasterboard TV niche is the classic one, made using a load-bearing wall or a plasterboard surface that serves as the back wall.
There are so-called portal elements, which are a niche from the ceiling itself to the floor covering. The relevance of using this kind of structural elements lies in the implementation of numerous ideas, even in those cases where there is no smooth cladding. The final result looks quite harmonious and worthy.
Such a portal is mainly framed by two rather wide columns. The form option is selected taking into account the customer’s wishes, without in any way affecting its functional use.
The most complex shapes include curved versions of the front or side parts. Such a structure may well be complemented by additional shelf options used to accommodate a home theater and other equipment.
More detailed options can be seen in the photo of the niche for the TV.
Watch the video: How to make a niche for a TV from plasterboard
A very original living room with panoramic windows - firstly, huge windows let a lot of light and air into the room, and secondly, dark shades of wood throughout, but they don’t look heavy due to such a luxurious window. Our apartments often have smaller windows by an order of magnitude, so you should pay attention to lighter interiors - or balance this with a large amount of light with the help of chandeliers, lamps - table, floor.
Basic finishing materials
You can do the cladding yourself using the following materials:
- Decorative rock;
- Drywall;
- Plaster;
- Tiles;
- Tree.
Advice: when choosing finishing materials, pay attention to the fact that they harmonize favorably with the overall interior of the room - both in their structure and color design.
Mounting and load from the TV
Recently, equipment has become much more compact compared to previous versions, but despite this, it occupies quite a significant place. Its dimensions must be mentioned when creating the main frame of the niche for more reliable fastening.
Basically, TVs are installed using hanging mounts at a level of a meter from the floor covering. This gives the piece of furniture a certain lightness and calmness.
Fixing the TV panel on a plasterboard wall is subject to certain requirements:
- reinforcement of the rear part - selected taking into account the weight category of the installed equipment;
- The bracket is fastened strictly according to the instructions - for reliability it is better to use four fastening points;
As fasteners, it is better to use metal dowels in the form of an umbrella and a Hartmut fastener. If there is a wall made of brick or concrete, it is recommended to use bolted or chemical anchor options.
Wood finishing
To decorate the surface, you can use both natural wood and cheaper substitutes.
Description and characteristics
It has a light and pinkish tint. It is distinguished by its durability and beautiful design. To reliably protect the surface from moisture and other external influences, it is recommended to use a special varnish coating.
It has a light, monochromatic and slightly yellowish surface. It is distinguished by its elasticity and is easy to process.
The structure is smooth-fibrous and homogeneous. It can have both golden and dark brown color with pronounced strokes. It is heavy, which makes it reliable and very durable.
A budget option. In its appearance, structure and surface it resembles wood. Can have any color, surface and pattern.
It can have either a light shade or a pronounced pink-burgundy shade, depending on its variety. Ideal for finishing due to its light weight and flexibility.
Important: today there are a large number of species used for decoration, which include: walnut, ebony, teak, kaya, eucalyptus and many others.
You can learn more about these materials by watching the video in this article.
Direct assembly of the main frame
When compared with other furniture options, the TV niche has a separate assembly structure. The only similarity is that it has a main element and additional details of a special figure that have a formative function.
For non-standard shape options, a special so-called bent profile is best suited, which can create a suitable bend of the desired shape.
The assembly process itself is carried out as follows:
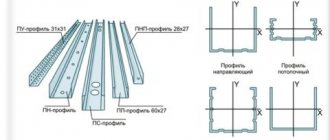
1. Installation of guide profiles. The most advantageous option for optimal load is 50 mm.
2. Approximately 4 rows of guides are nailed to the rough version of the plane, and in the case of continuous sheathing - to hidden plasterboard profiles.
3. An ordinary small podium is mounted at the foot.
4. If there are side columns, it is recommended to duplicate the guides, between which it is necessary to insert special jumpers of the required length; they will be the ones who will determine the depth of the excavation.
There are several profile connection options:
- with the help of bent wings”;
- use of “crab”;
- using a special insert that serves as a possible profile extension;
- The best option is cutters.
One more point should be taken into account: before sewing the frame, it is recommended to lay all the wires in the internal plane of the structure.
Plaster finishing
The easiest to implement and one of the most budget-friendly methods of finishing a fireplace, which is widely popular.
Plaster allows you to create a wide variety of decorative effects. For example, you can apply finishing plaster using a sponge or a special rubber spatula, which will create an attractive “wavy” effect. To enhance the result obtained, the solution can be slightly tinted with water-based or lime-based paint.
Allow the constructed brick fireplace to dry completely and begin plastering.
Video - Plastering a fireplace
First step
Add fiberglass, previously cut into small pieces, and salt to the plaster mixture. Such additives will help improve the quality of the coating.
Second step
Clean the surface of the fireplace and caulk the seams to a depth of about an inch. It's best to keep the fireplace a little warm, so you'll need to heat it up before you start plastering.
Third step
Lightly dampen the fireplace and begin applying the first coat of plaster using the "spray" method.
Fourth step
Venetian - fireplace decor
After the first layer of finishing has completely dried, begin applying the finishing plaster. To do this, use a trowel or brush. Level the applied coating using a trowel.
The thickness of the finishing layer of plaster should be no more than 0.5 cm. Level the coating using circular movements. The surface can be lightly sprayed with water if necessary.
Decoration of the fireplace - vine molding and decorative plaster
The material is attached traditionally to a pre-arranged frame. When attaching the vertical frame racks, make sure that in the future the joints of the sheets are as neat as possible.
The connection of slabs can be carried out exclusively on frame elements. It is prohibited to fasten sheets between profiles.
First step
Apply marks to the mounting surfaces to secure the profiles. Make sure that the markings are made evenly and at the same level.
Second step
Secure the frame posts in accordance with the markings. Fix the profiles using screws.
Third step
Mount the horizontal frame members between the vertical posts.
Fourth step
Proceed to covering the frame. Use self-tapping screws to attach drywall. Place fasteners every 150 mm.
Fifth step
Seal the joints using tape previously soaked in gypsum solution.
Sixth step
Ensure that the corners of the structure are secured using metal corners.
At the end, all you have to do is plaster the finished cladding. To do this, use the instructions above. You can also decorate drywall with other suitable material.
Do you want your fireplace to look truly elegant and chic? Then turn your attention to finishing with stone. Natural facing stone is characterized by excellent performance characteristics and fits perfectly into any interior.
If you have access to specialized equipment, you can do the pre-processing and installation of marble or granite yourself. In the absence of the necessary equipment, give preference to shell rocks, limestone and rubble stone.
Artificial stone has no noticeable differences in appearance from natural finishing material. It can also be safely used to decorate a fireplace.
You can make artificial stone with your own hands. To do this, mix cement, sifted sand and coloring pigments of the desired color and pour the resulting composition into silicone molds. Allow the solution in the molds to harden, remove the resulting products and use them to decorate the fireplace.
The cladding itself is carried out in the same way both in the case of natural stone and when using an artificial analogue. It is enough just to fix the elements on the surface of the fireplace using mastic or tile adhesive. You can first lay out the stones on the floor to see the future finish and choose the most optimal option for placing the stones directly on the surface of the fireplace.
This cladding belongs to the category of the most popular options for finishing fireplaces. The following materials are best suited for finishing:
All mentioned materials are characterized by excellent wear resistance, resistance to elevated temperatures and mechanical damage.
When choosing a finishing material, be sure to pay attention to the size of the elements. Large tiles are much easier and faster to install, but they can be difficult to fit under shelves, ledges, and all sorts of niches. With small tiles such problems will not arise, but you will spend more time laying them.
It is also important to choose the right adhesive mixture for installing the tiles. Use only heat-resistant compounds made with elastic substances. Thanks to its elastic structure, the glue will not deform when the temperature rises.
First step
Prepare the fireplace for tiling. To do this, clean and deepen the seams. If there is any old covering on the fireplace, remove it.
If desired, a coating such as paint and plaster can be left by stretching a metal mesh over it with a cell size of up to 150x150 mm. Fasten the mesh using self-tapping screws or nails.
Second step
Level the base with glue. Allow the applied mixture to absorb well and dry.
Third step
Mark the surface to be finished and get to work. Start installing the tiles from the bottom row of the fireplace.
Sequence of work: using a notched trowel, glue is applied to the back side of the tile, the element is firmly applied to the base and gently tapped with a rubber hammer.
To ensure that the seams between the tiles are the same size, use special plastic crosses, installing 2 pieces at a time. on each horizontal and vertical side of the facing element.
Immediately after completing the finishing work, remove any remaining glue, as It is extremely difficult to scrape it off once it dries.
Leave the finish to dry for about a day and then sand the seams. For this treatment, use paste-like mineral grout. This product is based on cement. Fill the seams with grout and smooth them carefully using a damp sponge.
Leave the grout to dry for about a day. Finally, all you have to do is treat the filled seams with a special dirt-repellent agent.
The final stage: cladding and finishing
The process is not a special technology. For the curved version, the drywall must be soaked.
As for corner parts and connections, the requirements in this case are quite strict. To finish the interior you will need paint that has an antistatic effect. It is better to cover horizontal shelves with a thin version of glass of the required size.
“False fireplaces in the interior: the art of imitation”
Decorative false fireplaces in the interior can never be a substitute for real ones, but this does not deny that they have many advantages. What is this - a tribute to short-term fashion or a legitimate accessory?
Who needs a false fireplace?
Making a false fireplace
- Stone
- Drywall
- Tree
We design the firebox window
- Candles
- Books
- Drawing
- Vintage style
“Who needs a false fireplace?”
- To the townspeople. The construction of wood-burning fireplaces in most city houses is not possible. Electric fireplaces and gas fireplaces in the interior are quite expensive; students and young families cannot always afford them. Or maybe you are not one of those who will sit by the fire for a long time, you lead a dynamic lifestyle, and the fireplace interests you only as a highlight for the interior.
- Space innovators. A false fireplace is very convenient to use to camouflage the shortcomings of a room.
- To parents. The safety of a false fireplace allows you to make it a play element in a child’s room or an accessory for a little fashionista’s teenage room.
- Those who like to follow trends. False fireplaces in the interior, as in the photo, are now in fashion, as they bring an elegant touch to boring apartments that have been stripped of decor. They are like an elegant chandelier or a dressing table - things that go out of everyday life, but can turn everyday life into holidays.
A false fireplace lacks the main attribute of a real wood-burning fireplace - the firebox. Therefore, purchasing the first one is simply purchasing a separate fireplace portal. But the art of fitting it into the interior also needs to be learned, which is what we will do immediately!
Decorating with plasterboard
Finishing a fireplace with plasterboard is one of the simplest and most budget-friendly options.
In order to carry out such a design, it is enough to simply sheathe a metal or wooden frame with sheets of this material. Its main advantages and features include:
- Low cost;
- Easy installation;
- Minimum time costs;
- Possibility of giving any shape;
- Light weight.
“Making a false fireplace”
In the future, electric fireplaces can take the place of false fireplaces. If you allow this option in the future, calculate the depth of the firebox in advance - it should be quite spacious. There are several ways to build an artificial fireplace in the living room interior. If you decide to do it yourself, choose materials that you can handle.
"Stone"
The first way is to build a fireplace yourself from bricks or stone. This false fireplace is suitable for a country, rustic or Russian country interior, as in the photo. The rougher the stone, the more your fireplace will look like a real antique one, and not every guest will notice the difference at first glance. If your kitchen or dining room lacks coziness, do not rush to install expensive bio-fireplaces in the interior, start small. If you wish, you will always have time to occupy the niche of a false fireplace.
“Drywall”
Study the Internet, where there are many diagrams and drawings; anyone can cut out a fireplace portal from plasterboard. The main advantage of the material is its flexibility and readiness to change. It can be painted, aged, pasted on with classic stucco or plastered.
"Tree"
A false wooden fireplace will be a good addition to your existing set if you need to occupy an empty corner. This material is suitable for decorating good old English and oriental interiors.
Proportions of a corner fireplace
There are specified proportions for the unit that should be taken into account during design. The calculations are very simple, but require special attention, since the correct relationship of all elements is essential for the functionality and safety of the structure.
Below are step-by-step instructions for designing a corner fireplace:
- On a regular checkered sheet, you need to draw to scale the perimeter of the room where you plan to install the fireplace.
- The volume of the fuel compartment for maximum efficient heating should be equal to 1/50 (2%) of the volume of the room.
- The ratio of proportions for calculating the depth of the portal where the fireplace will be installed is ideally 1:2 or 2:3. This way you can achieve maximum heat transfer and minimize the level of possible smoke in the room.
- The optimal opening area for the chimney is 1/8 or less of the size of the firebox.
- For a round pipe, the minimum diameter is 100 mm, and the product reaches an average height of 5 m.
“Designing a firebox window”
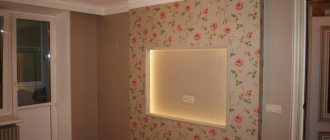
How to fill the portal window of a false fireplace for an apartment is up to you to decide. Sometimes it is appropriate to leave it empty or stick a strip of patterned wallpaper on the back; this option is perfect for modern youth interiors. If you need fresh ideas, read on!
"Candles"
You can get closer to the aesthetics of a real fireplace and place a live fire inside. To do this you will need a set of large candles, as in the illustration below.
More candles - a livelier effect! Look how interesting the large-scale composition looks, worthy competition for the TV.
“Books”
Using a fireplace as a bookshelf is a classic, but not everyone can afford to organize a library in a portal! All that remains is to decorate such a fireplace with the inscription: “Manuscripts do not burn!”
"Drawing"
An excellent option for those who feel a creative streak in themselves is a slate board in place of the firebox. It can be used as a banal board for notes or sketches, or to sketch firewood and coal. Remember that thought is material - perhaps this will be an excellent visualization of your dream of a real fireplace.
"Vintage style"
Don’t know how to beautifully arrange a grandfather clock, an antique vase or antique traveling bags in your interior? Imagine that a false fireplace is an elegant frame that will decorate whatever you put into it. Actually, that’s what the owners of the interior in the illustration below did, and it turned out great.
Did you like all the presented options, but you still can’t choose the best one? Fill the portal of a fake fireplace with all sorts of things, as in the illustration below, even such an unusual design can turn out to be unexpectedly stylish. Of course, not least because of the unconventional color of the portal, which itself invites you to play with the decor.
Finishing
For final cladding, the plasterboard base is prepared as follows:
- The screw caps are covered with putty. The composition should be selected for aggressive environments with elevated temperatures.
- After hardening, the excess is removed with a spatula or special masking paper/sandpaper.
- At the end, the surface is completely puttied, sanded, and primed. The plasterboard finish on the fireplace insert matched the finishing lining.
GCR is a universal material, so porcelain stoneware, gypsum, clinker tiles, natural stone and others can be used as a finishing coating. The finish is selected to match the style of the interior.
An interesting solution is porcelain stoneware. The modern market offers this tile with an imitation of any other finishing material - marble, granite, wood. Moreover, the canvases can also have a texture similar to natural fibers.
Finishing a fireplace with plasterboard with your own hands is a simple process, but it has a number of subtleties. False fireplaces do not require thermal insulation or a solid foundation. It’s enough to just build a plasterboard portal and choose the appropriate finish. In the case of functioning furnaces, it is recommended to contact professionals who will perform high-quality installation, which will ensure the reliability of the equipment and fire safety.
A fireplace is the decoration and heart of any living room, and thanks to modern technologies, the owner of any home or apartment can become the happy owner of this piece of furniture. In the realities of today's life, you do not necessarily have to build a heavy brick structure with a chimney and pipe to enjoy the view of the fireplace. You can build a fireplace from plasterboard with your own hands and install an electric firebox inside with the effect of flames and even smoke - such a fireplace will be inexpensive and will decorate the room, and it’s not at all difficult to make if you carefully read this article!
To make a fireplace from plasterboard, you must first complete the project: draw a sketch of the fireplace, indicate its dimensions, type of finish, and decide on its functional purpose. At the same time, you need to start not so much from desires as from possibilities - it is unlikely that a small room will be decorated with a bulky front fireplace that occupies a third of the usable area of the room. In the article we will give an example of building a corner fireplace - it takes up minimal space, and the shelves attached to it allow it to be used as a stand for equipment, an aquarium or trinkets.
There is a niche inside the proposed fireplace design. You can build an electric fireplace into it or decorate it with brick-like clinker tiles and put candles or a backlight there.
The frame of the fireplace can be built from a galvanized profile for plasterboard (the so-called “CD” and “UD” profile) - its trimmings are often left after repairs, and they can be used. If you plan to install an electric fireplace inside, it is better to take a stronger profile for the main stiffeners, for example PN-2 75x40x0.6. profile PN-2 50x40x0.5 is sufficient.
It is better to take plasterboard with a thickness of 12.5 mm - it will provide the necessary structural strength. You can use scraps. When installing an electric fireplace with a heating function, it is better to play it safe and take fire-resistant drywall and additionally insulate it with heat-insulating material.
To attach the plasterboard you will need drywall screws, and to assemble the frame you will need metal screws (they are called “fleas”). And, of course, a screwdriver - assembling the structure with a screwdriver is quite difficult and time-consuming.
The mantelpiece and side countertops are made of artificial stone with a glossy surface; it can be ordered in furniture stores according to the size of the shelves. The shelves are secured with screws and corners.
In addition, you will need dry alabaster for the manufacture of stucco moldings, moldings and pilasters or ready-made elements, as well as finishing artificial gypsum stone. It is attached to gypsum putty and painted on top with white acrylic paint. Decorative elements are additionally emphasized with “Antique Gold” acrylic paint and bitumen patina, after which the entire finish is coated with acrylic varnish - this will allow you to easily remove dirt and dust.
Plasterboard fireplace
The fireplace portal made of plasterboard is decorated with glass and an electric fireplace. The portal with an aquarium looks original and stylish. It can also be placed on a wide shelf.
An electric fireplace made in the wall looks unusual and completely merges with the surface. Designers recommend decorating an empty portal with a forged grille, firewood, candles, original vases, a painting, a mirror. Another step-by-step method for constructing a false fireplace. To build it you will need plasterboard, guide rack profiles (for the frame), self-tapping screws with a hidden head (fixing sheets), ordinary self-tapping screws (from 1.4 to 1.6 cm), dowel nails (attaching profiles to the wall and floor), primer , putty, glue, grout. Layout is done according to the drawing, taking into account the dimensions of the future fireplace.
With its help, calculations and expenses for materials are made. Make models from foam plastic or cardboard. When creating a layout, it is not necessary to adhere to exact calculations. It is needed in order to have a visual idea of the design to be made. The layout can indicate errors, it is easy to move it around the apartment and experiment (choose color, decor).
After making the frame, it should be sheathed with gypsum board. For these purposes, you will need to cut the sheets with a manual grinder. The joints must be additionally secured with a profile (take this into account when purchasing materials). The seams of the sheathing are secured with self-tapping screws and puttied. Often plasterboard material does not require finishing treatment, so after some time the lining of the portal can be changed without disassembling the device.
Plasterboard structures are the most popular today. This material is most often used for frame cladding. It goes well with any finish and is easy to assemble. Using plasterboard it is easy to create a spatial form of any complexity.
The price of the material is low.
Creating a foundation for a corner fireplace
As for the “pillow”, the corner fireplace must correspond in size to the calculation. It is necessary to correctly calculate the proportions, because based on them, the calculation will be made.
3b6d7c83cdfce92f4c3dc7998fc1b88e.jpg:large f4565c6d29b6172cc4143d0a47cedf01.jpe
Foundation for a corner fireplace
In order not to be mistaken, keep in mind that the base for the fireplace is made independent of the main foundation of the building
So, pay attention to the following:
- Pit up to 600 mm. in depth, indents of 10 - 15 cm from the attack.
- First of all, crushed stone is laid down, a layer, as a rule, no more than 150 mm.
- The formwork should be pre-finished with bitumen.
- After installing the formwork, fill in the solution, the proportions should match - cement/sand/crushed stone - 1/3/5. Make the rubble level lower than the “pillow” to the height of the brick.
- Cover the foundation with film and let it dry for a week.
In addition, many designs require additional reinforcement if the weight of the fireplace itself is large. For this purpose, reinforcement and corners are used to form reliable corners.
Decorative fireplace for a cozy atmosphere
There are a lot of options for creating a pseudo-fireplace in the interior of a wide variety of rooms. You can use the services of specialists or try your hand at creating a fireplace from the following materials: To decorate a decorative fireplace, which is created using a frame and plywood or plasterboard sheathing, the following materials are used: On such a pseudo-fireplace, created using a wooden frame covered with plasterboard, it turns out quite durable fireplace mantel. It is quite capable of supporting the weight of photo frames, books and even vases of flowers.
In a word, a false fireplace is not only a decorative element itself, but also helps to introduce other functional and useful decor into the interior of the room. A mobile pseudo-fireplace is most often a structure similar to a cabinet, but with a facade in the form of a fireplace portal. Such a piece of furniture is, of course, very convenient - it not only decorates the design of the room, adds a special aura, it can be moved, taken with you when moving and used as a storage system, while it is not easy to install books or framed photos on the mantelpiece, but and store necessary things inside the structure.
- drywall;
- tree;
- tile;
- natural or artificial stone;
- wall panels;
- polycarbonate;
- metal;
- ordinary cardboard and film;
- even art and wall stickers.
Application of plaster
This surface decoration option has a lot of advantages, which include an affordable price and minimal time costs. Despite the visually simple composition of the material, it can be used to achieve an interesting pattern and surface design.
Advantages of this material
One of the most budget-friendly finishing methods. It has an affordable price with high quality coating at the output.
The plaster retains its original appearance for a long time; the surface does not crack or darken over time. Does not require special or complex care.
The material can be used both for decorative units and for devices in which a real flame burns in the hearth, or there is a heating element.
This design method allows you to profitably save not only effort, but also time, thanks to simple application and minimal drying interval.
Depending on the chosen application technique and the color of the plaster, the surface can be made either simply smooth or applied with any pattern - with a sponge, spatula or other tools and devices.
Plaster can be used for both decorative and wood-burning, electrical installations, depending on its fire resistance class and properties. Before using this material, you must read all the requirements and recommendations of the manufacturer (insert leaflet or instructions on the package).
You can learn more about examples of works decorated with this material by looking at the photos in this article.
DIY plasterboard fireplace: step-by-step manufacturing instructions
Island fireplaces are quite voluminous structures. Their construction requires experience and knowledge of building structures. The consumption of materials for this model is the highest, since the portal is designed on four sides. The room for them should be spacious. The portal should not be placed in an area of active traffic.
Elements with sharp corners can cause bruises, especially in families with children. Choosing the model and finish of a plasterboard fireplace is a very responsible task. The fireplace should become the central accent of the living room interior. Which style to choose, where to place it - ideas will suggest spectacular and stylish design solutions. Limestone finishing or brickwork will harmoniously fit into the interior of a country estate in a rural style or chalet.
The external heaviness of the structure will give solidity and natural expressiveness. This material goes well with wood and simple plastered walls. The design of the premises in Scandinavian, English, Mediterranean style, as well as loft-style decoration, will be complemented by an accent in the form of a fireplace trimmed with stone.
To build a box around an existing chimney, it is better to invite a specialist. A number of conditions must be observed to insulate materials from high temperatures and ensure safe operation of the structure. The chimney pipe itself must be insulated with mineral wool and air gaps between the structural elements must be maintained. The reward will be a structure that will add solidity to the interior. The suspended ceiling flows structurally into a protruding plasterboard panel.
A rectangular niche is made in the panel for a decorative firebox. The firebox has a flat frame that can be painted to match the color of the panel or highlighted with contrasting colors. It is better to repeat these colors in the decor of the room.
For a fireplace, it is enough to add one or two original details to destroy classical stereotypes, move the fireplace frame at an angle to another - and futuristic features of the high-tech style will appear.
- First you need to choose the room where the fireplace will be installed.
- Then you should decide on a specific place in the room.
- If the scale of the room allows, the fireplace can be placed against a longitudinal wall. Preferably in the middle, which will make it possible to decorate it with a false chimney and decor.
- In a room with a small area you can always install a corner fireplace.
- However, one way or another, the selection of location should be carried out taking into account the technical requirements of the room.
An important element of the decor of any fireplace is the portal. Essentially, this is the façade of the entire structure, which will be visible. It can be made with almost any material. Most often used for these purposes:
Use of decorative stone
Decorating a fireplace with decorative stone is one of the most popular and versatile. Depending on the chosen stone, its size, surface and color design, you can bring any idea and idea to life.
- Natural or natural (has a fairly high cost);
- Artificial fireplace for apartments and houses (a more affordable and budget option).
Advantages of decorative stone:
- Durability. It has an almost unlimited service life. The material does not lose its original qualities, characteristics and properties over the years;
- Easy care. Most types of stone do not require regular and complex maintenance, with the exception of marble and some others with a non-uniform and grooved surface;
- Fire resistance and versatility. When properly insulated, it tolerates temperature changes well and is therefore suitable for all types of installations.
How to decorate a plasterboard fireplace in an apartment
How to decorate a plasterboard fireplace in a private house
How to decorate a plasterboard fireplace in a high-tech style
Types of stone
The decoration of decorative fireplaces made of plasterboard can be made from the following samples of natural and artificial stone:
Features and Specifications
Belongs to the natural category. Medium or coarse-grained samples are most often used. It is distinguished by its strength and durability. Depending on your wishes and preferences, you can choose granite in gray and black, as well as red and pink tones.
One of the most expensive materials. You can use either pure marble, which is white, or painted marble, which has any color design. The main advantages include fire resistance. When finishing an installation with a heating element or an open hearth with this material, it is necessary to insulate the surface well so that it does not darken when exposed to temperature.
It is laid according to the principle of simple tiles, has an affordable cost and average strength. Used for decorative installations only.
It has a slightly uneven surface and rough structure. It can have shine and combine several shades at the same time. Its characteristics and strength are similar to marble and granite.
Belongs to the category of environmentally friendly. It is moisture resistant, and any dirt can be easily and easily removed from its flat surface. When exposed to high temperatures, it does not burn, but melts and does not emit hazardous or harmful substances.
It is distinguished by its durability and the ability to choose any color. The stone is easy to install and withstands moisture well. Over time, it does not deform or change.
An environmentally friendly material with high durability and durability. Can be painted in any color. You can make this material yourself at home using: plaster, water and special molds.