Types of gazebos
According to the criterion of operating features and functional load, the following are distinguished:
- Stationary - structures designed for all weather conditions and all seasons, functional throughout the year.
- Portable or collapsible: used only in the warm season.
According to the criterion of design features:
- Closed: a gazebo, fulfilling both its direct functions and the role of a country house, summer house. There are: floor, roof, walls, windows and doors. Functional at any time of the year.
- Open: a gazebo used for its intended purpose only during the warm season. They consist of a frame, the floor is not a mandatory part. The walls are curtained or open. Climbing plants are planted around as decoration.
- Semi-open: a gazebo with glazed walls, visually reminiscent of a small house.
According to the criterion of location on the site:
On this topic:
You can build a gazebo alone in one day (video)
Dec 31, 2014
Do-it-yourself construction of a gazebo for a summer house
Oct 22, 2014
BACK FORWARD 1 of 2
- Separate: a gazebo made of wood with your own hands is located on the site separately from the residential building itself.
- Attached: the structure is adjacent to one of the walls of a country house.
How to choose a gazebo style?
Depending on the style of landscape design and the residential building on the site, you can choose the appropriate gazebo option:
- Classic style: symmetry, proportionality, 4- or 6-gonal shape, regular geometric lines. The roof is predominantly 2-, 4- or 6-slope with a tile covering. The domed shape looks harmonious.
- Oriental style: the central accent of the design is a domed or unusually shaped roof. The second characteristic feature is unusual ornamental compositions as decoration. Interior decoration should match the exterior design. Options for oriental buildings are a pagoda gazebo or a structure in the Japanese minimalist style.
- Victorian aesthetics: an English-style gazebo combines features of classic and country forms. Timber is the most popular material for Victorian buildings and is usually painted white.
Semi-closed or open light structures are typical; the perimeter is decorated with climbing plants. Features: symmetry, regular and clear forms, lattice walls, light colors. - Rustic style allows the use of rough, untreated wood - this is the very beauty and uniqueness of the gazebo. Such an unusual, “uncouth” design creates a feeling of comfort and homely warmth. The shape and design depend entirely on your desire. Stylizations like a chalet, a forester's house or a bird's nest will look harmonious on the territory of a personal plot.
- Country gazebos combine the features of rustic and classic. Made only from wood! It is recommended to use carved ornaments as decoration. Design options: stylization of a log house, a fairy-tale hut on chicken legs and others - you can fully show your creativity. The structure can be closed or open.
- Mediterranean design of a gazebo and a pergola are almost identical concepts. A light, open pergola, entwined with exquisite plants, is typical for areas with a subtropical, Mediterranean climate. To create the structure, wood is used in combination with stone and brick. The floors are laid with ceramic tiles or finished with solid boards.
Do-it-yourself summerhouses are represented by two of their distant relatives:
- Belvedere is a lightweight, open structure designed for installation on a hill. Provides excellent all-round visibility in a picturesque area.
- A pergola or “canopy” is a light, open gazebo used in the warm season. The structures are openwork, arched, and are used as a support for climbing plants. The most popular material for constructing a pergola is natural wood: oak, spruce, pine.
Garden gazebo manufacturing technology
To make a simple garden gazebo in the shape of a square, you need four wooden beams up to four meters long and a cross-section of 10-15 cm, screws and boards. First, the pillars are installed in the ground and filled with concrete - this is the support of the gazebo. The support tree is pre-treated with copper sulfate. Then, at a height of 0.25 m from the ground, the pillars are connected to each other by boards. And at a distance of about 2.5 m, the pillars are also fixed with boards. This is the frame of the gazebo.
To ensure that the roof of the structure is sufficiently sloping, another beam is attached at a height of 40-50 cm. The material for covering the gazebo should be light, for example, straw, awning film, reeds or bitumen tiles, etc. It is recommended to stretch fishing line and wire in 50 cm increments for additional support of the roof. Next, the floor and fence for the garden structure are made.
The floor can be made of cement, garden tiles or planks. It is advisable to use wood for fencing. The design can be decorated with carvings, painted in any color or varnished. This will depend on the wishes of the client.
To advertise your products, it is fashionable to create a website where examples of work will be posted, and hand out booklets and business cards in gardening associations or cottage areas. For the most efficient use of working time, it is recommended to prepare and process the gazebo parts in advance.
DIY gazebos: where to start?
If you have chosen a style and design option, you should choose a location for the structure. Depending on the size and shape of the site, the dimensions of the small architectural structure depend. Consider the purpose for which you are installing the structure:
- large family feasts in summer and winter or all year round;
- garden plot decoration;
- a convenient place for drinking tea in the summer;
- holidays in large groups on holidays or weekends.
In the first case, you should choose a secluded place, not very close to a residential building, so that unfriendly gatherings do not interfere with the rest of those who are in the house. Especially if several generations live in the house. As a decoration, the gazebo is installed so that it fits as harmoniously into the landscape design as possible and emphasizes its features.
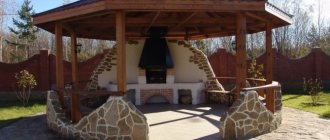
A gazebo for feasts can be made in a closed form, equipped inside with a fireplace, a lighting system, and installed heating appliances. If you install it close to your home, you can quickly transport food and dishes prepared in the kitchen.
How to make a gazebo for a summer house or personal plot? It is worth paying attention to the recommendations.
Select the location for construction according to the following criteria:
- the area should not be subject to flooding;
- preferably a flat, open place;
- You should not install a gazebo next to outbuildings and a toilet.
Photos and drawings of wooden gazebos with your own hands will help you choose the best option:
Design
If you decide to use a ready-made project, be sure to take into account the data indicated in it. In the case when a decision is made to build a gazebo step by step with your own hands, including the project, then it is necessary to take into account some nuances.
First of all, decide on the functionality of the gazebo, deciding whether it will be used all year round or only in the summer, as well as how many people will gather under its roof and whether a barbecue will be installed there. If so, then you need to consider building a gazebo with your own hands with a barbecue.
As for the roof, you need to take into account the snow load, taking into account the indicators for your area.
It is also necessary to calculate the amount and type of material used both in the construction of the gazebo itself and for the manufacture of the foundation and roof.
Foundation and walls for the gazebo
Depending on the type of soil, the purpose of constructing the building, and its parameters, we choose the type of foundation: slab, columnar, strip.
A massive structure needs a strong and reliable foundation. Wall options:
- wooden beam;
- boards;
- whole logs;
- slats.
If you are a professional, it will not be difficult to build a structure of complex shape, round or 6-gonal. For a beginner, we recommend starting with a simple, square or rectangular gazebo with lattice walls - it looks elegant and stylish.
Step by Step Actions
- We first prepare the columnar foundation. To do this, we dig out a pit, arrange and compact “pillows” from consumables.
Installation of the foundation for a two-story gazebo - Then reinforcement, mortar pouring and waterproofing work are carried out. On the resulting base we lay a frame made of beams that have not been sanded. An insert is used to connect them. To ensure such a docking, you will need to make recesses for 1/2 of the element.
- The next stage is the installation of vertical racks. In this case, a step of 1 m is observed. We first fix the racks with braces. Then the interfloor lining is laid from beams of a smaller cross-section. The components are connected using a similar method. To strengthen the resulting structure and prepare the basis for the future plank covering, floor joists are installed on all floors.
Scheme for installing vertical gazebo posts - Then we install racks of another level according to a similar principle described above. To move around the second floor, experts advise installing a temporary floor. We lay the final strapping on the finished posts. It will combine the individual elements of the 2nd floor. To join the beams we use the scheme described above.
- For better fixation of the racks, experts advise using metal corners. We fix the pillars on all sides. In this case, the installation of products is carried out from below and from above. Taking into account the shape of the roof, the rafter system is assembled. Its elements must be installed in the same plane. Otherwise the coating will not be even.
- If the rafter joists are installed, we fill the sheathing (step 300 mm). At the same time, we leave a space from the bottom bar (2.3 cm). This technology ensures that the first wave of the structure is laid on the board.
Project of a two-story gazebo with wooden latticework - The next stage is the layout and fastening of metal tile sheets. This process is carried out so that the capillary groove is on the left. We install skates at the top junction of the canvases.
When laying tongue and groove boards, we use hidden fastening. For fixation, we use nails or self-tapping screws, which must be hidden in the groove. We drive the fasteners into the boards at an angle. For the manufacture of railings we use polished beams. It is recommended to install the crossbar first. Then, in increments of 15 cm, wooden balusters for the stairs are installed.
If the main elements of the building are installed, we finish the ceiling and side surfaces of the floors. For this we use lining. We fasten the facing material in a hidden way. To do this you will need to buy clamps.
Scheme for installing lining using clamps
The final stage of construction is painting work. This procedure is carried out in clear and dry weather so that the paint is well absorbed into the wood. We carry out painting work with a brush. To paint the beams, use a roller instead of a brush.
If the gazebo with a terrace will be used at night, it is recommended to create the main source of lighting for the gazebo and the area in the country house. If there are flowerpots with plants in pots, then we place special feet at the bottom. In this case, the building will be full of fabulous shadows.
If it is not possible to use the main lighting source, you will need to buy small lamps. They run on batteries. We install lighting fixtures along the eaves of the building.
An example of a lighting device in a gazebo
To prevent the contrast of light and shadow from putting a strong strain on the eyes of vacationers, it is recommended to use an additional and functional lighting mode. The first system involves the use of a device of low brightness. When independently constructing a two-story gazebo for a summer residence, you must follow safety precautions.
Choosing a foundation
Since there will be a lot of building material, the load on the foundation will be considerable. Therefore, it is recommended to use a strong and reliable foundation for the gazebo.
- Monolithic is the most expensive and reliable.
- Tape is the best option for most designs.
- TISE (pipes with concrete) - relatively inexpensive, but very strong. Labor costs are higher, the technology is more complex, but the efficiency is very high.
Professionals often do TISE if a regular floorboard is to be laid on the floor. If you plan to lay tiles, it is better to immediately make a screed from a monolithic foundation.
No different from all other buildings. It is recommended to take thicker timber, for example, 150 by 150 mm. It connects to half a tree. Be sure to place a layer of roofing felt between the foundation and the frame to protect the tree.
Attaching the bottom harness
We maintain an angle of 90 degrees and attach it to metal corners or self-tapping screws. The number of pillars will vary depending on the project.
Erection of the roof
In terms of roof shape, any option among those proposed below would be appropriate:
- Single-pitch.
- Gable.
- Four-slope tent.
The tent version looks most impressive. It is more difficult to construct, it will require more building material, and in the future a more expensive roof will be required.
In the case of the first two options, everything will be much simpler, but cheaper. And definitely cheaper. If the price of the issue is of fundamental importance for you, then it is better to abandon the tent option and give preference to a small number of slopes.
Roofing
Corrugated sheeting, metal tiles, and ondulin will be the most economical options for your roof, especially if it has one or two slopes.
Soft tiles look very impressive, but require additional cladding and are quite expensive in themselves. Therefore, here you decide for yourself what is more important to you - aesthetics, quality or minimal costs.
Flooring
It is better to think about the floor at the stage of pouring the foundation, so as not to make a bad choice later.
- Paving slabs are perfect for a monolithic foundation. Reliable, thorough and long lasting.
- For the strip base you will have to make an additional concrete screed if you suddenly decide to lay tiles too.
- A classic edged board with a thickness of 40 mm is perfect for TISE.
Frame covering
The question of finishing is an eternal one, everyone has different tastes, so there are no strict recommendations here. Rather, a few tips on how to save money, but still make it beautiful.
- If you do not plan to glass the gazebo, then you do not need to completely sheathe the building on all sides. It is enough to close 2-3 sides if you want to protect yourself from the wind, and partially cover the most visible one with boards, block house or decorative sheathing.
- The side that no one sees can be covered with corrugated sheeting. It's cheap, reliable and a great money saver.
- An interesting material is 9 mm oriented strand boards OSB, which after painting acquire a pleasant color and are excellent as cladding.
A few more tips that may be useful to you in terms of decorating your gazebo.
- Provide good lighting not only inside, but also outside. The path to the restroom should ideally be partially illuminated so that a person does not get lost and at the same time everyone does not look at him when he goes there.
- Brighten up the walls with wooden latticework. It's inexpensive, fun, and comfortable for adults sitting inside.
We suggest you familiarize yourself with How to properly grow tulips in the garden
Drawings with dimensions
The problem of finding good drawings is not new. I tried to find the best construction solutions that are applicable to the construction of a 6 by 6 gazebo.
- We first prepare the columnar foundation. To do this, we dig out a pit, arrange and compact “pillows” from consumables.
https://www.youtube.com/watch?v=11XC8p-rxV4
Installation of the foundation for a two-story gazebo
Then reinforcement, mortar pouring and waterproofing work are carried out. On the resulting base we lay a frame made of beams that have not been sanded. An insert is used to connect them. To ensure such a docking, you will need to make recesses into 1/2 of the element. The next stage is the installation of vertical posts.
In this case, a step of 1 m is observed. We first fix the racks with braces. Then the interfloor lining is laid from beams of a smaller cross-section. The components are connected using a similar method. To strengthen the resulting structure and prepare the basis for the future plank covering, floor joists are installed on all floors.
Scheme for installing vertical gazebo posts
Then we install racks of another level according to a similar principle described above. To move around the second floor, experts advise installing a temporary floor. We lay the final strapping on the finished posts. It will combine the individual elements of the 2nd floor. To join the beams we use the scheme described above.
For better fixation of the racks, experts advise using metal corners. We fix the pillars on all sides. In this case, the installation of products is carried out from below and from above. Taking into account the shape of the roof, the rafter system is assembled. Its elements must be installed in the same plane. Otherwise the coating will not be even.
Project of a two-story gazebo with wooden latticework
The next stage is the layout and fastening of metal tile sheets. This process is carried out so that the capillary groove is on the left. We install skates at the top junction of the canvases.
DIY gazebo: drawings and dimensions
Let's look at the features of building a small, open wooden gazebo. Characteristics of the future design:
- size: 3x3 meters;
- height of the structure to the top – 3.5 meters;
- 4-pitched roof;
- columnar foundation.
The initial stage for the construction of a gazebo
Preparing the site for construction. It needs to be cleared, excess vegetation removed, and the surface leveled. The size of the plot should be one and a half meters larger on each side than the building itself. A do-it-yourself gazebo made of natural wood should be protected from flooding.
We buy materials for the gazebo
For a square building of 3x3 meters, you need to purchase timber in several cross-section options:
- 10x10 cm: 3-meter beams in the amount of 5 pieces for the base; 4 pieces 2.3 meters long for supports, 5 pieces meter long for the construction of the entrance, 3 pieces for strengthening and rigidity of the structure, for the center of other sides of the structure.
- 10x4 cm: for the roof - 8 pieces of 2 meters each, 7 beams of 3 meters each for piping and railings, beams of 2 pieces in sizes 1 and 4.3 meters (roof cross and railings).
To create a gazebo other than timber:
- solid floorboard: 4 cm thick, 9 sq. m;
- lining in the amount of 20 sq. m;
- wooden slats;
- inch for roof sheathing;
- roofing;
- bricks and cement;
- 5 kg of nails and screws;
- special processing agents for wood (about 15-20 liters).
Installation of a columnar foundation
How to build a gazebo with your own hands? It is very important to build the foundation correctly.
The optimal type of foundation for a small, open building is columnar. In this case, brick was chosen for it.
What is needed to install a columnar foundation:
- item for digging holes for posts: a drill or an ordinary shovel;
- level for leveling;
- roulette;
- material for posts;
- cement;
- steel reinforcement to strengthen the structure;
- roofing felt for waterproofing the bottom of a wooden gazebo.
Want to save money? If you have already used bricks, you can use them for the foundation.
A drawing is presented according to which the area for installing the gazebo should be marked.
It is necessary to dig holes at the points where the foundation pillars will be installed. The last row of bricks should be at ground level. Before laying the brick, you need to create a cushion that is placed at the bottom of the hole. The pillow is made of crushed stone or sand.
Using a hydraulic level, it is necessary to level the plane of the brick pillars. To ensure the rigidity of the structure, reinforcement bars must be inserted into the corner posts.
On this topic:
Construction of a wooden gazebo
Construction of a gazebo in a “primitive” style
How to create a cozy relaxation area in your country house
Five options for a gazebo in your garden
BACK FORWARD 1 of 2
Considering the size of the building, the result should be 9 columns: 4 corner, 4 intermediate between the corners, 1 central.
The supports should be located under the side walls every 2 meters. Considering that brick was chosen as the material for the supports, the holes need to be dug with a shovel, they should have a square shape. Recommended depth – 50 cm (not less). A hand drill is used if the posts are made, for example, from metal pipes.
It is recommended to provide waterproofing and protection of the bottom of the gazebo from moisture. For this, a double layer of roofing material is used. Do-it-yourself installation of a summerhouse gazebo is presented in the drawings and photos.
For the base, beams with a cross section of 10x10 cm were purchased in the amount of 5 pieces. The reinforcement that remains on the surface of the posts is placed in a hole drilled in the corner beams.
In order to connect the beams at their intersections, you can use the “half-tree” fastening technique. If everything is done according to technology, the result will be a reliable, durable structure.
Installation of the floor in the gazebo
The design can be made with or without a floor. Floor installation requires a foundation.
If there is no floor, you need to prepare a platform for the gazebo, finished with paving slabs and paving stones. The option without creating a special area is also allowed for summer open buildings.
Now consider the option with a foundation and floors. Installation is carried out after the foundation is completely completed and strengthened. What you need for the floor:
- beam;
- edged board;
- tools: hammer, drill, level, jigsaw;
- nails.
The easiest way to create floors is in a square or rectangular gazebo. The first step is to install timber around the perimeter of the base. Fastening is carried out using reinforcement that protrudes from the foundation.
The next step is to install logs every 30-40 cm. The floor should not be inclined, so you need to use a level.
And the last thing is covering the floor with boards.
To treat wood, it is necessary to use special substances to protect it from rotting and the negative influence of insects.
Frame installation
For the frame, logs 2.3 meters long with a section of 10x10 cm are intended:
- The surface of the beams should be smooth; an electric plane can be used to process the surface.
- It is necessary to make cuts to attach the roof rafters. The thickness of the cut depends on the thickness of the planks.
- In the corners of the gazebo there is reinforcement that must be mounted on support posts. To do this, you need to make a small hole at the end of the post - about 1 cm in diameter.
- The posts must be absolutely straight and vertical - you need to use a level to check the post's position.
- The position of the pillar is secured using first rough and then finishing struts made of timber.
In addition to wood, PVC or steel pipes are used for the frame. Polymer materials do not require special protection against rotting.
Installation of a roof for a gazebo and lining with clapboard
Construction process:
- For the roof, a cross is formed from wooden beams. To connect, you can use the “half-tree” technique.
- Cuts are made at the edges of the boards to connect with similar cuts on the supports.
- It is recommended to use a special block to enhance the strength and durability of the connection.
- The structure is installed on supports.
After the frame is assembled, it is necessary to install the pillars and railings.
It is planned to create a 4-slope roof and cover it with bitumen shingles.
To create the roof, we use 10x10 cm timber - an 8-sided section about 80 cm long is made from it. Makes a cut in the timber for the first 2 planks. This is a post that will be fixed in the central part of the cross; it will ensure the strength of the future roof.
2 rafters are connected using the half-tree method and fixed in the grooves. We then attach the second pair of rafters to the central post. The entire structure is assembled on the ground.
When 2 pairs of rafters are secured, we attach 4 more planks so that their lower ends lie on a bunch of outer posts.
If winter in your area is characterized by heavy snowfall, you should consider additional roof reinforcement. You need to add support posts between the corner supports, above the center foundation posts.
Now you can move on to covering the gazebo with clapboard and roofing work.
To cover the gazebo, we chose clapboard and special fasteners for its simple and aesthetic fastening. The roof is made of wood - planks up to 3 cm thick. We gradually cover all the roof slopes with these planks.
It is imperative to take care of creating a drain - the lower strips must protrude beyond the rafters by at least 10 cm.
In the future, the roofing covering will be laid on top of the sheathing. The choice of roofing depends on stylistic nuances and financial capabilities.
The open parts of the gazebo, which are not covered with clapboard, can be decorated with thin wooden planks fixed crosswise.
Since the work is carried out with wood, care must be taken to protect the structure from the negative influence of external factors. Wood is treated with special substances to protect it from rotting.
Features of drawing up a gazebo project
When drawing up a drawing of a wooden gazebo, you can use existing drawings, which are not so difficult to find now, or you can create your own individual style. If the design chosen is too complex and difficult to complete as a project, you can use the services of professionals who, in accordance with all the rules and requirements, will reproduce the correct drawing step by step.
The implementation of the project includes the creation of a sketch and drawings according to which the construction of the structure will be carried out. A sketch and layout diagram will help you understand at the first stage how the gazebo will be located on the ground relative to other buildings, as well as note the internal content of the building and understand how best to install communications and how much building material will be needed.
When drawing up a plan for a gazebo for a summer house, you should use some recommendations that will allow you to complete it as correctly as possible:
- Determination of the type of construction that will be made: open or closed.
- Determining the design of the gazebo, which should be combined with the general background and buildings on the site.
- Selecting a construction site for the structure. To do this, you need to have a site plan that shows all the buildings on it, garden paths, as well as the location of trees and shrubs. It is best to place the gazebo in the depths of the garden, at the end of the garden path at a distance of 3 - 5 meters from the residential building. If you plan to equip the gazebo with a barbecue, then it is better to remove it from the house by 8 meters.
- Indication of the dimensions of the gazebo, the location of the support posts and other elements of the gazebo. The shape and height of the structure’s fencing are also prescribed. For a company of 4 – 8 people, gazebos with a total area of about 12 – 16 square meters are suitable. meters. If in the gazebo you want to install not only a table with benches, but also a more comfortable relaxation area with sun loungers, then the area is calculated based on the fact that 4 square meters will be needed per person. m.
- Inclusion in the project of drawings of the gazebo, which are made from all sides. This is an image of the facade, a sectional view of the gazebo, and the location of technical components inside the structure.
- When installing a closed structure, a ventilation scheme is prescribed.
- Reproduction of a separate plan of the base for the gazebo, indicating its type and the material that will be needed.
- Description of installation locations for doors, stairs, windows and other important elements.
- Separate execution of the roof plan, which displays its type, dimensions, height, angles of inclination and material.
- Indication of the technology for installing the gazebo and each of its elements separately. If you plan to install a stove or barbecue, follow the masonry diagram and the design features of the foundation.
- Execution of wiring and power supply diagrams, if required.
- Development of a plan for the placement of light sources, furniture and necessary equipment.
According to the finished plan, the amount of necessary materials is calculated and an estimate for their purchase is drawn up. It must include fastening elements, impregnations and finishing compounds. Examples of plans are shown in the photo below.
The quality and strength of the future structure and the ease of its operation depend on how correctly and clearly the project is drawn up. It will also be possible to correctly calculate the amount of materials and components so that there is no shortage of them, and there is no need to purchase excess.
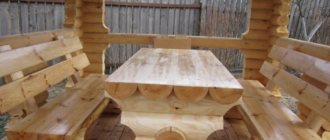
Alternative: log walls
Projects for building a gazebo at the dacha involve the use of logs to create side walls.
If you choose logs for the walls of the gazebo, keep in mind that you do not need a frame. The actual laying of logs in rows begins immediately. The first row is attached to a base protected by waterproofing. Fastening the corners is done by creating grooves at the ends. Docking is done at the corners. The number of rows depends on the project - for an open type structure, 3-4 rows are enough.
What material to choose for the roof?
The material that will cover the roof of the gazebo must meet a number of requirements:
- resistance to moisture and temperature changes;
- high level of strength with low weight;
- durability;
- providing protection from precipitation (especially if the gazebo is closed and will be used in the autumn-winter period);
- stylistic match, if the house is covered with soft bitumen shingles, it is naturally better to use it for the gazebo.
The calculation of the roof truss system depends on the choice of roofing material, so you need to think through all the points in advance. The weight of the future structure, which also takes into account the roof, influences the choice of foundation type.
When choosing, consider the type of gazebo, its style and purpose.
What roofing options can be used for a wooden gazebo:
- Ethnic or natural options - reeds, shingles, straw. It's stylish, inexpensive, but short-lived. It is absolutely not compatible with a barbecue, since the material is flammable, but it looks impressive.
- If the roof is planned to be flat, roll materials are used. For example, roofing felt. Laying it is simple and quick, but aesthetically it loses.
- Slate is an inexpensive material that is suitable for a wooden gazebo, but reinforced. The material has significant weight, so it cannot be called practical. Aesthetically, it’s not the most advantageous, but it’s inexpensive. If you plan to install an economical version of a summerhouse gazebo, this type of roof is suitable.
- Corrugated sheeting and metal tiles are practical and beautiful roofing materials for a wooden gazebo. The advantages include: light weight, no special requirements for the rafter system, installation is simple and not for a professional, aesthetics, variability of color solutions. Disadvantages: noisy material during precipitation, gets very hot in the sun.
- Euroslate or ondulin is a lightweight, profiled fabric-based material with bitumen impregnation and basalt topping. The coating is beautiful, moisture-resistant, and inexpensive. Cons: can become overgrown with moss, fades, not the most durable material.
- Polycarbonate is an inexpensive, lightweight, flexible material that demonstrates moisture resistance and noiselessness. This is an option for an open gazebo for summer tea parties, rather than a closed structure or a gazebo with a barbecue. It's melting!
- Bitumen shingles are the most preferred, functional and practical option. But not the most economical! Looks harmonious and stylish when paired with wood. Please note: if you are not a professional, it is recommended that you carefully study the installation features of such a roof. The remaining comments regarding the soft roof are only positive: it is durable, lightweight, resistant to moisture and UV radiation, rotting, frost, versatile and silent. The material is suitable for barbecues and is not flammable.
Foundation options for gazebos
Above is an example of the technology for installing a columnar foundation. This type combines practicality and ease of installation.
There may be two more types of bases for a wooden gazebo in your arsenal:
- Slab: suitable for small structures with regular square or round shapes. Installation begins with marking the territory. A small pit is created (up to 50 cm deep), the bottom is leveled and a cushion of sand about 15 cm thick is formed. Another 15 cm of crushed stone is poured on top of the sand. A reinforcing mesh is laid on the crushed stone. Waterproofing is being carried out. The reinforcement sections should protrude approximately 15 cm above the foundation. The perimeter is delineated by formwork reinforced with spacers. Concrete is poured inside.
- A shallow, strip-type foundation is the best option for a closed gazebo. When the territory is marked, the boundaries are marked with pegs. Calculate so that the tape is thicker than the walls - up to 30 cm. Depth - up to 70 cm. The depth may depend on the type and characteristics of the soil. A sand cushion is made at the bottom, gravel is poured on top, reinforcement and low formwork are performed.
High-quality execution of the gazebo is the key to its durability and aesthetics.
Tool
Of course, you can’t do without tools. The minimum set for doing the work yourself is as follows:
- hacksaw;
- axe;
- level;
- plumb line;
- drill;
- hammer;
- screwdriver.
Since we live in the 21st century, working the old fashioned way is not only long, but also extremely tiring. Since we will be building a lean-to gazebo with our own hands from wood, we will therefore expand the set of tools by adding those that will greatly facilitate the work of building a wooden gazebo:
- screwdriver (cordless or electric);
- electric plane;
- circular machine.
When sawing long beams, a gas or electric saw can be useful, and a jigsaw can help make various decorative decorations for a wooden gazebo.