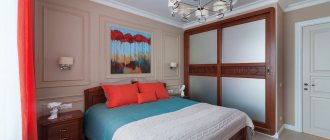
A sliding wardrobe is the most popular type of furniture for the home. Such designs are ideal for storing various things, accessories, clothes and shoes, as well as other items. To save space in the room, this type of furniture is equipped with sliding systems. The functioning of such doors is ensured by sliding wardrobe guides. This article will help you understand the features and technical characteristics of such products.
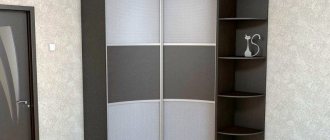
A sliding wardrobe is an ideal place to store clothes, shoes, accessories and other things
Guides for sliding wardrobes: general information about fittings
Guides, as part of furniture fittings, perform a vital function. Thanks to these elements, the sliding system together with the doors operates easily, freely and quietly. The operating principle of this design is quite simple: the door leaves move along sliding wardrobe rails using rollers or balls.
The Versailles sliding system is equipped with reliable and durable fittings
Versailles is the most common and popular type of sliding system, which is found in compartment-type cabinets. This popularity is due to the presence of durable, reliable and high-quality components, as well as easy-to-use internal filling elements. Sliding systems are additionally equipped with stoppers, seals and rollers for sliding wardrobes. Guides with such a complex design eliminate the possibility of door panels being skewed and closing randomly.
Sliding system components and requirements for guides for sliding doors
The width of the guides for the sliding wardrobe and other parameters of the fittings should be selected taking into account the characteristics of the door leaf. In this case, the weight and dimensions of each sash, as well as the material from which they are made, must be taken into account. Guides for sliding systems usually come with furniture, so there is no need to purchase such elements separately. However, they may be needed if the fittings fail and require complete or partial replacement.
Helpful advice! If you select guides that meet basic quality requirements, then such products can be used for a long time.
If the installation of guides for wardrobe doors is done correctly, then the opening and closing of the door will occur in the same plane. Together with other fittings, this type of product is part of the sliding system. Requirements for guides:
Guides for sliding doors are selected based on the weight and material of the doors
- High level of strength - good strength characteristics ensure a long service life of the sliding system, even if it is used regularly.
- Aesthetics – the guides must match the style of the room where the cabinet is located, as well as the design of the furniture itself.
- Convenience - the sliding system should be so simple and easy to use that any user can open and close the cabinet doors without any problems.
The standard equipment of the sliding system is the same in all compartment designs. But the list of additional accessories may vary depending on the cabinet model and its internal contents.
The sliding system includes the following elements:
- upper and lower guides for the wardrobe, along which the door leaf moves;
- profiles with vertical and horizontal installation types for reliable fixation of all elements of internal filling;
- closers for smooth movement of the sashes;
- silicone seal;
- a system consisting of lower and upper rollers for sliding wardrobe doors, which ensures their free and silent movement;
- screws as fasteners;
- stops for fixing the door leaf in a certain area (they look like spring brackets);
- brushes.
Guides must be strong, durable and easy to use
Types of guide profiles for sliding doors: classification by type of material
When choosing guides for a wardrobe, you must pay attention to the material they are made of. The following raw materials are used for the production of these products:
- plastic;
- aluminum;
- steel.
Plastic guide profiles have the lowest price. Such products do not have a long service life and high reliability. They can be used without problems for 5-7 years. For this reason, many consumers prefer to avoid purchasing furniture with plastic components.
Helpful advice! To extend the service life of the sliding system, it is advisable to use plastic sliding wardrobe guides only in combination with parts made of metal.
Guides for wardrobe doors are made of plastic, aluminum or steel
Steel is used to make fairly strong and reliable products. However, the size of the guides for the wardrobe, including their thickness, must be selected taking into account the parameters of the door leaf. If the fittings are selected correctly, the service life of the sliding system will be long. The price of such profiles is considered affordable for most buyers and, as a rule, it corresponds to the quality level of these products. Sometimes there are options that are not as durable and easy to install as we would like.
The highest quality parts are made from aluminum. These profiles are usually installed in expensive and luxury models. Aluminum slides are designed for cabinets that are 4 m or more in height. Such products are distinguished by an extensive palette of colors and a large selection of decorative design options.
Installation instructions
The most important part of the work is installing the doors. They can only be put in place after the cabinet has been completely assembled. Its doors should be perfectly level. The entire performance of the structure depends on this. Therefore, before installing the sliding system with your own hands, level the floor surface and ceiling.
To install wardrobe doors, you need to perform a certain sequence of actions.
- Installing the top guide.
- Attaching the bottom guide.
- Installation of the clamp.
- Adjustment of canvases.
- Buffer tape sticker.
Installing the top guide yourself
The upper guide is a W-shaped metal profile. It is attached flush with self-tapping screws at a distance of 450-600 millimeters parallel to each other, that is, in each recess of the profile. If this is not done, the profile becomes slightly twisted, which affects the operation of the system. For fastening, first measure the width of the cabinet at the top, subtract 1-2 millimeters and cut off the guide. Using a drill and a drill bit, we make holes for the screws, which are then ground.
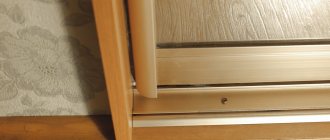
Attaching the bottom guide
To attach the bottom rail with your own hands, the width of the cabinet at the bottom is also measured, then holes are made on the profile. The installation has one peculiarity. The profile must be fixed with an offset inside the structure. The recess is 20 +/- 2 millimeters. The exact distance is determined as follows.
Simply place the guide in the cabinet. Then you need to install the sashes. You can't do this without an assistant. The rear panel is placed first, and then the front panel. One person will insert it into the upper profile, and the second into the lower one, while lifting the wheels. By moving the profile, align the door strictly vertically using a level. Having determined the ideal position of the canvases, we fix the guide.
Installing the retainer
The lock is necessary to ensure that the door leaf does not slide, but remains in the closed position, fitting tightly to the side wall of the cabinet. It must be inserted into the bottom groove of the profile before it is screwed to the bottom. The latch is adjusted using a flat screwdriver. It must be placed in such a position that the middle of the stopper is where the middle of the wheel is when the blade is closed. To do this, before installing the stopper, the blade is closed and the location of the middle of the wheel is marked on the profile.
Adjusting the blades
After installing the doors in place, you need to make adjustments so that the door fits evenly to the side and does not form gaps. For this purpose, the lower wheels have adjustment holes. The setting is made with a hex wrench. Turning clockwise raises the blade, counterclockwise lowers it.
Buffer tape sticker
The function of the buffer tape is to protect the contents of the cabinet from dust. Therefore, there is no way to do without it. In addition, it softens the impact of the canvas on the sidewall when opening, increasing the service life of the sliding system.
Buffer tape can have two pile lengths:
- 6 mm – short;
- 12 mm – long.
Long pile tape is not used often, but will provide more comfortable use of the cabinet. Its color matches the color of the entire system. It is easy to glue with your own hands. You need to remove the protective layer from the back side and attach it to the end of the door leaf.
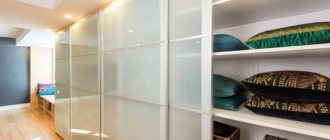
Furniture guides as part of sliding systems
Sliding wardrobes use different types of sliding systems, so the door leaf can be opened and fixed in several ways. Types of sliding structures designed to open door leaves:
Sliding systems are hinged, with bottom guides, coplanar and combined
- Support system with bottom guide for sliding wardrobe doors. The structure is installed directly on the floor, or the bottom shelf of furniture can be used for these purposes. The sash is held in a vertical position thanks to rollers installed in the upper profile. The main disadvantage of such systems is that the open strip can become dirty and clogged.
- Top rail mounted system. This profile is used to hang the sash. Special rollers are installed at the bottom of the canvas, which do not damage the floor covering.
- Combined system. It is considered the most reliable and effective. The movement of the sash is carried out using ball furniture guides.
- Coplanar system. It has a special structure, due to which the canvases are in the same plane when closed.
Note! In most models, double systems are installed, in which not only the upper, but also the lower guide profile is used. Such designs eliminate the possibility of sash skewing and vibration during movement.
Features of hanging sliding doors without bottom guide
The hanging-type sliding system consists of upper slats with rails and a moving mechanism. This device includes a stop for fixing the sash and two carriages with rollers. One carriage usually has a pair of wheels. In some cases, their number can be increased to 4 pieces. The carriages themselves are made of metal (steel) or plastic with a high strength index. Thanks to the presence of ball bearings, the wheels move very smoothly.
Suspension systems consist of a stop for fixing doors and carriages with rollers
The dimensions of the top rail for a sliding wardrobe can be different, and they depend on the dimensions of the door leaf. This type of furniture is usually made to order, so the design parameters are individual. However, there are a number of recommendations regarding dimensions that make the operation of the cabinet comfortable.
The optimal leaf width is 0.6-0.9 m. There are narrower options, but their width should not be less than 0.5 m. Otherwise, misalignment may occur and the door leaf will jump out of the guides. The maximum allowable width is 1.1 m, but moving such a heavy sash will require significant effort, so it is better to stick to average values. The upper guide has a U-shaped configuration. It is equipped with two wide shelves that serve as latches for the carriage, which moves until it reaches the stop.
Advantages of hanging sliding systems:
- The hanging mechanism can withstand heavy loads, which makes it possible to use this system in cabinets with massive door leaves.
- Even with the heavy weight of the door leaves, the suspension system operates silently.
- There is no need to install stiffening frames on each door, which simplifies not only the design of the cabinet itself, but also the process of its assembly. Such furniture looks more aesthetically pleasing and is much cheaper.
Suspension systems can support heavy weights and still operate silently
The suspension system also has disadvantages. Even with high-quality fittings, over time the door leaf begins to loosen.
Helpful advice! To prevent damage to the mechanism, you need to equip the suspension system with a special stabilizer. Thanks to this, the door leaf will remain in place.
Support system with bottom guide for sliding wardrobe doors
In support-type sliding systems, the load from the door leaves falls on the guides, which are installed in the lower part of the cabinet. The upper profile serves as a holder. It fixes the canvas in a vertical position and has the form of an M-shaped strip.
When installing roller guides in the support system, steel reinforcement frames must be installed on the sashes. The profile itself looks like a flat bar with two rails for wheels. The doors in such runners are placed in a checkerboard pattern. There are two ways to install the bottom rail: mortise and overhead. The first option looks more neat and aesthetically pleasing. But installing the profile using the overhead method is much simpler and cheaper.
Bottom guide support systems are low cost
The lower wheels are made from hard and very durable plastic. If heavy massive doors are installed in the cabinet, these rollers must be supplemented with steel bushings.
The main advantage of a support-type sliding system is its low cost, as well as the ability to adjust the position of the sashes in height. The disadvantages include a high risk of contamination. If the slides become clogged with debris and dust, moving the doors will be difficult, and high loads on the wheels will cause them to wear out prematurely.
Helpful advice! If belt brushes are installed, most of the dirt will be swept off the runners as the door opens and closes.
Features of furniture guides with combined and coplanar systems
The combined system combines the advantages of supporting and hanging mechanisms. In this case, the sashes can be fixed both from above and from below. The cost of guides for sliding cabinet doors with a combined system is very high. However, this drawback is fully compensated by excellent quality and durability, because during operation the door leaves not only move silently and smoothly, but also do not become loose over time.
Guides with a coplanar system are the most reliable and easy to use
The combined type sliding system is ideal for sliding wardrobes in which the length of the panels exceeds 1 m. This version of the mechanism can also be used in conjunction with heavy regular-sized doors made of solid wood.
In a coplanar sliding system, closed panels are arranged in a special way. This mechanism includes a combined set of guide profiles that are attached not only to the top, but also to the sash itself. To open the door leaf, you need to pull the handle towards you. As a result of this action, the sash will move forward slightly and can move to the right or left. In this case, the adjacent door will remain behind.
Advantages of the coplanar sliding system:
- silent, soft and smooth opening of door leaves;
- The cabinet doors, thanks to their even placement, look aesthetically pleasing, just like the front part of the furniture;
- The system provides savings in the internal space of the cabinet (about 10%).
Door repair
After a certain period of time after the start of use, sliding doors may begin to close poorly. This is often due to dust, lint and other debris getting into the working mechanism. Repair in this case consists of lifting the blade up as much as possible and assessing the condition of the roller that sets it in motion. The mechanism is cleaned of accumulated debris, and if necessary, the roller is replaced with a new one.
If the door jams in one of its positions, we can conclude that the profile is deformed. Repair in such a situation comes down to aligning the guides. If this is impossible to do for any reason, then it is replaced.
For more serious damage, such as a cracked mirror or bent frame, replacing the broken element of the system will help. Such repairs can be done with your own hands by purchasing all the necessary parts in advance. To do this, you need to remove the door and disassemble it, after which a replacement is made. After replacing the part with a new one, the door needs to be put back in place.
Technical features of guides for sliding wardrobe doors and prices for products
Guides for compartment-type cabinets can have several runners. Their number depends on the number of door leaves. The following types of profiles are distinguished:
- single-rail;
- two-way;
- three-row.
For aluminum profiles, two types of coating are used - anodized or colored PVC film
Most models of modern cabinets have a two-way system. The color of the guides depends on the material from which they are made. Steel profiles come in bronze, silver and gold, as well as champagne. If desired, the buyer will be able to select products that imitate various types of wood. The color palette of aluminum profiles is more extensive, as is the choice of textures.
Note! Color coating on steel profiles is less stable and durable. Over time, it becomes covered with cracks and peels off.
There are two types of coatings used on aluminum profiles:
- Anodized coating - chemical methods are used to color the metal surface. The cladding is very durable because the pigment particles penetrate into the material. As a result, the paint is resistant to mechanical stress and is also not afraid of exposure to moisture and direct sunlight.
- Colored PVC film - this type of coating is wear-resistant, durable and moisture-resistant. The film reduces the noise level that occurs during the opening and closing of the doors.
Price table for guides for sliding wardrobes:
| Name | price, rub. |
| Bottom rail, 590 cm (single strip) | 660 |
| Bottom guide, 600 cm (silver) | 660 |
| Bottom guide, 600 cm (bronze) | 1055 |
| Bottom guide, 600 cm (gold) | 1100 |
| Top rail, 590 cm (single strip, silver) | 1200 |
| Top rail, 600 cm (two-way, silver) | 2240 |
| Top rail, 600 cm (two-way, bronze/gold/champagne) | 2420 |
Installation of lower and upper rails for a sliding wardrobe
The upper guide profile is fixed at the top of the cabinet. Self-tapping screws are used to secure this fittings. Press washers and universal-purpose screws are suitable as fasteners, but they must have a countersunk head.
Top guide installation diagram:
- Holes of 4 mm in size should be made in the guide profile, which will be located in increments of 30 cm. A drill can be used for this.
- If universal-purpose screws are used as fasteners, you will need to make a countersink in each hole.
- The profile must be installed in the appropriate area of the cabinet and leveled.
- After this, the part is fixed with fasteners.
The bottom rail of the sliding wardrobe has a similar structure, but it is used as a supporting part.
To install the top guide you will need self-tapping screws, press washers and screws.
Installation diagram of the lower guide profile:
- Holes of the appropriate size are made in the profile.
- You should not immediately fix the fittings, since according to the installation technology, this element should be shifted 2 cm inside the cabinet. In this case, you must use a level.
- Once the exact installation location has been identified and the guide is level, you can fix this part with self-tapping screws.
Important! Since the bottom rail is located inside the furniture, you need to make sure that it will not deform the internal contents, such as drawers and baskets.
Assembly
The wardrobe assembly diagram is simple, but in order for the system to work reliably and well, this diagram must be followed. When installing a wardrobe, you will need elements such as guides (bottom and top). There should be one of these guides at the top and bottom for each door. It is necessary to take into account that the lower guides bear the entire main load, so you should not skimp on quality. When choosing rollers, ignore the cheapest offers, as the sliding system can quickly fail. If you want to save on a wardrobe, then save on the weight of the doors, rationally use lightweight door options, and do not hang very heavy mirrors on them.
On the Internet you can find many step-by-step photos and videos that describe detailed assembly instructions; they will make the work much easier.
In principle, the upper guides do not carry a load; they guide the movement of the door, but without them the correct operation of the structure is impossible. Also, a useful part of the overall design is the stopper; it regulates the opening width of the product.
Work procedure
So, you can install a wardrobe with your own hands without outside help, even if you do not have special skills in building and installing doors, all work is done easily and is not considered painstaking.
Please note that the doors must be installed perfectly level, so before installation you need to level the surface of the floor and ceiling, because the curvature of the surface will lead to incorrect installation.
- The first thing you need to decide on is the size. The dimensions must be taken taking into account the overlap of the door, and also without taking into account the width of the wall, if you want the door to rest against it, and taking into account the width of the wall, if the door will extend beyond it. It will still be aesthetically beautiful if the entire structure is flush with the wall, but if the sliding system is not in the wall, but in a wardrobe, then superimposed fasteners are used (that is, attached to the side).
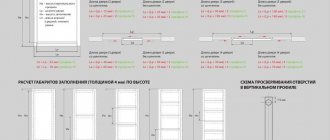
- The height of the doors must be measured taking into account the upper and lower slats, 16 mm each, and taking into account the gaps, 15 mm each. In total, from the total height of the door, for the height of the door leaf you need to subtract 15+15+16+16=62 mm
- Considering that you are installing ready-made doors with your own hands, the next step will be the top slats, they will determine the movement of the door.
- The lower track with the positioners already installed on it must be placed on the floor, but do not screw it in, this will complicate further installation.
- The next step is to install the sashes. It should be noted that the rear door is installed first, because if you install the front doors right away, it will simply be impossible to install the rear doors. After all, the doors overlap one another.
- The next step is to insert the bottom wheels of the door into the groove. To do this, you will need to press the wheels and wind it until it completely fits into the groove.
The movement stopper is very useful; it makes the use of the doors more comfortable and also extends the life of the system. In addition, its installation is done in no time. For the work you will need the stupor itself, a screwdriver and several bolts. All you need to do is screw in the bolts on the guide. These are the basic instructions for installing doors. All that remains is to try to open and close the doors, if they slide easily, then you did everything right.
Installation of ball guides for sliding wardrobe drawers
Modern models of chest of drawers guides have become the optimal replacement for conventional wooden planks, which have been used for quite a long time to move drawers. Telescopic fittings are considered the most practical and functional. It consists of ball guides with the possibility of full extension.
Advantages of full extension ball slides:
- reasonable cost;
- smooth and soft movement;
- excellent strength characteristics;
- wear resistance;
- simple installation system.
Ball guides can support weights up to 25 kg
Telescopic guides are characterized by a hidden type of installation. This type of fittings is used not only in chests of drawers, but also in wardrobes, desks, and kitchen furniture. Don’t forget about the advantages of hidden-mounted guides with a closer. Such models allow you to pull out the drawer to its full length, thereby gaining access to all the things stored in it. The oil closer ensures smooth closing.
The ball guide mechanism with a closer can withstand up to 50 thousand openings and closings. The design of the fittings is designed for weight loads up to 25 kg.
Features and Benefits
The sliding wardrobe system is convenient because it does not take up much space and saves living space, because the cabinet doors do not need to be opened 90 degrees. Such doors make it possible to create a more interesting interior. In addition, it is very convenient to get all the necessary things from such a closet.
Sliding wardrobes are quite functional, and a variety of design variations allow them to fit into any interior. After all, such a cabinet can be decorated with paintings, hung a mirror, or pasted on a picture of your favorite landscape. The only problem that may arise is the installation of the structure. Some companies offer their services; for such a service they can charge about $50, which, although not significant, takes a toll on your wallet, especially during repairs.