Every summer resident or owner of his own home should know how to cut the corners of ceiling plinths, and do it at home without the involvement of builders. Nowadays, repairs are an expensive business. Therefore, many people try to do as much as possible on their own. After all, in fact, if you put in the effort, be patient and have the necessary materials, you can do it just as well as the builders. And to make a beautiful ceiling, you need to know how to create a beautiful vault from plasterboard, both for the kitchen and for the hall.
Cutting plinths for the ceiling
Many people think that cutting a ceiling fillet does not involve any difficulties, and what is the problem anyway? In fact, there are many features that have negative consequences. Therefore, in order for the ceiling to be perfect, you should know how to cut the baseboards correctly and accurately, making high-quality wall decor of your own production.
Beautiful ceiling with skirting boards
Form
The construction market offers a lot of products of a wide variety of shapes, which are divided into three groups.
Extruded
This type of plinth is also called stretched. Because the cross-section pattern in any part of the segment will be the same. The entire pattern is identical and consists of bulges or grooves that run lengthwise. Selecting a pattern is not a problem for you, but if you putty the cracks, it will take a little more effort.
Extruded type plinth
Before starting work
Choosing the correct width of the baguette is the key to a beautiful interior. The method by which you do it also plays an important role in the sawing process. We would like to give you a couple of recommendations that will help you achieve your plans.
So, how to choose the width of the material and how to trim the ceiling plinth in the corners:
- the prepared surface of the walls is not a standard of evenness; use planks of smaller width, as they are more flexible and can cover the maximum number of defects. Accordingly, on the contrary, the more ideal the surface, the larger the width of the molding can be, but keep in mind that in rooms with low ceilings, install a narrow molding so as not to reduce them visually;
- Always apply the left side of the corner to the miter box while sawing from the left, and the right side to the right. Also, this should be the side of the tool closest to you, the far side for floor moldings. Please don't be confused.
How to cut corners on a skirting board ceiling at 45 degrees
Below we will look at the task in more detail, where you will learn how to cut the corners of the ceiling plinth correctly and with the highest quality.
External
There is one nuance to this process that you should never forget about. We always look at the ceiling fillet from below, so when the plank is placed in the miter box (to the wall closest to you), it must be turned over.
The upper part of the molding will then be at your bottom, and the bottom, respectively, at the top. Thus, there will be no gaps between the planes of the corner parts when they are connected.
In the photo there is a miter box, a carpenter’s tool used for cutting corners of ceiling plinths.
The process instructions will be like this:
- Take measuring tools, for example, a tape measure, and a pencil. Start marking from the inner corner, so you won’t miss the outer one. It may happen that the length of the baguette is not enough and you will have to make a lot of joints;
- Place the molding on the ceiling surface and mark the dimensions;
- Prepare a miter box and a hacksaw. Press the baguette to the side of the tool closest to you;
- Hold the fillet with your hand and select the position of the hacksaw that will set the appropriate joint angle. These can be standard parameters - 45, 90, or 135˚, or arbitrary, for which you need to move the miter box to the selected degree;
- Cut the workpiece with a hacksaw;
- Place the opposite bar against the near wall of the instrument and secure it with your hand;
- Set the selected degree on the miter box and cut the workpiece with a hacksaw;
- Join the resulting plinth strips.
Advice: if the walls are connected to each other at right angles, only in this case will a miter box help you with your work, otherwise you will have to make the adjustment yourself.
Interior
There is a professional miter box, which has a rotating platform and can be extended to obtain arbitrary angles, as well as for home use, where special capabilities are limited. Usually in repairs it is enough to use the second option.
How to cut ceiling plinths in corners without gaps
So, the basic principle is that the ceiling strips are cut off at the wall of the instrument closest to you, we hope you haven’t forgotten.
The process in this case looks like this:
- Measure the required length of the baguette by placing it on the ceiling surface;
- Place the molding strip in the miter box, and its position should completely correspond to the location of the baguette on the ceiling;
- Press the bar against the near wall of the tool;
- Select the appropriate cutting degree, most often it is 45. Make sure that the handle of the hacksaw is as close as possible to the hand holding the bar to make the cut as accurately as possible;
- Cut the workpiece, but do not apply excessive force to the hacksaw;
- Prepare and cut the opposite baguette strip, not forgetting that it should be pressed against the nearest wall of the miter box;
- Select the appropriate cutting angle for it, leaving a minimum distance between the handle of the hacksaw and the hand holding the molding;
- Cut off the edge of the plank.
Proper trimming of ceiling plinths in the corners improves the appearance of the room
All that remains is to check the correct joining of the segments, and, if everything meets expectations, install them in place.
Tip: start cutting from the front of the molding, then you can orient it in place as accurately as possible. After cutting, process the corners of the wooden baguette and adjust them with a file.
How to cut corners of ceiling plinths using a hacksaw and miter box
How to make the corners of a ceiling molding without a miter box
Having decided to make a frame on the ceiling for the first time, a beginner does not see any problem in this, but in vain. We advise you to immediately take into account the costs of a certain amount of material that will simply have to be thrown away.
Alas, at what angle to cut the ceiling plinth depends only on the connection of the walls to each other. Not everyone fits straight, for which it is enough to simply cut the strips at 45˚. Often there are parameters corresponding to 85 or 95 degrees, but this is already a problem for novice finishers.
How to cut a plinth in the corners of a ceiling plinth without using a miter box
If you are the owner of an apartment built in the last century, this was generally considered the norm. The fact is that when you simply cut the planks at 45˚ and install them on the ceiling, there will be gaps between them, which will then have to be sealed with sealant or putty. We will try to help you solve this problem with minimal costs, since the price of not every molding is cheap.
So, how to correctly cut the corners of the ceiling plinth for the internal corner:
| Preparation | Prepare the tools you will need for your work. If the plinth is made of:
|
| Marking |
|
| Segment | Using a sharp knife or hacksaw, cut off the edge of the molding. |
| Examination | Take the two resulting baguettes and place them on the corner. There should be no gap between them, otherwise correct the surfaces using a knife. |
Final trimming of the corners of the ceiling plinth without the use of special tools
Remember when creating:
- internal corner - the lower part protrudes above the upper;
- external - upper over lower.
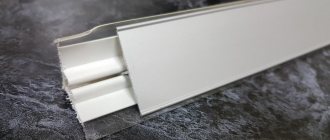
Laminated
This type of baguette is the most unpretentious in installation, and very little effort is required to install it. There are no drawings here, so possible cracks can be easily filled and removed. The main task is to trim it correctly.
Laminated baguette
Injection
This type of ceiling plinths requires the most attention and effort for installation. Here the pattern has a periodicity, but the meticulousness of trimming should be at its best. In this case, putty will not hide the sides, because it will create the effect of artistic modeling. In terms of aesthetics, this type of material is really chic.
Injection type plinth
How to make a corner on a ceiling plinth?
To make a ceiling angle on a ceiling plinth, you will need two important components: glue and a ruler for measuring angles. If the wall is level, measurements can be taken without any difficulty. But if there are gaps, additional measures will be required. It is advisable to treat the corners with sealant in advance. In some cases, painting is desirable. Remember that the first thing you should do is decide what the corner of the product will be, and then do the rest of the manipulations, for example, cutting out the corner.
Material
In addition to the shape, you should also pay attention to the material from which they are made. Because this also affects the characteristics of the work.
Expanded polystyrene
This material is most in demand on the market. It is inexpensive. Density directly affects the quality of baguettes. It is worth choosing denser textures - they are easier to work with. But loose ones are difficult to install. But the main problem with polystyrene foam (expanded polystyrene is made from it) is the difficulty of sanding. Any flaw or even minor putty will be visible on the baguette.
Trimming is done with a hacksaw or a sharp knife (construction knife).
Expanded polystyrene skirting boards
Polyvinyl chloride
Working with plastic baguettes is even more difficult than with foam ones. The fact is that in this form it is generally impossible to putty or correct flaws. For installation, you should use a special tool - molding. If not, then the master will have a hard time. Basically, such baguettes are installed on plastic ceilings. Therefore, you can’t really talk about beauty. You need to cut it with a sharp tool.
Plastic moldings for ceilings
Tree
Wooden baguettes are very difficult to install, but they belong to the elite segment due to the naturalness of the material. Most often they are used for sheathing a wooden vault. Its cutting occurs using a special saw with small teeth. Alternatively, you can use a good metal blade.
Wooden ceiling plinth
Gypsum
This type is the most expensive. You can find another name - stucco. Basically, it is created by the master himself, so his skill is important. There are also purchased options. The gypsum baguette looks really chic. The main advantage is that flaws and jambs can be easily removed - putty, sanding, painting). The disadvantages include the great fragility and high cost of both the material itself and the work involved in its installation. Moreover, the cutting should be as correct as possible the first time. In addition, when installing a gypsum molding, it is worth considering its considerable weight.
Gypsum baguette
Polyurethane
Now polyurethane baguettes are the most optimal when it comes to price-quality ratio. Although its cost is considerable, this material is significantly superior in comparison with gypsum. Advantages: lightness, no cracks, excellent adhesion, nice texture, possibility of factory painting, ability to create imitation of various natural materials, as in the photo below. In addition, installation does not require much effort. To cut it, you should use a special knife that will not form crumbs.
Ceiling plinths made of polyurethane
Selection of tools for cutting ceiling plinths
To correctly and accurately cut the ceiling plinth, you need to use a tool suitable for cutting. It is selected depending on the material from which the fillets are made:
- Styrofoam. It is characterized by low strength and is relatively inexpensive, and therefore foam models are becoming increasingly popular. Their strength does not particularly affect performance characteristics, since usually the ceiling plinth is not subject to mechanical stress. A regular stationery knife is suitable for cutting.
- Extruded polystyrene foam. A cheap material whose density is several times higher than that of foam plastic. Because of this, cutting it is a little more difficult, and therefore a sharp and thin knife is used for this purpose.
- Tree. Such skirting boards are more difficult to process, although they have many advantages (environmentally friendly, durable). They are more expensive, especially if made from hardwood. Before cutting the ceiling plinth from wood, stock up on a hacksaw.
In addition to the tool for directly cutting the baguette, you will need a miter box. This is a special device made of wood, plastic or metal in the form of a box with notches on the sides. A hacksaw or knife can be inserted into it at the desired angle. This way the cutting angle is as precise as possible. You can purchase it at a hardware store or make it yourself using the following instructions:
- Three planks of 50*15 cm are knocked together with a long edge into the shape of a three-sided, rectangular box. Please note that an angle of 90 degrees must be maintained between the side bars and the transverse plank.
- Using a protractor, mark a 45 degree angle on the bars. Instead of a protractor, you can use a school square. In it, one angle is 90 degrees, and the other two are 45 degrees.
- Before cutting corners, mark the vertical direction with a simple pencil.
To make working with this homemade device convenient and safe, the boards must be well sanded before fastening.
Features of cutting ceiling plinths
To ensure that all your efforts and finances are not wasted, you should arrange the corners correctly. The ceiling plinth or fillet can be beautifully laid independently. Of course, stores sell ready-made corners for these tasks, but this is still an additional expense. And with a little effort, you can do it all yourself.
Next, we’ll talk about how to cut the corners of ceiling plinths at home and at the same time maintain a beautiful and neat appearance. There are two ways to perform this task - with and without a miter box.
Correctly cut baguettes on the ceiling
Angle cutting
How to cut ceiling plinths in corners? The secret to a quality cut is making cuts on both the outside and the inside. The inside cut matters if we are making an outside corner.
Typically, professional equipment is used - miter saws or electric hammer drills for industrial use. But home renovation enthusiasts can make do with ordinary tools. The main requirement is that upon completion of the work, the result should be a clearly visible texture for the cornice, reflected on its front or back side.
Using a miter box at home
A miter box is a simple tool that is a carpenter's assistant. It makes it easy to cut workpieces at any angle needed. Its design is not complicated - the tray is made of wood, metal or plastic. This tray has special slots (placed vertically) for cutting at an angle of 90 or 45 degrees.
Some models have a more complex structure with the ability to cut at an angle of 60 degrees. For professional work, there are special models where the workpiece is fixed at any given angle.
Miter box - a simple but important tool
Internal corner
- Take a baguette and attach it to the ceiling. In this case, it is worth setting aside the required length. This blank is inserted into this tool in the same position as it will be placed on the ceiling. You need to press it against the far wall of the miter box.
- You need to hold the fillet with your left hand. The hacksaw, or rather its blade, should be placed so as to create an angle of 45 degrees. The handle should be as close to the hand as possible.
Correct placement of a baguette in a miter box
- Cut the baguette. But you shouldn’t press it too hard to avoid breaking it.
- Near the baguette you should cut off the return strip. It also needs to be placed at the far wall of the structure. But the difference is that you should hold it with your right hand. The hacksaw is placed in the same position as before - at a 45-degree angle. Without pressing, cut off excess.
Hacksaw for cutting ceiling plinths
- After trimming, you should join both planks of the baguette and see how accurately they converge.
Advice : For better orientation during the design of the internal corner, you should start cutting from the front side of the fillet. Where cuts have been made, most will require filing to fit both sides of the corner.
Joining corners using a miter box
- A miter box is a carpentry tool that allows you to cut various materials, which are subsequently planned to be mounted together at right angles.
There are two main designs of miter boxes:
A simple miter box is a wooden (plastic) tray with vertical slits in the walls into which a hacksaw will be inserted. This design allows you to accurately trim the baseboard vertically at an angle of 90 or 45 degrees. In addition, it is convenient to work with such a miter box, because it is possible to use a hacksaw not only to cut vertically, but also to tilt the blade at 45 degrees.
Simple miter box
A miter box with a rotating mechanism is a professional tool; it allows you to fix the hacksaw blade at any desired angle. If a regular miter box is only suitable for cutting skirting boards for joining at right angles, then with a rotating mechanism it is suitable for installation at any angle.
Miter box with rotating mechanism
The procedure for cutting fillets:
- attach the fillet to the place of planned installation and take measurements
- Place the upper part of the plinth (the one that will be attached to the ceiling) on the bottom, the lower part of the plinth will be pressed against the wall of the miter box
- cut the baseboard, smoothly and without sharp pressure, at an angle of 45 degrees. The cut must be carried out with a hacksaw with a fine tooth (optimally a hacksaw for metal) or a knife. A large tooth will bite the material, especially polystyrene with its porous structure - the end will turn out uneven, with chips
- The operation is carried out similarly with the adjacent plinth - only the cut is made in another slot at 45 degrees
- attach the resulting skirting boards to the place of planned gluing and select the optimal joining angle. If necessary, the cutting planes can be adjusted with a sharp knife to achieve the most accurate fit.
Advice! If there is a need to simultaneously cut the outer corner on one side and the inner corner on the other, cut out a more complex element first - the inner corner.
The procedure for trimming adjacent fillets for internal and external corners:
Trimming adjacent fillets
Advice! The most accurate cut can be obtained by making a simultaneous cut of two joined skirting boards. Since the plinths are sawn in a mirror image in relation to each other, you can fold both plinths with their inner sides facing each other and secure them tightly in the miter box, after which you simply make one cut at an angle of 45 degrees.
Smooth and neat corner of baseboards in the kitchen
The corners of the plinths are decorated using a miter box
You can trim a baguette using a miter box
If you don’t have a miter box, then this is not a reason to give up; there is a method that allows you to get a good result, you just need to be careful and careful. First of all, you need to cut off those sides where the baseboards will join, strictly at 90 degrees.
After this, we take the plinth and apply it to the wall in the same way as it is planned to mount it. Please note that the precisely cut end is pressed tightly against the wall. Now draw a line with a pencil:
Draw a line along which the plinth will be glued
We take the second plinth and repeat all the operations exactly, but on the other side:
Marking the baseboard on the other side
We get on the ceiling the point of intersection of two lines - this will be the place where the skirting boards join. Now let's designate this point on each of the fillets:
Transferring the point of intersection of lines to the plinth
The line that will run from the transferred intersection point to the opposite edge of the plinth is the desired cut line. Using a sharp knife (a metal file), we make the cut clearly, but without strong pressure. We join the plinths in the corner, selecting the optimal position, if necessary, we cut the corners with a knife:
Angle obtained by marking method
If the angle is not straight, the work becomes more difficult, but not much. We simply measure its value exactly, divide it in half and get the value required to mark the cut of the plinth. For example, the angle is 76 degrees, we need to cut at an angle of 38 degrees. In this case, it is better to make the initial cut at an angle of 40 degrees, and then at the joining site, adjust the angle with a knife.
Unfortunately, even with the most accurate and scrupulous work, it may turn out that the angle is not quite even and precise - maybe the wall is not quite straight, the angle is not quite straight, perhaps when cutting the material could be slightly deformed under pressure. Therefore, the corner may have gaps along the joining line, or dents may appear on the edges - this looks sloppy and unaesthetic.
Advice! This can be corrected by using a sealant - just fill the dents and cracks, let the sealant dry well and trim off the excess sagging with a knife - and the appearance will again be pleasing to the eye.
Even skirting board corners can be trimmed without using a miter box
A neat corner in the room, formed using markings
The markings will help you cut the baseboard neatly and evenly.
A neat and beautiful edging on the ceiling sets interior accents and masks the gaps between finishing materials. There are several techniques for how to correctly cut a corner on a ceiling plinth. Builders use several special devices or work without them.
External corner
Such work should begin precisely from the inner corner. This will help to better maintain the proportions and dimensions of the baguette. If you start from the outside, then if you make a mistake, you will end up with a lack of strip along its entire length.
- The fillet should be attached to the ceiling and marked according to the required dimensions.
- Using your left hand, hold the baseboard and press it against the wall that is closest. In this case, the hacksaw (its handle) should be as close to the hand as possible.
- Cut the workpiece.
- The right hand holds and presses the striker against the wall. The tool blade should be at an angle of 45 degrees.
- Cut off the excess baguette.
- The corner is joined.
This method of cutting fillets is suitable if the corners in the room are perfectly even and straight. Otherwise, the result will be disappointing, and it is better to resort to another pruning option.
How to saw without a miter box?
You can cut the baseboard without a miter box. It's easier to do this at right angles. The width of the end part of the strip is measured. Then on its upper or lower side (depending on what kind of fillet you need) a mark is placed at the same distance as the width of the plank. A line is drawn from the corner to the point.
After this you can cut the baseboard. To adjust adjacent elements to each other, you can use a table or a rectangular template. By adjusting the planks with their help, there is no need to constantly go up to the ceiling and apply fillets to it.
For angles deviating from 90°, cutting the planks is somewhat more difficult. In any case, their ends are cut at an angle equal to half the angle between the walls, so it is important to measure it as accurately as possible. In order not to buy a goniometer, make a device from 2 slats, which are tightened at one end with a self-tapping screw or screw. Having attached them to the ceiling in the corner part, spread the slats until they rest against the walls. Using a protractor, you can measure the resulting angle.
Based on this, create a template according to which the ceiling plinth will be cut. The device you got can be used to measure other angles.
Creating markings on the ceiling
By creating a mark on the ceiling, you are guaranteed to cut off the excess correctly and in the exact size. You just have to work hard, because holding the fillet suspended and basting at the same time is quite inconvenient. But this method is the most accurate and practical.
By attaching the baguette to the ceiling in the right place, you will immediately notice all the features. This will allow you to immediately outline them and take them into account when cutting and installing.
Making a mark on the ceiling
How to properly cut a ceiling plinth with your own hands without the help of professionals
Foam components would be more preferable for installation. They are a little easier to work with. First of all, you need to organize work on measuring inter-wall angles. If their value is close to 90°, then cutting the edges at an angle of 45° is required. This action must be done with the next trim. If the inter-wall joints are represented by any irregularities, then the radius of the corner is divided in half. Try not to confuse the parts: the baguette, the one that is fixed on the left side, should be equipped with a right cut, and the right fillet with a left one.
To make an internal corner, you must try to make sure that its lower section rises above the upper, and for an external corner - the opposite. The plastic and rather soft structure of polystyrene foam fillets eliminates the need to adjust them to each other, which can hardly be said about components made of wood or plastic. After working on the side sections, you need to estimate the plank to the ceiling for fitting. If necessary, cuts are made in the area where the base and accessory join. The work of rough joining the skirting boards is completed by fixing them with glue or screwing fillets to the walls with further sealing of the seams.
Cutting ceiling plinth
A pair of blanks is initially cut at an angle of 90 degrees. In this case, the end of the plinth rests against the wall, which is placed perpendicularly. After this, add one baguette. A line on the ceiling is drawn along its contour.
After this, the first plank rests, and according to this principle, the counter plank is applied. Again, a line along the contour is marked.
The point that is located at the intersection of both lines is the mark for cutting the baseboard. Each fillet should be applied again to the ceiling to mark points for subsequent cutting.
Draw a cut line that runs from the established point to the second edge of the baguette.
Having carefully cut the baseboards, they should be joined and mounted in place. Using this method, internal corners are easily and beautifully processed.
Cutting ceiling plinth
How to cut ceiling plinth with a miter box
You can add sophistication to the room with the help of decorative ceiling plinths. In addition, this product perfectly masks cracks in corners and errors in the connection of the ceiling to the walls. But only if the installation is flawless. And a convenient carpentry device called a miter box will help with this, which is used to evenly trim the baguette at the required angle.
1
The problem of cutting off the cornice does not lie in the laboriousness of the procedure. The fact is that ideal angles of 90° are rarely found in our homes. Basically, they are crooked, and in order to avoid having to subsequently seal the formed cracks with a putty mixture or silicone, you should carefully trim the baguette by hand. When cutting, consider the material from which it is made. To cut plastic skirting boards, you will need a hacksaw. The plinth, made of wood, is processed using a wood saw with fine teeth. If you have a foam or polyurethane baguette, then make sure you have a plasterboard or utility knife.
2
In addition, to cut the ceiling plinth you will need a carpentry tool called a miter box. The tool is structurally a tray made of metal or wood. You can even find plastic products on sale. It has grooves for guiding the hacksaw at the desired angle to the axis of the tray. This tool allows you to cut the cornice at different angles, namely 45, 60, 90°. Although an angle of 60 degrees is rarely cut. Corners in a room can be internal or external, and the procedure for cutting them is different.
3
Cut the inner corners like this:
- Place the baseboard against the inside corner so you can determine the cutting line. Remember that the bottom edge needs to be longer for wall mounting.
- Place the baguette in the fixture. The edge with which you will attach the plinth to the ceiling should be located at the bottom. The position of the plinth should be similar to its subsequent placement during installation.
- Make sure that the baguette fits snugly against the opposite wall of the instrument.
- Its end should be set at the angle you require, for example, 45 degrees.
- Place a hacksaw in the special hole and cut off the unnecessary part of the cornice. Act carefully, smoothly, without sudden movements. Do not apply unnecessary pressure, otherwise the edge of the cut may be damaged.
- When processing an adjacent part, it must be cut in a mirror image.
- After cutting, try on 2 skirting boards; they should fit perfectly together.
- If there are protrusions at the joints, then adjustments are required. For wooden cornices, use a file; for baguettes made of soft material, use a knife.
4
External corners are cut in a different direction. At the same time, keep in mind that the longer edge should be the one with which the plinth is attached to the ceiling surface. Based on this, the baguette for the right side should be cut from right to left. For the left side, cut from left to right. If a gap is formed when cutting the inner plinth, it can be easily repaired. In the case of an outer corner, such a defect cannot be corrected, so proceed very carefully.
5
However, there are situations when there is no miter box at hand. In this case, it is not always advisable to buy a tool, especially if the installation of the baguette needs to be carried out only in one room. But you can make a carpentry device for cutting ceiling plinths with your own hands:
- First you need to decide what size the tool will have. It should be taken into account that the height and width of the miter box depend on the size of the cut baguette; they cannot be smaller than the cornice. The recommended dimensions are: length – at least 50 cm, width – 20 cm, height – 20 cm.
- To make a miter box, you will need a base, which is a wide rectangular board. Its dimensions are similar to those described above, that is, 50 by 20 cm. The thickness is 2.5 cm.
- Guide boards are needed to guide the hacksaw blade when cutting a baguette. They should be the same length as the base. Thickness does not play a special role. The width is determined taking into account the thickness of the base: 20 cm + 2.5 cm = 22.5 cm. Take guides in the form of rectangles.
- Then you should screw the guides to the ends of the base using screws.
- Use a protractor to mark the corners. It is enough to set marks at 45 and 90 degrees. Draw lines that should go from these points along the walls of the guides. We use a square for this.
- Cut along these lines almost to the very bottom to make cuts for the hacksaw. Twist the boards.
Thus, if you cut the corners on the ceiling molding correctly, you can install them without any problems!
Secret tips for cutting baguettes
In order for pruning to occur not only accurately, but also as correctly as possible, you should take into account several important little things that can affect the result.
- It is necessary to take correct measurements, which you then use to cut the skirting boards for the ceiling. To determine and mark an internal corner, you should start taking the length directly from the corner. To mark the outer corner, do not forget to take into account that the baguette will look into the room at a length equal to the width of the baseboard itself.
- It is prohibited to fix the ceiling plinth strips until you have approximately established their placement and cut the back molding. Only when the corner fits perfectly with both strikers can you begin their full installation and fastening.
- Defects and flaws in skirting boards for ceilings made of wood or polyurethane can be removed and corrected using a special nail file or file. Expanded polystyrene skirting boards are corrected with the sharpest blade.
- If all adjustments do not bring the desired result, then you can use regular putty.
- In order not to spoil your ceiling plinth, it is worth doing several preliminary cutting tests on small pieces. This will allow you to study the process in practice and get better at it; you should start with decorating the toilet.
If you are properly armed and have patience, cutting skirting boards for the ceiling will not be difficult. The main thing is to choose the most suitable method for performing such an action. It is important not to forget about attentiveness and accuracy, because the material is very delicate and does not accept brute force.
Beautiful baguettes indoors
Knowing the rules and features of how to cut the corners of ceiling plinths at home, you can easily create a beautiful look for your room, and repairs will take much less money. All that remains is to choose heating radiators, complete the repairs and you can live. After all, the work of master builders is not cheap these days. And to master the entire technology of cutting ceiling plinths in even more detail and learn about the secrets from professionals, watch the thematic video.
Related publications
- Read
How to cut glass correctly
- Read
Warm electric baseboard
- Read
How to make a warm water baseboard
- Read
Baguette in the interior
- Read
How to accurately measure and cut the corner of a ceiling plinth without a miter box
- Read
Work technologies
If you don’t know how to cut a corner on a ceiling plinth, familiarize yourself with the basic techniques and select the optimal algorithm.
Using a miter box
The tool allows you to cut molding corners located on the outside or inside. The rotating mechanism will help to form parts with a bend of 90 or 45 degrees.
External fillets
To figure out how to quickly cut and make a beautiful outer corner located on the ceiling plinth, you will need:
- Measure the length of the fillet from the surface of the wall to the point where the corner is located.
- Mark the inside of the piece with a pencil.
- Place the outer corner into the bottom of the miter box and make a cut at a 45 degree angle.
- Carry out cutting of the adjacent plank according to the same pattern.
- Try on the parts and trim the ends with a knife for perfect joints.
On a note! The outer element should protrude slightly.
Internal elements
How to carefully cut out the inner corner that is located on the ceiling plinth? After completing the markup, work according to the following algorithm:
- Place the bar in the bottom of the miter box so as to repeat the location on the surface.
- Press the plinth against the far wall of the miter box.
- Hold the product and pinch it with your free hand.
- Place the hacksaw at a 45° angle into the recess and make a cut.
- Trim the adjacent element using a similar method.
On a note! An internal corner made of PVC or polystyrene foam can be processed with a stationery knife or a hacksaw for metal.