It is often problematic to get a flat wall even using professional materials and tools. Finishing facade plaster solves the problem. It represents a certain surface condition at which the wall becomes suitable for further processing: painting, whitewashing, wallpapering. The process is labor-intensive, and even knowing the nuances, it may take several days or weeks to complete it.
What is the final layer of plaster?
Finishing plaster is necessary to make the walls even for subsequent work. The following problems can be solved with the help of plaster:
- Filling space with some unevenness;
- Elimination of minor mechanical damage;
- Making the surface smooth and even.
At the same time, not only finishing plaster solves problems. Craftsmen use the primer several times, especially paying attention to uneven areas. Sandpaper, which is used to clean certain areas, also helps eliminate surface defects.
The properties of the final finishing plaster resemble ordinary plaster and putty. It is necessary not only to add a perfect application of this composition to the walls, but also to make sure that it has the correct texture. Otherwise, the plaster may crumble along with the paint applied later or with the wallpaper glued on it.
Final layer of plaster
Purpose
The finish takes on all unwanted environmental influences.
In any work, it is important to know what outcome should be achieved as a result of its successful completion.
In the case of plastering the walls with the final layer, the latter must fulfill the following conditions:
- Filling and eliminating all uneven surfaces of the wall. Like any plaster, the finish is intended to level the surface, and this task must be solved in full, regardless of what other tasks are assigned and how they are solved. Even the most durable and high-quality finish is considered a failure if it is uneven or uneven;
- Protection of the structure and basic finishing from mechanical damage, moisture, sunlight, corrosion and other destructive factors. It is the final finishing that takes the brunt of the environmental impact, and protection must be comprehensive;
- Creating a high-quality surface in terms of texture, relief, color and other decorative properties. The solution must have correctly selected components in terms of fractional composition and properties, which, when dried, will look like a durable monolithic material, smooth or embossed.
The main task of the finish is a smooth, durable and beautiful surface.
It is worth noting that the final plaster combines the properties of two related finishing technologies - putty and traditional plaster. The putty is intended for filling small depressions and irregularities, fine leveling, which is also typical for final finishing with plaster. However, unlike classic putty, final plastering not only levels, but protects the walls, and also serves as a decorative cladding .
An example of interior wall finishing.
Plaster is more often called façade cladding, while interior finishing is closer to putty, although the difference between these concepts is now blurred. The only clear difference may be the presence of a relief on the surface, which is more typical for plasters, although putties are sometimes treated in a similar way.
Applying the finishing layer of plaster in the classical sense.
Speaking in standard terminology, the finishing layer is the second layer in classic lighthouse plaster, when the main base has been applied and leveled, and all that remains is to fill in the depressions and irregularities and rub the surface to the smoothest possible state. We will also consider this stage.
Important! Whatever the finishing technology is called, its main task is to protect the wall and create a smooth, beautiful surface.
Features and differences
Finishing materials differ in the properties of the components.
The main difference between the finishing mixture is the fractional composition or grain size of the filler. Regardless of whether cement, sand, lime, talc, chalk or gypsum are used in the mixture, their particles should be as small as possible, as this allows for the smoothest and most durable surfaces to be created.
Fine filler allows you to create smooth surfaces.
However, the small fraction imposes a number of limitations on the technology:
- high fluidity of the solution;
- impossibility of applying a thick layer;
- high probability of cracking.
That is why, for basic leveling, starting mixtures with large filler particles are used, which level out large differences in the plane.
The finishing layer should be thin.
Important! To prevent the coating from cracking, various plasticizers are added to its composition: glue, resins, polymer compounds, rubber and others. The layer can also be reinforced with fiberglass or a special painting mesh.
Also, the material must be moisture-resistant, frost-resistant (for facades) and strong enough, exhibit minimal shrinkage and have good adhesion to previous layers of finishing. For this purpose, various additives and additives can be used in the mixture, so the price of the finish is slightly higher compared to starting materials.
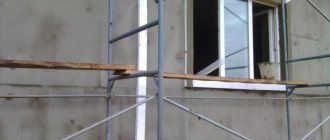
How to apply the finishing layer to facade plaster
The process of applying finishing plaster is divided into stages. But the essence depends on where exactly the work takes place: outdoors or indoors.
The walls of a house on the street are exposed to a number of negative factors. Among them: snow, rain, mechanical damage.
Therefore, the following requirements apply to the final layer of plaster:
- Resistant to cuts and mechanical damage;
- Moisture protection;
- Air permeability;
- High thermal insulation and sound insulation properties;
- Long-term preservation of the original appearance.
Craftsmen prefer to choose polymer-based compositions. These include acrylic and silicone options.
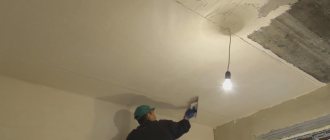
The preparatory stage begins with an inspection of the surface. A thin layer of finishing plaster will not be able to fill existing bulges or large cracks. They must first be eliminated. Before starting work, it is necessary to achieve the necessary indicators: temperature at least 10 degrees, humidity no more than 60 percent. After completion of work, this temperature and humidity must be maintained throughout the day. Applying plaster on the facade of a building is required in warm weather, without precipitation. The solution is prepared before direct application; it should not be allowed to harden. The application itself is done as follows:
- Take two spatulas: narrow and wide;
- Using a narrow spatula, scoop up the plaster mixture from the container;
- Transfer to the surface with a wide spatula;
- Level it with a wide spatula on the wall, and you can pull the composition off several times, not a lot;
- Place the next layer on top of the previous one and level it in the same way.
The thickness of the final plaster should not exceed 2 millimeters. If it is denser, there is a risk that the plaster may crack.
If you plan to glue wallpaper later, one layer will be enough. If there is painting, then two layers are applied to make the surface perfect.
For processing corners, special corner-type spatulas will be lost. Traces from the use of the tool can be wiped away with sandpaper with a low degree of abrasiveness.
Finishing plastering of external walls seems like a simple task only at first glance. Experts advise following the recommendations:
- To improve adhesion, it is necessary to use a primer between the initial layers and the finishing coat;
- It is better to start work from the upper left corner, moving vertically down;
- Using a spatula of 40 centimeters or more ensures that the surface becomes perfectly flat;
- The principle of application changes (bottom-up) if you work with the walls of concrete, plasterboard or brick.
Before applying, you need to practice on another surface. It is not always possible to make the layer perfectly even, and this is more due to the person’s lack of professionalism than to the tools used or the quality of the plaster.
Advice from an experienced master: how to plaster walls correctly
Before carrying out repair work, it is necessary to study the features of the base of wall surfaces. The method of performing the work will depend on this. For smooth walls, a spatula and a level are enough. Bases with large defects and deviations can only be leveled using beacons. You may need a large amount of mixture. In this case, additional reinforcement should be performed on the wall.
There are several rules for plastering walls:
- first of all, the wall surfaces are cleaned and primed;
- in the second stage, the bulk of the putty is applied and distributed;
- At the final stage, the base is covered and cleaned.
Wall cleaning
A video on how to properly plaster walls will help you complete all the work correctly:
Consumables and tools for plastering walls
- plaster;
- primer for pre-treatment of wall bases;
- beacons in case of large surface deviations;
- rule for aluminum plaster 2 m long for drawing out the composition and 2.5 m for installing beacons;
- bubble level at least 2 meters long;
- spatula 15 cm wide;
- construction float;
- trowel;
- bucket;
- roller with tray or brush for priming;
- gloves;
- perforator with a nozzle for stirring the mixture;
- dowels, screws, Phillips screwdriver, metal scissors for cutting beacons;
- hammer;
- metal ironing;
- roulette;
- plumb line
Some tools are already available in every home. Something will have to be purchased or rented. But this is not a tool for one repair; everything will be useful in subsequent repairs. You could say it’s an investment in the future. Now we know what tools are needed for plastering walls, we can start making repairs.
Tools
What you need to know to prepare high-quality plaster
To prepare cement plaster, mix cement and sand in a ratio of 1:3. Water is gradually poured into the composition with constant stirring. The result should be a solution with the consistency of sour cream with high fat content. Before mixing, you should read the manufacturer's instructions and recommendations. If repair work is carried out in a room with high humidity, experts advise adding lime. It will remove excess moisture and make the microclimate more comfortable.
For surfaces made of concrete and foam concrete blocks, it is recommended to use gypsum-lime plaster. Its plasticity is well maintained on the base. To prepare such a solution, pour gypsum into a bucket of water in a thin stream, then quickly mix everything, adding milk of lime. This mixture is applied quite easily, and will help beginners get their hands on finishing work.
To plaster walls with your own hands, you can buy a ready-made mixture, which is offered in a wide variety in construction hypermarkets and stores. This is the easiest way to prepare.
Solution viscosity
Preparing walls for plastering
The work process of preparing the surface for plastering begins with cleaning the base from previous coatings. After that, the level of deviations should be determined in order to determine whether the installation of beacons is necessary or whether additional work can be done without.
Then you should carefully prime all bases with a brush or roller. It is necessary to choose a deep penetration primer; there is no need to skimp on the composition at this stage, this will help the putty to adhere well to the surfaces. In addition, it will protect the walls from excess moisture and prevent the occurrence of mold and fungus, which can cause corrosion of the material.
Primer of walls
Do-it-yourself plastering of walls without beacons, video of step-by-step application
Before applying plaster to the walls with your own hands without beacons, after the primer has dried, you should thoroughly moisten all bases with water.
| Photo | Description of work |
| Before starting work, we clear the floor of debris so that it is convenient to collect the fallen solution, and all sockets are closed. | |
| All the walls get wet | |
| Spread the mixture with a spatula onto a 1 m² base in random order. We perform all actions with the hand. This is important so that the mixture hits the base accurately and does not scatter. It is necessary to just apply it, then the plaster will penetrate into the hollow places of the walls, in addition, this method will increase adhesion to the surface. | |
| Use a grater to smooth out the wall using random movements. Layer thickness is about 5-7 mm. All surfaces are gradually plastered using similar movements. Work should start from the floor to the ceiling. There is no need to perfectly level the base; a rough surface will improve the adhesion of the second layer. The drying time of the first layer should be at least 2 hours. | |
| After the first layer has dried, you need to go over all surfaces as usual. It will remove all large irregularities. The construction tool should be pressed tightly to the base and all walls should be leveled with arbitrary movements. | |
| When performing the second layer, the solution is applied to the base with a trowel using a spatula. Leveling should be done with some effort and voluntary movements. | |
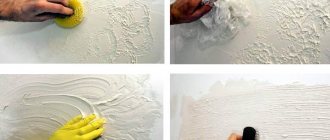
| After setting, it is necessary to check the quality of application. Protruding bumps are removed in a circular motion with a construction float, which should be periodically moistened with water. This will help with quick soaking and better removal of the mixture. To remove depressions, you need to rub a small amount of plaster into these places. The second stage levels the walls as much as possible. Drying time is about 3 hours. | |
| The third stage is the most painstaking. It is necessary to level the wall surfaces with a thin layer until they are as smooth as possible. The plaster should be diluted with a small amount of water to a more liquid state. Work is carried out from top to bottom. The solution is poured onto the walls with a ladle and smoothed in a circular motion until perfectly smooth. Drying time – up to 8 hours. | |
| The grout will give the walls a velvety feel. The surfaces are spilled with water, then a construction trowel should be walked over them. This step can be omitted if tiling or stone cladding is planned in the future. | |
| Excess mortar is removed from the ceiling surface. |
Drying time is several days at average temperature and moderate humidity. At elevated temperatures, all surfaces should be periodically moistened with water to avoid the formation of cracks.
If in the instructions on how to level walls without beacons, some points are not clear, you can watch a video with an accessible description of the entire technological process.
Step-by-step application of plaster on walls with your own hands using beacons: video with detailed description
If the deviations on the base are large enough, putty should be carried out during additional installation of beacons. After preliminary preparation and treatment of surfaces with a primer, their installation begins. If work is carried out in rooms with high humidity or with large defects in the foundations, you should secure the mesh for additional reinforcement before leveling the walls along the beacons with your own hands. Video tutorials will help you do the work correctly. It is secured using a mixture or dowels.
The sequence of plastering work is similar to the process without installing beacons. The solution is applied in a dense layer between the beacons with a slight extension beyond them. As a rule, using zigzag movements from below towards the top, the plaster is leveled. The excess is removed with a spatula, the voids are filled with new solution. After passing the entire surface, leveling must be repeated from top to bottom.
At the end of the work, you should check the result using the rule. The protruding parts are rubbed down. After which it is necessary to perform leveling with a liquid mixture. Before work, you can watch professional videos of beacon plastering for beginners. This will prevent mistakes in repair work.
Reinforcing mesh
Methods for installing beacons - advantages of fastening with screws
Placing beacons under plaster can be done in two ways: using plaster mixture or using self-tapping screws. For non-professional craftsmen, it is better to choose the second fastening method. A reliable and fast method proves the advantages of such fastening, including financial ones.
| Photo | Description of work |
| The level makes vertical markings at a distance less than the length of the rule by 20 centimeters. | |
| Using a hammer drill, holes are drilled for beacons around the perimeter. | |
| Dowels 8x40 mm are driven in with a hammer. | |
| Screws 40-45 mm long for plaster layers up to 30 mm. In areas with a thicker layer, longer fasteners should be used. | |
| The heads of the beacon screws should be aligned with a level along the perimeter. | |
| The fastening elements for the beacons are fixed on the screws. | |
| Attaching beacons around the perimeter. | |
| Work is carried out similarly on the entire surface of the walls. | |
| The wall is checked with a thread for the presence of protrusions. If the base protrudes too much, it can be adjusted by screwing in a screw. | |
| The template checks and aligns all the caps. | |
| All elements and beacons are fixed. |
With this method, time is saved exactly four times. The video below describes the entire installation process quite clearly:
At the end of the work, professionals recommend removing the beacons and sealing the resulting stripes with a solution so that rust does not appear during operation. This is a controversial opinion. If the beacons were purchased from a branded retailer and they are of good quality, there is no need to remove them.
What materials and tools are needed
In order to carry out finishing plaster, you will need the following tools:
- A special container in which the composition will be diluted;
- The spatula is narrow and wide (the first is to collect the mixture from the container, and the second is to directly lay it);
- Trowel or ladle;
- Construction float;
- The rule is to level the surface and correct minor defects;
- Special corner for processing hard-to-reach surfaces;
- Paint brush for working in confined spaces.
The effectiveness of the work performed largely depends on the type of finishing plaster chosen. The best option for walls not in a building is a cement-based composition. But it’s quite difficult to prepare one yourself, since you need to maintain proportions.
Polymers are added to the mixture to improve adhesion and plasticity. If there are high levels of moisture outside, it is recommended to use cement and sand plaster. It is preferable to treat wooden surfaces with gypsum or clay plaster. This is explained by the property of the composition - it prevents fire.
Puttying walls after plastering
After leveling large defects, blockages of walls and significant irregularities, they move on to the final stage - leveling and strengthening the walls. Using putty, small scratches, transitions of layers of plaster, chips and cracks, and all minor flaws in the rough finish are repaired. The putty surface becomes completely suitable for wallpapering or painting.
Why putty the walls after plastering?
Special polymer and stabilizing additives are introduced into putty mixtures based on gypsum or cement-sand compositions, making the solution more plastic and slowing down its setting. Thanks to this, the putty is applied in a very thin layer, creating a perfectly flat and smooth surface.
After the plaster has dried, it is not necessary to putty the walls only before laying tiles or gluing thick wallpaper. Small defects underneath will simply not be visible, so the surface is only primed. In other cases, especially when painting or finishing with thin wallpaper, you cannot do without plaster. After all, it is capable of not only smoothing out the smallest cracks, but also:
- prevent the plaster from falling off over time,
- significantly improve the adhesion (adhesion) of walls to wallpaper and other finishing materials, they will hold more firmly and will not peel off,
- reduce the consumption of wallpaper glue and paint.
After what time can putty be applied?
Cement-sand leveling mixtures take quite a long time to fully gain strength - 4 weeks. But there is no need to wait this long after plastering. Cement gains 70% of its strength in a week. This is quite enough for applying putty and subsequent finishing, including heavy tiles. For example, Knauf Unterputz cement facade plaster 20 mm thick dries within 7-10 days.
Gypsum compositions set in 40-60 minutes and dry completely in about a week . For example, the popular Knauf Rotband, applied to the walls with a layer of 15-20 mm, can be puttyed after 7 days. In a humid room or low temperatures, the drying time may increase to 10-14 days.
Drying time also depends on the thickness of the layer, as well as the temperature and humidity in the room. Using construction hair dryers or creating drafts to speed up the process is not advisable - significant cracks can form on the surface if it dries unevenly, and over time the plaster will begin to peel off.
After drying, before puttingtying, the plaster must be sanded - using a special grater with a fine mesh or sandpaper, the wall is processed in a circular motion. In this way, small deposits of the dried mixture, traces of a spatula, and places where layers were applied are removed.
Do I need to prime the walls?
Many people believe that pre-priming walls is just an unnecessary waste of money. However, if you want the future decorative coating to look perfect and last as long as possible, then the walls must be primed before puttying.
Primer that penetrates deep into pores:
- protects the surface from peeling,
- promotes more uniform penetration of putty, adhesives and dyes.
Primer solutions are also an excellent antiseptic that protects walls from fungus. In addition, they prevent moisture, which contributes to its development, from penetrating too deeply into the walls.
The choice of primers is quite large on the construction market, and manufacturers offer special types for each type of surface. To cover walls after plastering, it is better to use acrylic, polystyrene or perchlorovinyl mixtures of deep penetration or universal compositions of medium porosity.
The walls must first be treated with a wet sponge to remove the smallest dust particles. You can prime with either a roller or a brush - a roller distributes the mixture more evenly, and a brush is more convenient to apply it in hard-to-reach places. Also, for convenience and speed, hand sprayers are used.
Puttying begins only after the primer has dried. The time for complete fixation is always indicated on the packaging and can vary from 5 to 15 hours.
What is the best way to putty?
Basic requirements for compositions for interior decoration:
- high plasticity,
- ease of application,
- ideal smoothness of the created surface,
- affordable price.
Gypsum-based compositions are ideal for puttying inside the house . A feature of gypsum materials is their rapid setting (40-60 minutes), ease of application and subsequent grouting.
The requirements for facade putty are completely different. First of all, they must:
- be frost-resistant
- easily withstand temperature changes,
- have high strength,
- resist precipitation and high humidity.
For finishing facades and rooms with high humidity, it is better not to use gypsum putties without covering them with waterproofing. Therefore, cement or acrylic mixtures are used for external plastering work. Cement ones are resistant to destruction when wet, while acrylic ones do not let moisture inside at all.
Consumption per 1 m2 for plaster
The consumption of the putty mixture depends not only on the thickness of the applied layer, but also on the type and density of the composition. You can find out the exact number on the packaging:
- heavy and dense cement putties for facade and interior decoration are used the least economically: with a layer thickness of 1 mm, 1.2-1.5 kg/m2 of plastered wall will be needed,
- the consumption rate of gypsum putty on plaster will be 0.8-0.1 kg per 1m2,
- Polymer-based putty is considered the most economical - consumption per 1 m2 is only 600 g.
The better the walls are leveled with plaster, the smaller the layer of putty is needed after it. Much depends on the manufacturer:
- "Wide." Compositions for interior work of this brand are used very economically: on average, with a thickness of 1 mm per 1 sq. m will only require 0.68 kg, the only drawback is that the company packages its products in very large containers, which is not always convenient,
- "Vetonit" sells both facade plaster and mixtures for interior work, in the first case the consumption will be 1.2-1.5 kg, and for finishing the premises you will need 1.2 kg, the company also produces high-strength oil-adhesive compositions, but their per sq. m will need up to 3 kg,
- Knauf products for interior work, made on the basis of resinous substances, are of very high quality, but not very economical: it will take 1.7 kg to finish a square meter.
Advice! Unlike plaster, which can be applied in a thicker layer, the starting putty layer should be no more than 3 mm, and the finishing layer should be no more than 1 mm. If re-correction of the surface is required, it must be thoroughly dried, and only then a new layer must be applied.
We hope that this article was interesting to you, leave your comments and questions in the comments below.
Is it possible to leave a wet facade without finishing plaster for the winter?
It is not recommended to leave a wet facade without finishing plaster for the winter. The fact is that then the applied primer, which increases adhesion, may collapse. The work will have to be redone in the spring.
Some experts say that finishing plaster for the winter can be replaced with putty or paint. But others do not support them, explaining that there is a high probability of cracking of the facade. But, if the materials are selected correctly and experienced craftsmen work, then such a problem can be avoided.
Knowing how to choose the right plaster for exterior work and the peculiarities of its application, you can create smooth walls of the house yourself.