Today we will make a stand for books or a tablet from cardboard with our own hands. Paper and cardboard are excellent materials for crafts. The advantage is that cardboard and paper can be found in large quantities and practically free.
You can easily make a book stand out of cardboard with your own hands in a couple of hours. The stand is comfortable and cute.
To make a stand you need: 1. Corrugated cardboard; 2. Regular napkins; 3. Newspapers; 4. Hot melt adhesive; 5. PVA glue; 6. Acrylic paints and varnish.
Watch the master class on how to make a stand out of cardboard and feel free to get to work. I believe you will succeed!
Cardboard is a universal material from which you can make not only boxes, but also various crafts, as well as quite useful things in everyday life.
This environmentally friendly material is not difficult to find and is also quite easy to work with.
Here we have collected the most interesting and useful things that you can make from cardboard at home or in the country.
How to make a cable/cord/wire organizer out of cardboard
- cardboard toilet paper rolls
- cardboard box (ideal for shoes)
- tape or glue to hold the bushings together (optional)
*The number of bushings depends on the number of cables and space in the box.
*You can fill the box completely or halfway with grommets to leave room for larger items.
* To ensure that the bushings do not dangle in the box and fit tightly to each other, you can fasten them with tape or glue.
Another option for a cardboard laptop stand
- ruler (preferably metal)
- a place where you can cut (a board or a special mat)
- glue (PVA or hot).
* Please select part sizes according to the size of your computer.
* Make cuts on the parts about 6 cm.
* This stand was designed for 13 and 15-inch laptops.
* Use glue to secure all parts, starting with the bottom ones.
*Allow the glue to dry before testing the stand.
Triangular shoe rack made of cardboard boxes
- scissors or stationery knife
- Ruler and pencil
*Each module in this shelf is a triangular tube. Its size depends on the shoe size.
First you should make one module.
1. First, cut the cardboard, divide it into 3 parts with a pencil and a ruler, bend it into a triangle and secure with wide tape.
2. Create some more modules in this way.
3. Each row of triangular modules must be glued to a sheet of cardboard for stability.
4. You can put another cardboard on top.
DIY folding stand for camping pot
Hello, dear readers and DIYers! Many of you like to hike, fish, or have a picnic in nature. However, even cooking a simple fish soup in a pot, or preparing pilaf without special equipment is quite difficult.
In this article, the author of the YouTube channel “George Kosilov” will tell you how to make a simple folding stand for a pot or frying pan.
This project is quite simple to make, but will require a small amount of welding work.
Materials. — Steel rod with a diameter of 12 mm — M12 nuts — Large flat washers — Machine oil — Liquid against adhesion of welding spatter — Heat-resistant aerosol enamel.
Tools used by the author. — Grinder, cutting disc — Semi-automatic welding machine — Lerka — Rolling machine, vice, hammer, tape measure.
Manufacturing process. So, the main material for the frame of such a stand will be a steel bar with a diameter of 12 mm.
First of all, the author needs to bend the steel bar into a ring. He had previously made a simple bending device, the manufacturing process of which was described in this article.
The device is fixed in a vice, and in several passes a product resembling a ring is obtained.
When working with such a bending device, a small margin of the workpiece (about 100 mm) should be taken into account, since its edges remain straight. As a result, the diameter of the workpiece turned out to be 300 mm.
Unrounded edges are cut with a grinder.
One edge of the ring is fixed in a vice, and the master bends the second edge so that they become coaxial.
Now both ends are clamped in a vice and hammered.
You will also need to align them vertically. The master leaves a gap between the edges of the rod of about three mm.
Before welding work, the author applies a liquid against the adhesion of welding spatter. This is necessary so as not to damage the jaws of the vice.
The two edges of the ring are sealed by welding.
The ring is removed and the seam is finally welded. Then the slag layer is removed and the weld is ground.
To make the legs you will need three similar rods 300 mm long. An M12 thread is cut at one end.
A nut is screwed onto the thread of each rod, and the ring is divided into three equal parts.
Now the master welds the nuts to the ring, unscrews the legs, and then cleans the seams and surface of the ring.
To increase the support area, he welds enlarged washers to the second edge of the legs.
So, all the parts are ready, and their surfaces are cleaned of rust. Now all that remains is to cover them with heat-resistant enamel.
Tests of the stand were carried out in nature and pizza was prepared.
I thank the author for a simple but useful device for cooking in camping conditions!
Good mood, good luck, and interesting ideas to everyone!
The author's video can be found here. Source
DIY cardboard shelves (photo)
1. Prepare cardboard. If you have boxes, straighten them.
2. Now you need to make a hexagon from a sheet of cardboard. To do this, you need to make additional folds, one on each of the two largest sides of the cardboard.
3. Place the box flat and make a couple of cuts (see image) so that the top parts of the shape can be folded towards the center.
Turn the figure and repeat the same thing, only you need to bend the parts of the cardboard not towards the center, but inward.
4. In this example, the top and bottom parts (which you bent towards the center) are connected using special plastic fasteners. You can also use a large staple gun and/or white glue/hot glue.
5. The modular shelf is ready. Make a few more and connect them together.
DIY wall shelves: advice from an experienced craftsman
Before you start creating a useful structure for your home, it is advisable to think about secure fastening. The safety of household members and the safety of valuable things for which the shelf is being prepared depends on it.
There are different types of fasteners for wall structures:
- regular loops;
- decorative brackets;
- for glass options - the so-called “pelican”.
For example, hinges are most often used for wooden shelves. First, they are attached to the wall with self-tapping screws. Then holes are made into which dowels with a small head are screwed. It is on them that the homemade structure is hung.
To create regular and thick shelves on the wall you will need:
- boards (maximum thickness 20 mm, width - 180 cm);
- self-tapping screws;
- fastening devices;
- dowels;
- screwdriver;
- wood hacksaw;
- level;
- pencil for marking;
- sandpaper.
When the tools and material are prepared, they begin to create a useful structure.
For shelves, it is best to use pine wood, plywood, laminate, chipboard or MDF.
Marking and preparing material
Most often, the dimensions of a hanging wall shelf created by yourself are chosen in random order. In this case, the future method of use, the square footage of the room and the location of the structure are taken into account. If the edges of the top and bottom panels are connected to the side parts of the structure, then when calculating the height, allowances are made for this.
When marking corner options, it is better to use suitable boards. Their edges should be oblique. Thanks to this, the connection will fit harmoniously into the outer or inner corner of the wall.
A huge help when creating plywood shelves with your own hands are drawings made by experienced craftsmen.
Before proceeding with the installation of the structure, experienced craftsmen sand the wooden surfaces with sandpaper.
The finished elements are coated with a protective substance:
- stain;
- primer;
- varnish;
- paint.
On this topic:
Homemade mousetraps from a plastic bottle - two...
DIY refrigerator incubator: two simple models...
How to improve a summer cottage with your own hands (photo)
Do-it-yourself beds made from plastic panels are easy to...
BACK FORWARD 1 of 41
However, you always need to take into account the interior of the room, the color scheme of decorative items and furniture.
To reliably connect the ends, they are lubricated with special glue. Then the elements are connected using clamps or self-tapping screws so that they dry completely.
Creating a secure place for print publications
As an example, let's look at how to make a shelf for books on a wooden wall with your own hands.
First, the craftsmen prepare a set of tools:
- hacksaw;
- electric drill;
- level;
- ruler;
- pencil;
- stain;
- varnish;
- grinder;
- fasteners.
The next step on the way to the goal is a well-written sketch of the future design. It should indicate the expected dimensions and configuration of the shelf. Next, boards are installed on the desktop, on which the appropriate markings are applied. After this, they are sawn, polished and treated with protective agents.
In a similar way, you can make a shelf for a computer on a wooden wall with your own hands.
To assemble the structure, you must perform the following operations:
- markings are made on the prepared boards;
- drill the joints of the parts;
- assemble the structure using self-tapping screws;
- brackets are attached to the side ends;
- prepare mounting points in the wall;
- install the structure in a permanent place.
A wooden book shelf can last for several decades without losing its original appearance. Often such structures are decorated with vases of fresh flowers, figurines, souvenirs or family photographs.
Cardboard products: cabinet organizer
Books, in any form, will always be in fashion, as well as bookshelves for them. But homemade book stands can add variety to even the most dull interior.
A modern book holder can be of any shape.
Often it reflects the interests of the owner of the house, his passion for a certain topic or genre, and commitment to a certain style.
The main purpose of this simple device is to preserve good vision in children, since a vertically placed book does not strain the pupil, preventing changes in the structure of the eye lens. Also, modern design solutions are focused on minimalism and comfort, and a book stand in this case is indispensable, because it frees up space at the desk.
The shape of the book holder depends only on the imagination and interests of the owner.
This is not only a convenient device, but also a magnificent interior detail.
In order for an elegant accessory to decorate your home, just a few hours of free time, imagination (and the World Wide Web will help you get interesting ideas), patience and perseverance. A book stand can be made without any special material costs, because the material can be used: toothbrushes, cardboard boxes or wooden planks, children's toys, plaster or plywood and even wallpaper left over after renovation.
Even the most unnecessary things will help turn an amazing idea into reality.
Available materials for creativity
Practice shows that it is not at all difficult to create a wall shelf with your own hands from chipboard.
The material has a number of advantages:
- decent strength;
- ease of processing;
- high quality;
- ease of care;
- attractive appearance;
- homogeneous texture.
In addition, chipboard can withstand different temperature and humidity ranges. Its low cost allows it to be widely used to create various designs.
Let's consider a method for making a flower shelf from chipboard with your own hands. First, let's collect the tools:
- electric jigsaw;
- sandpaper;
- measuring tape;
- pencil for marking;
- ruler;
- level;
- fasteners;
- screws;
- corners;
- required number of plugs;
- edging tapes;
- iron.
We create a sketch or design drawing. At the same time, we take into account the number and type of plants that are planned to be placed on the shelf. It is important to think about the style of the interior so that the design fits harmoniously into it. As well as the preferences and taste of the main housewife.
The principle of work is almost the same as when creating shelves made of natural wood. The only difference is that chipboard is not treated with protective substances. The material is initially ready for use.
It is very convenient to make corner shelves on the wall with your own hands using laminated chipboard. To work you will need:
- laminate;
- self-adhesive edge tape;
- electric jigsaw;
- drill;
- marking tools;
- set of connecting parts;
- fasteners.
We come up with a design design that matches the overall interior of the room. We make a drawing of the product and then transfer it to the material. To get a beautiful decorative shelf on the wall, we cut out the parts very carefully.
When working with laminate, it is almost impossible to avoid chipping. Therefore, you should determine the front side of the product in advance.
The edges of the resulting parts are treated with self-adhesive film. To improve its appearance, apply a heated iron to it and press lightly. Next, we drill holes for fasteners and connect the parts. A DIY laminate shelf can be placed in any free space in the room.
To summarize, we note that various materials are used to make wall shelves. A creative approach will help you create unique masterpieces to improve your home interior. Why not start creating your new wall shelf today.
Cardboard stand
If you are wondering how to make a paper bookend, use cardboard.
You can also make such a stand from corrugated cardboard.
- Cut out 2 identical rectangles, each 35x42 cm in size. Bend them 14 cm on the long side and glue them into one piece.
- Cut out 2 more rectangles measuring 5x14 cm and also glue them together.
- Glue the small and large triangles together as follows: glue one end to the smaller part of the folded rectangle at the edge, and the other to approximately the middle of the larger part. Carefully lubricate the joints with hot-melt adhesive.
- Cut out the piece 29.5x10 cm and fold it in half.
- Cut a rectangle 2 times smaller in width than the previous one. Glue the parts from steps 4 and 5 to form a triangular cylinder.
- Glue the cylinder to the large blank from below.
- Cover the workpiece with newspapers and napkins, paint and varnish.
Very light, compact. It can also be made from plywood.
Ideas for shelves for manufacturing with stages of work
In order for the manufacturing process to bring a positive result, it is necessary to strictly follow the proposed instructions. Let's consider the most successful projects that will be an excellent addition to your interior.
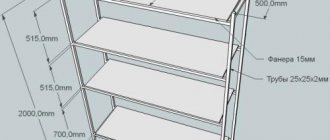
Wood shelf
To make a wooden shelf, you can take any project, we offer the simplest one so that you have the opportunity to learn and subsequently use these skills for other homemade projects.
When choosing wood in a store, pay attention to several parameters:
- Humidity of the material, ideally, the wooden board should be completely dry
- Presence of knots - if such flaws are present, then such a board should be discarded
- The presence of cracks or chips is also an argument against purchasing it.
- Absolute evenness - if the board has deformation bends, this indicates that it was not stored correctly, and such material is not suitable for you.
In addition to wood for making shelves, you will need:
- Standard set of tools
- Hacksaw
- Self-tapping screws
- Corners
- Fasteners for hanging shelves
- Dowels for fastening the shelf
The algorithm of actions looks like this:
- We draw up our own drawing based on the basic one, with mandatory indication of dimensions for each part. Please note that we took the simplest project as an example; you can supplement it with an additional partition or several, depending on the size of the shelf.
- The next step is marking, which is performed on a special table, workbench, or on the floor to eliminate errors during the marking process.
- After applying all the data, you need to prepare the shelf blanks. To do this, take a hacksaw or jigsaw.
- After cutting, care must be taken to ensure that all parts are absolutely even. To do this, they are sanded and then coated with stain and varnish. You can try to leave the shelves in their natural form; sometimes naturalness is more suitable for interior design. Just round the corners of the blanks to make the shelf look neater.
- When all the parts have been processed, you can begin assembly. Place the side strip on the table and mark on it the places for attaching the screws. Drill holes, and gradually, wall by wall, begin to assemble the shelf.
- Attach two brackets from the back to secure the shelf to the wall.
If you wish, you can leave the front of the shelf open, or install glass doors that slide or open on it. Depending on the complexity of the design, other components are also purchased, rails for moving the glass, handles for the glass, etc.
Corner shelf made of wood
To decorate the interior and make good use of the corner space of the room, designers often resort to using corner shelves. Why don't we use this technique?
As in the previous method, wood is taken as the basis, which is selected according to the same principle.
Let's consider the simplest project for the corner of the room.
The algorithm of actions in this case will be as follows:
- Select the design of the shelf you want to make. Please note that corner shelves can be for both external and internal corners.
- The next step is to draw up a drawing with dimensions and mounting locations.
- Markings are made on the board, followed by cutting out the blanks.
- After their preparation, they are also sanded, covered with stain and varnish. If desired, the shelf can be painted in any color to best match the interior; in this case, all blanks must be coated with a layer of primer.
- All that remains is to assemble the shelf, fastening each part with self-tapping screws.
- It is necessary to attach brackets to the back panel for further hanging of the shelf on the wall.
Please note that in this way you can benefit from 2 walls in the interior, forming an entire system from shelves.
Wall shelf
To make a shelf of this type, you can use several material options as a base: wood, plastic or metal. In this case, we will consider the possibility of making a shelf from wood and ropes.
All you need for the job are wooden boards, ropes, dowels for fastening and decorative elements to decorate the ends of the rope.
The manufacturing process is quite simple:
- We prepare a project and according to it we make blanks from a wooden board.
- It is necessary to make holes in the four corners of the workpieces for further threading of the rope, but not too large.
- Two dowels are fixed to the wall to secure the rope.
- Cut two identical pieces of rope and fold them so that one part is slightly shorter than the second. The shorter one is the back part of the shelf, the longer one is the front part.
- At the bend, make a small loop to secure the rope and prevent it from moving while the shelf is in use.
- Thread a short piece of rope through one flange and tie a knot. Repeat the same procedure with the second rope. If the shelf consists of several elements, after each passage of the board you need to tie a knot or use other fastenings so that the shelf does not fall through.
- Similarly, pull the rope along the front of the shelves, making sure to fix each floor.
- The location of the shelves is controlled by the level, and if one edge is lower or higher, the knot is tied.
- To make the finished product as aesthetically pleasing as possible, the lower edges of the rope can be decorated or slightly fluffed.
Instead of ropes, you can use leather straps to hold the shelf in place. In this case, you need to secure the belt with a self-tapping screw to the shelf to prevent it from moving.
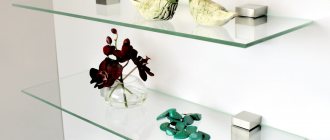
Glass shelf
Despite their fragility, such shelves are often found in modern interiors. It is noteworthy that their production requires a minimum of materials. The only hitch for home-made work is cutting the blanks and grinding the edges, but this can be solved if you order this from special workshops.
The manufacturing algorithm is quite simple:
- First, markings are made on the wall for future fasteners.
- After this, holders for glass shelves are installed, with a mandatory check for horizontalness.
- Adhesive tape is glued to the rear edge of the glass and the shelf is inserted into the installed brackets.
The shelf is ready and ready to use, but make sure that the shelf cannot break during use. Therefore, such shelves are not installed near beds or sofas.
Metal shelf
Metal structures look very beautiful in the interior, especially if they are complemented with forging elements. It is not always possible to make such bases yourself, due to the lack of skills and tools, but there is still a way out if you visit a store and purchase the necessary blanks there.
If you have the opportunity to make elaborate curlicues yourself, for example from a rebar rod, then this is only a plus. Because everything else is a matter of technique.
Draw a layout of the future product in advance, prepare the necessary metal blanks, connect them into a kind of frame and install a shelf on it, which can be made of wood or a metal sheet.
The finished shelf needs to be coated with paint to give it a more complete look and match the interior.
Keep in mind that metal is susceptible to corrosion, so it is better not to use such shelves in rooms with high humidity.
Ironwork
You can forge a real work of art from iron. But how to make a book stand out of iron if you are not a blacksmith? - using wire. The flexibility of the material can give it any desired shape. For a book accessory you will need a wire with a diameter of 4-5 mm, 4 pins with a diameter of 1.5 mm.
It’s not difficult to make an elegant interior book support; you just need to have imagination and some craft-making skills.
For such creativity, all kinds of, but at the same time, affordable household items will be useful.
From other materials
You can also make a book holder from stone yourself. In the simplest case, you will need two massive stones, spray paint, and cork adhesive pads so that the stones do not scratch the surface and move easily. The stones must be painted, for example, in fashionable gold or silver colors. Glue cork pads to the dried stones.
Making stone book supports is even easier: just find a suitable cobblestone on the street, cover it with paint and varnish.
A holder made in this way can take on any appearance depending on the author’s imagination.
To make a book holder out of concrete on a shelf with your own hands, first of all, you need to oil the mold. Next, knead the concrete until it forms a dough. Fill the molds with concrete and leave to dry overnight. Separate the seized parts from the molds by tapping them with a brick or hammer. Sand the bottom of the future stand. At the end of the form, paint it or leave it as is.
Once the paint has dried, the endpapers are finally ready to hold the books.
Additional information: to get rid of bubbles, you need to tap the container with concrete and shake it.
Minimalist, durable tree branch holder design. A nice addition to a row of titles on a shelf.
Antique-looking owls are massive and detailed.
If the classic options are boring, then the following will help answer the question of how to make a creative book stand with your own hands:
- Handsets of old wired telephones;
- Kids toys;
- Pillows of different shapes.
Such a soft pillow stand would be perfect for a child's room.
You can also cut a toy animal, such as a giraffe, horizontally. Glue the back part to the left holder, and the front part to the right one.
A witty holder in the shape of a dachshund is another find for extraordinary people or a gift option.
Good luck in your creative pursuits!
The animal book holders covered with sheep's wool turned out to be soft and textured.
Variety of designs to suit every taste
Each room consists of 4 walls, which can be decorated with various decorative items. But it is best to place them on shelves made by yourself. It’s good that modern furniture occupies mainly the lower part of the room. Therefore, shelves on the wall are an original solution for arranging a room.
There are a huge number of such structures. Let's mention only the most popular:
- open in nature (do not have front and side panels);
- closed options (reminiscent of a miniature hanging cabinet);
- corner structures (located on the internal or external corners of the walls);
- asymmetrical models (the shelf placement system does not have a main axis);
- suspended structures (belts, ropes or thick fabric are used as support);
- decorative interior elements (used for original placement of various decorations).
The types of wall shelves shown in the photo are visible evidence of such diversity. In addition, they are:
On this topic:
What can be made from rose petals - simple, beautiful and...
Apr 15, 2020
Beautiful gift Christmas tree made of fabric with your own hands
Dec 4, 2019
BACK FORWARD 1 of 79
- multi-level;
- with rounded edges;
- in the form of various geometric shapes;
- traditional rectangular options.
To make shelves on the wall use:
- tree;
- chipboard;
- laminate;
- glass;
- plastic;
- metal;
- mirror.
Depending on the location, open structures serve different purposes. Shelves by the front door are used as a place for hats and scarves. Options installed in the living room are decorated with souvenirs. The kitchen is a safe place for dishes and bulk products. If you attach homemade shelves to the wall in the bathroom, then detergents and toiletries will fit there.
For avid fashionistas, the design is installed in the bedroom so that cosmetic accessories are at hand. Children can place toys, textbooks, stationery and photographs of friends on the shelves. As you can see, such designs have different purposes and fit wonderfully into the modern interior of the room.