What is the product
First you need to decide on the design of the product. Experienced craftswomen know how to make a doll sofa and what material is easiest to work with. It is better to initially ask the child’s opinion, since this toy is just for him. The little one will be happy to tell you about her idea, and if you ask her to draw a sketch, then there will be no happier child in the world than your daughter.
If your daughter cannot decide on her wishes, then you can offer your options. Basically, several standard options are suitable for making at home: a classic sofa, a sofa, a Turkish sofa.
A classic sofa is a product made of a solid frame and soft upholstery. The sofa represents the same concept, but with smaller parameters. In this case, solid elements are used for decoration. A Turkish sofa consists exclusively of soft elements: frame, back, handrails. Additional decor can be easily created using pillows.
Required tools and materials
The problem always arises with the choice of material for making the frame. The choice will depend on the capabilities and skills of the person who will make the sofa. Dad will be able to work with complex materials: wood, metal. It will be difficult for mom to process such raw materials, so it is easier to work with cardboard, polystyrene foam, and foam rubber.
Additionally, you may need the following materials for decoration: cotton wool or padding polyester, fabric, beads or buttons, satin ribbon or border, fringe, knitting threads. Next will be detailed instructions on how to make a sofa for dolls. From cardboard, foam rubber or polystyrene - depends on preferences and materials that are available.
To work you will need the following tools:
- Scissors.
- Needle and thread.
- Ruler or measuring tape.
- Chalk, fabric pencil.
- Fabric glue and stationery glue.
- Stapler and tape.
Additional tools may be needed when implementing more complex techniques for making children's furniture. The list of necessary tools depends on what materials will be used.
The principle of working with materials and models
First, sketches are prepared, and then original patterns are formed in the full size of each frame detail. The simplest options for making a frame for different models of sofas:
In addition to a simple model, you can make a complex case that will fold out. Dads can tell you how to make a folding sofa for dolls so that the product completely imitates the original. A do-it-yourself sofa box for dolls is made as follows: cut the blank for the seat lengthwise into two equal parts, fasten them together in a movable way, imitating door canopies. Canopies can be two strips of fabric, which are attached to the parts at an equal distance, on one side.
When the base is ready, you can begin finishing. Here you can show your imagination and decorating skills.
Features of decorative finishing of the product
You can invite the girl to participate in the manufacture of finishing for the finished sofa frame.
Classic sofa and sofa
for greater realism, they are usually made soft, so the hard base is first finished with soft material: cotton wool, foam rubber. The second step is sewing a cover that will imitate furniture upholstery. The cover can be sewn from fabric by machine or by hand. For those who don’t want or don’t know how to sew, a crochet hook or knitting needles are the ideal option. A knitted cover will look no less impressive.
If you can’t create a complete pattern for the case, you can sew separate parts for each element of the case, and then connect them.
Upholstery can be made of almost any material
: leather, terry, cotton, velvet, jeans, plush. It all depends on what material is available for recycling. If the upholstery is made of textiles, then each seam should be covered with a thin satin ribbon - this way the product will look more aesthetically pleasing. The joints on the handles can be covered with buttons or beads.
Additional decor for any type of children's furniture of this type will be small decorative pillows, which can be very easily and quickly made from any of the materials described above. The work is carried out according to the same principle as the process of creating a cover.
When the children's sofa is ready, you can think about additional decoration, based on the appearance of the product. Decorations will help hide defects and mistakes that could have been made during the work process.
A DIY sofa for dolls
will look better than any store product.
Methods for making a doll chair
Furniture with this functionality can be made from completely unexpected materials, such as elastic bands for weaving. All the girls who make their own bracelets from this material probably know how to weave a sofa out of rubber bands. First you need to choose a weaving pattern; you can find a suitable one on the Internet. Often, little ones themselves can turn an idea into reality.
The Internet will tell you how to make a chair for Monster High dolls from scrap materials. The principle of operation is the same as when creating a sofa from any material. The only difference is the parameters and the presence of legs.
The legs can be made from nails or screws if the seat is made of wood. Lollipop sticks are suitable for light materials: foam plastic, cardboard.
Attention, TODAY only!
The range of toys for children is so large that even special furniture is produced for dolls. The products are expensive, the quality does not always correspond to the price. It’s easier and more economical, and in some cases even safer, to make furniture yourself. Instructions on how to make a sofa for dolls with your own hands will become a clear example for any parent so that they can start producing furniture on a large scale.
In order for a child to enjoy using this piece of furniture in playing with dolls, the baby needs to be involved in the manufacturing process itself. The child will be able to show his creative talents and will be interested in the result by making a sofa for a doll with his own hands.
The work proceeds according to a given algorithm, but first you should decide on several nuances. They are preparatory in nature:
- Select the material for the base of the future product. The body of this furniture can be made from many things: sponges for washing dishes, boards, fabric rollers, cardboard shoe boxes.
- Prepare the material that will serve as upholstery for the body. You should also consider decorative finishing to decorate the product. The intricate shape of the sofa and elements will do just fine.
- Select the parameters of the sofa in accordance with the size of the doll. Think over the very shape of upholstered furniture, design features.
- Select the assembly method and materials with which production will be carried out. Most often it is glue, a needle and thread, a construction or office stapler.
- Auxiliary tools for technical operations.
A doll sofa must be strong and safe. The baby should enjoy playing with such a toy. You need to think over the most striking design for finishing children's furniture: use sequins, beads, ruffles, lace. Using permanent markers, you can create a design directly on the fabric.
Materials needed for crafts
- An empty box of tissues or disposable tissues (size approximately 22.5x10x12.5 cm);
- ruler;
- pen or pencil;
- scissors;
- scotch;
- velvet fabric for “upholstery”. Depending on the size of the box, you may need blanks of other sizes. In our case: blanks for gluing the side walls - 2 rectangles 12.5 * 15 cm; the main part is a rectangle 22.5 * 47.5 cm; for armrests - 2 rectangles 10 * 15 cm.
- fabric glue;
- 2 “stationery” rubber bands (or a needle and thread);
- 6 or 8 cotton balls for stuffing armrests.
Step-by-step making of a sofa
For the first time, it is better to make a sofa from cardboard. A minimum of skills is required, the product will be the most reliable. To make a sofa for Barbie with your own hands, you need to follow the instructions:
1. Take a shoebox and cut it in half lengthwise. One of the halves will serve as a seat, that is, the upper body, and the second will serve as the lower part, which forms the height of the sofa.
2. One of the parts should be cut so that half of the bottom of the box fits into the other, and the side part will form the height of the sofa. This part needs to be cut to the required size.
3. From the scraps you need to make additional supports for the bottom of the sofa. They should be attached around the entire perimeter of the bottom using glue or a stapler. When the workpiece is fixed, you can cut out the shape of the back and side handles.
4. When the cardboard is dry from the glue, the next step is finishing with fabric. Each part is covered with fabric separately, so you need to take measurements. The fabric is glued to the cardboard and fastened with a stapler. Sometimes it is sewn on with thread, but this process is complex and long. All seams must be closed inward so that a child cannot tear the upholstery.
5. The next stage is decoration. You can sew mini pillows for the sofa or decorate the bottom of the sofa with tassels and pom-poms.
This product is manufactured within 1-2 hours. Decorative finishing will take approximately the same time. It is possible to make a realistic model using additional materials, such as cotton wool or foam rubber. It is initially placed under the fabric, which is secured using a stapler. Using this sample, you can make a doll sofa of any size and for any doll.
On video:
sofa for a doll from a cardboard box.
Sofas for dolls: step-by-step instructions
Now it’s all about how to make a sofa for dolls with your own hands. Prepare a work corner and devote two to three hours of free time to making crafts.
Sofa out of the box
There is always a use for a good box in crafts.
- tall candy box;
- a piece of thick cardboard;
- padding polyester;
- napkins or scraps of paper;
- ruler;
- a simple pencil or pen;
- scissors or stationery knife;
- clothespins;
- glue "Moment";
- fabric and braid for decoration.
This sofa is designed for dolls such as “Brothers” or “Monster High”. For other dolls, you need to select the sizes yourself.
- Mark the length of the box: measure 7 cm from one end and 9 cm from the other. Using a ruler, draw lines along the width and sides.
- Cut the box along the 9 cm line. You do not need to cut completely, but only along one side and the sides.
- Place the box on its entire side. Cut the 9 cm long part facing you in the center and open it. Make cuts in the corners of the whole part (see photo).
- Cut off the side and open side of the cut part. Bend the edges of the whole part inward along the intended line (it should look like the one in the bottom photo). The whole part is the future seat, the flat part is the back of the sofa.
- Bend the back and glue a piece of padding polyester to it. Stuff the sofa seat with scraps of paper and cover it with padding polyester to add volume.
- Cover the sofa with fabric. To ensure that the material sticks well, secure it with clothespins.
- Cut out the back back from cardboard and also glue it over. Glue the back and let the craft dry.
- Decorate the seat and back with braid. The sofa is ready.
Above in the photo is the correct cut box, below is the almost finished base of the sofa.
Folding sofa made of plywood
If the doll often has guests, this sofa will be very useful to her.
- plywood;
- padding polyester;
- furniture nails;
- small awnings;
- jigsaw;
- glue;
- fabric and various decorative elements.
To make such a sofa, you need to understand how folding furniture works.
- Cut out the parts for the future sofa: the back, sides and three bases. One base is a seat, the other two will be folding.
- Connect the folding parts together using canopies. The rest can be fastened with nails.
- Add volume to the sofa using padding polyester. Now you can cover it with fabric and decorate it as you wish.
Sofa made of pressed cardboard
A strict sofa for a business doll.
- pressed cardboard;
- padding polyester;
- artificial leather;
- stationery knife;
- glue "Moment".
This cardboard craft can also be covered with fabric.
- Cut out the base. To make it rigid, you need to glue several layers. The thinner the cardboard, the more layers will be needed.
- Cut out and glue the back and side parts to the base. To give it softness, you need to glue a thin layer of synthetic padding on the inside.
- The next stage of work is wrapping the sofa in leather. The length of the first piece of material: the height of the back + the height of the sofa and plus an allowance of 1 cm on each side. The length of the second segment is the perimeter from the joints of the back with the sides in a circle to the next joint.
- Mark the centers on the sofa and both segments. Lubricate the pieces of leather with glue and, aligning the centers, paste them over the craft (see photo below). Cover the visible cardboard with an additional strip of leather.
- For pillows, cut out 6 rectangles from cardboard. The length of each of them is equal to one third of the length of the seat. The width of the rectangles is equal to the depth of the sofa.
- Glue pieces of padding polyester to future pillows, and then wrap them in leather, as in the photo. Lay them on the back and seat.
- If desired, you can make small pillows for the armrests.
At the top is the base of the sofa, at the bottom is the making of the pillow.
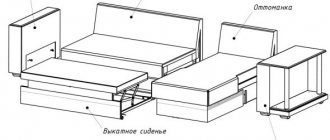
Matchbox sofa
Girls often make furniture from matchboxes for their dolls. The easiest way is to make a sideboard with doors and shelves out of them, but with some effort, you can also make a cozy sofa.
- 4 matchboxes;
- thick cardboard;
- scissors;
- glue;
- 2 beads;
- colored or wrapping paper.
Furniture made from boxes is only suitable for small dolls.
- Cover two solid boxes with colored paper - these will be the armrests. Glue the other two together with the sides and glue only on top, without touching the retractable parts.
- Glue the armrests to the base of the boxes. Glue beads to the retractable parts to create drawers with handles.
- Cut out the back of any shape from cardboard. Cover it with paper and attach it to the base.
- If desired, decorate the finished craft with appliqués. You can draw patterns with paints, imitating embroidery.
More complex products
A more complex model to manufacture is transformable furniture, namely a sofa bed for dolls. The instructions for the work are more complex, and the material used is completely different. This is necessary so that during the transformation process the product simply does not break.
Making a sofa from plywood
This sofa will become a real work of art. An analogue can be made from dishwashing sponges. Mom herself will make it. The main thing is to think about the method of transformation. It can be seen in models of real sofas.
You can also make other furniture elements to go with the sofa: poufs, armchairs. The principle of assembly and operation is the same as the main product. You can decorate an entire room for your baby doll.
How long have you played with dolls? All girls like doll furniture, for example. Doll furniture is expensive these days, so we offer you an original version of the craft that will delight your child. You can make such a gift for your daughter for Christmas, March 8th. Just look at this handmade miracle. This is exactly what we will do today.
To work we will need:
- A piece of leatherette
- Foam sponges (3 pieces)
- Glue "Moment"
- Satin ribbons in two width sizes
- Glass beads
- Threads for knitting
- Toothpicks
- Cardboard, colored paper or a piece of beautiful wallpaper
I would like to say that the work will consist more of gluing and not sewing, so it is not difficult at all. It is better to use Moment glue, because it glues quickly and remains invisible after drying. Select the colors of the pallet, ribbons, beads, and threads in advance.
You can see that the lower part of the sofa is made like a box decorated with beads with intertwined threads, which looks exquisite. So, let's start working from the bottom of the object. Let's take two identical pieces of thicker cardboard (from a cardboard box), the size should be equal to the size of the saddle (sponge) that you will use in your work. I have it measuring 15 x 10. Therefore, we cut the cardboard to this size. We glue two pieces of cardboard together, covering the edges of our pallet with beautiful paper or the remains of non-woven wallpaper.
Next, take a needle, make through holes at the same distance, then insert toothpicks there, having previously measured the desired length. I got 10 toothpicks on the front and back of the sofa, and 7 on the sides. You should end up with a structure like this.
Now the fun part begins - decorating the elegant weave of threads with beads at the bottom of the sofa. Here you can show your imagination. I had the idea to take the shiny blue threads and weave them between toothpicks, like weaving a basket. Then string beads (blue + yellow) onto four toothpicks in front. Now that the bottom is complete, you need to take another sheet of cardboard, also cover it with paper around the edges and carefully glue it to our pallet on top. It should look something like this. Beautiful, isn't it?
Sofa back
Let's start with the back of the sofa. Measure the height of the backrest, correlating it with the height of the seat. I glued two sponges together. Since I wanted to add volume to the top of the back of the sofa, I simply folded the upper part of the back down and glued it together.
Then I cut out the necessary strip for the back. Next, I used a ribbon to decorate the edges of the leatherette strip, gluing it on both sides. I glued the front part. Now pay attention, do not glue the back part yet, in order to sew the beads onto the top of the back and hide the seams under the leatherette. To do this you will need three small flat buttons or just cardboard circles. We sew the beads in front onto the back of the sofa, and secure them at the back with buttons in a tight fit. This is how it will visually look.
After this, we glue the back of the strip of leather to our back.
Well, now it’s time to tackle the seat of the sofa. Take an ordinary sponge, cut out a strip of leatherette of the required length to cover the seat with it. As in the case of the back, we frame the skin with a beautiful satin ribbon on both sides. We also sew on two beautiful beads or, like mine, glass flat buttons, fixing them at the bottom of the seat in tension with circles of cardboard. We glue strips of artificial leather to the seat. We glue together the pallet, the back of the sofa, and the seat. This is what happened.
Ours is almost ready, all that remains is to make the side backs. Again, take a sponge and cut out the backs from it. In the store you can buy a ready-made shaped sponge and cut it in half in the middle so that the back is thinner than the seat. We follow the same principle as before, cut out leather parts for the back, and glue satin ribbons to the sides, first wide, then narrow on top. We glue the details of the side backs to the sofa and admire our creation.
However, that's not all. After all, we still have visible sharp edges of the toothpicks in front of the sofa. To correct this defect, you can smear the toothpicks with glue, then put beautiful beads on them. And glue a piece of beautiful cardboard down the sofa, covering the remaining toothpicks, while simultaneously leveling the inside of the sofa. Like this. Well, that's all, give your gift to the child, he will be very happy!
More crafts
Nowadays you can buy almost everything in the store, even furniture for toy dolls. But it is worth noting that this approach is quite monotonous, but a do-it-yourself sofa for dolls is an original approach and individual execution.
In this case, your imagination is absolutely unlimited; you can do absolutely anything you want.
It is worth noting that there is a great variety of material for a doll sofa, and you don’t even have to buy most of it. You can even make a folding version that will double surprise your child. In addition, you can do this handicraft directly with him, because it perfectly develops fine motor skills and allows you to spend useful time with your child.
If you don’t know how to make a sofa for dolls, then use regular matchboxes. They have an amazingly comfortable shape, from which you can put together almost any model of room furniture. The finished sofa can be painted or covered with fabric, and it will look great. For this type, ten boxes will be enough, but you can of course make more massive furniture.
Making a sofa with your own hands is very simple. The process begins with the formation of the seat. Apply glue to the edges of the boxes and glue them together. After that we do the back. You shouldn’t make it very high, the box is still made of paper and may not withstand mechanical damage, without which no children’s game is complete. Next, the sofa for the dollhouse needs to be decorated, or better yet, covered with a beautiful fabric. Here everything depends on the imagination of the creator: bows, ruffles and other decorations will look very impressive on children's furniture.
LiveInternetLiveInternet
In this master class I will show you how to make a miniature sofa for a dollhouse or a nice accessory for photo shoots. Size: length 19 cm, height 9.5 cm, width 12 cm.
The proportions are taken from “human” sizes and reduced by 12 times. You can increase or decrease the size, but do not forget to change the thickness of the foam. For this sofa, I used 1 cm thick foam rubber. Foam rubber can be replaced with padding polyester, folded in 4-5 layers (in this case, the armrest needs to be cut in one piece). This sofa will have a more rounded shape.
To create a sofa we will need: micro-corrugated cardboard, foam rubber, padding polyester, cotton fabric, PVA glue, Crystal Moment glue, cotton lace, needles, threads, toothpick, paper tape, scissors, breadboard knife, cutting mat, ruler, pencil , dull creasing knife, buttons.
Crystal Moment glue can be replaced with another universal glue for various types of surfaces, including plastics. You will also need a scoring knife - any dull knife with a rounded end. Fabric consumption - a cut of 45*50 cm or two smaller cuts from companion fabrics.
We transfer the drawing to a sheet of micro-corrugated cardboard; it is more convenient to start by constructing a grid (red lines in the drawing). Solid black lines are cutting lines, dotted lines are creasing lines (folds). Creasing is a pre-pressed line on a product blank made of hard, thick paper or cardboard; it is done so that the fold is even, without creases. We will score with a dull knife.
Before cutting the cardboard, I pre-cut foam rubber and padding polyester.
Foam parts:
2 pcs. 4.5*8.5 cm - outer sides of the armrest; 2 pcs. 2*8.5 cm - top of armrests; 2 pcs. 1.5*8.5 cm - inner sides of the armrests; 1 PC. 16*9 - back part of the back; 1 PC. 7.5*13 - seat; 1 PC. 5.5*15 - front part of the backrest.
Details from padding polyester:
2 pcs. 12*10.5 - armrests; 1 PC. 18*11 - back of the sofa; 1 PC. 9.5*15 - seat; 1 PC. 7.5*15 - front part of the back of the sofa; 1 PC. 3*15 cm - side from floor to seat.
Cut out the template using a template knife and a ruler.
Use a creasing knife to follow the fold lines.
Using scissors, we cut out smooth lines—the curve of the back.
We fold our future sofa along the creasing (fold) lines.
At the base, we turn the back and seat inward, place it on the fabric, first leaving allowances for the hem, and trace along the contour. Draw a cutting line on the fabric. Cut out the part.
We glue the flap of the armrests and the bottom of the sofa with PVA glue.
Turn it over, spread PVA on the bottom, let the glue soak in a little (about a minute) so that there are no glue stains left on the fabric.
We apply it to the fabric, aligning it with the pencil markings.
We fix it.
We glue the foam rubber parts for the outer wall of the armrest using Crystal Moment glue.
We glue the tops of the armrests from foam rubber (we glue foam rubber onto “Crystal”, “PVA” does not “take” it).
From the back side we make cuts on the fabric.
We take our favorite “PVA” and glue the fabric allowance to the back.
Now we will glue the part for the padding polyester armrest (also on “Crystal Moment”). It is convenient to fasten the back flaps with a paper clip so that they do not interfere.
Let's do the same with the second part. You can secure the glued part with pins and let the glue harden for a few minutes.
Next, we pin the fabric onto the armrest, make a fold of the fabric at the bottom and secure it with PVA.
Glue the side allowance of the fabric to the cardboard base. We repeat all the same operations with the second armrest.
“From the heart” we spread “PVA” onto the base of the armrest from the inside.
And we glue the large flaps, connecting the back with the armrests.
We fold the fabric allowance on the front side of the armrest and glue it to the base.
Now we cut out two strips of cardboard about 2 cm wide and a length equal to the length of the armrest x 2 (I had such strips left after cutting out the base), fold the strips so that one part is several cm longer than the other, and glue them at the bottom of the armrest base from the inside sides.
We try on the remaining foam piece for the inner side of the armrest.
We cover our almost finished armrest with fabric and secure it with pins.
Fold the fabric allowances on both sides and secure with a drop of glue.
At the bottom we glue the fabric to the base.
Apply a little glue to the junction of the armrest and the base of the backrest and fix it.
Now we coat the auxiliary strip of cardboard well with “Moment” and glue it to the armrest.
Well, the hardest part is over. Let's start decorating the seat.
We glue the sides of the seat rise with PVA, after placing a piece of padding polyester between the fabric and cardboard.
Next, we make cuts and glue the fabric allowances inside.
Using a toothpick and a drop of PVA, we form beautiful corners at the bottom of the armrest.
Use PVA glue to lubricate the back side of the seat and the flap for gluing.
Fix and glue the remaining fabric allowance.
We take a cardboard piece in front of the seat and mark the cut lines with a pencil - remove the corners.
We adjust the parts made of foam rubber and padding polyester to the size of the cardboard blanks (parts made of padding polyester have 1 cm allowances on each side).
We cut out the parts from the fabric, taking into account hem allowances of 2-2.5 cm on each side (from the cardboard base).
Glue the fabric allowances inside.
I wanted to give some relief to the front of the back. We mark the places where the buttons are attached, take thicker threads (I use cotton for knitting) and use paper tape to secure the end of the thread to the cardboard.
We sew the buttons to the front part of the back and secure the thread with tape. This is what happens from the inside out.
And this is the front view.
We take “PVA”, glue the front part of the back, the seat and the back part of the back into the base of our sofa.
Almost done! The finishing touches remain
For reliability of the design, we sew the back part to the base at the bottom...
... and to the front of the back from above.
We decorate with lace, measure out the required piece of lace + allowances of 1-1.5 cm on each side. We apply “PVA” to the junction of the two back parts (the main thing is not to overdo it with glue, it should not be visible on the finished sofa).
We apply a piece of lace, fix it, hide the ends (use a toothpick to apply a drop of glue between the armrest and the seat, tuck the tip).
Glue the lace under the seat in the same way.
We stitch the armrest.
It is necessary to design the side part of the armrest.
We cut out small circles (about 1.5 cm in diameter) from thick felt or cardboard and padding polyester and circles from fabric with an allowance of 1 cm.
We cover the base with fabric.
We sew the resulting parts to the ends of the armrests.
Making the legs of the sofa. I had these acrylic circles, but you can make them from anything: tube caps, cardboard glued in several layers, wooden beads, etc. I glued the acrylic blanks with Moment onto a strip of felt, then cut them out. Such pads are needed to prevent scratching sound from the legs on the surface on which the sofa will stand.
Use a ruler to mark where the legs will be glued, and glue the legs with Moment glue.
That's it, the sofa is ready! We admire the result and call the dolls.
Author of the master class: Elena Serdyukova
Cardboard sofa
A sofa for dolls made of cardboard is an opportunity to make furniture that is very similar to the real thing. If you don’t know how to make a beautiful sofa for dolls, then you should use a small instruction that will help you cope with the task. To work you will need:
- thick and thin cardboard;
- paper;
- textile;
- threads with a needle;
- scissors;
- glue;
- scotch.
You shouldn’t think about how to make a fashionable sofa for a doll, you need to act immediately. Even a beginner can easily cope with this task. As everyone already knows, you can make many things from cardboard with your own hands, and even children’s furniture for toys is not at all difficult, and in some places even exciting. It is worth noting that this activity can be an excellent hobby, as it is very exciting while creating furniture.
First you need to cut out the seat for the sofa. It should not be too large, otherwise its fragility will increase. You can make your own Barbie sofa from a single box, using it as a seat if you find the right size. Then we make the back. We cut out the base from thick cardboard and glue it to the base. Since it is not particularly durable, it should be secured on the inside with foam rubber. This will not only add volume to the structure made, but will also bring the model closer to the real one in appearance.
Scheme of a doll sofa Stages of creating a sofa
Armrests can also be made from sponges, and then carefully pulled together with threads, making a decor from relief. It’s not difficult to make a sofa out of paper, and if you take this issue seriously, the original version can surprise many. After the structure has dried, you need to carefully cover it with fabric. This can be done even with glue; in this case there is no fundamental difference. Then you can completely surrender to your imagination. For Monster High dolls, you can make furniture in a Gothic style, for regular Barbies - in pink tones, and so on. In this case, there is only one limitation: do not attach objects that can enter the child’s respiratory tract and do not use elements that are toxic for decoration.
If you don’t know how to make an original sofa for a doll at home, then use our tips. In general, you should not limit yourself; in the same way you can make a bed, chair, wardrobe and many other original furniture for a child. Remember that you can make a lot of things from cardboard yourself, the main thing is to use your imagination. Moreover, your child will be pleasantly surprised to see a unique thing for games, and will be proud of you and follow an example.
(1
ratings, average:
4.00
out of 5)
Probably every girl has a dream - to create a real house for her doll with doll furniture, dishes and other little things. In children's stores you can find many options for ready-made doll furniture. But not all parents can afford to buy such nice little things for their child. But it’s fashionable to make a sofa, and other interior items for a dollhouse with your own hands. This process will be especially exciting for a child.
Matchbox sofa
If you don’t know how to make a sofa for dolls, then use regular matchboxes. They have an amazingly comfortable shape, from which you can put together almost any model of room furniture. The finished sofa can be painted or covered with fabric, and it will look great. For this type, ten boxes will be enough, but you can of course make more massive furniture.
Making a sofa with your own hands is very simple. The process begins with the formation of the seat. Apply glue to the edges of the boxes and glue them together. After that we do the back. You shouldn’t make it very high, the box is still made of paper and may not withstand mechanical damage, without which no children’s game is complete. Next, the sofa for the dollhouse needs to be decorated, or better yet, covered with a beautiful fabric. Here everything depends on the imagination of the creator: bows, ruffles and other decorations will look very impressive on children's furniture.
How to make a sofa for dolls with your own hands
For making doll furniture such as a sofa, improvised materials such as cardboard, colored or corrugated paper, an old box of small household appliances, shoes or juices are quite suitable. To make upholstery for a sofa, you can use available soft materials - foam rubber, cotton wool, padding polyester, or just a piece of soft, no longer needed fabric (fleece, flannel), folded in several layers. It’s quite easy to find step-by-step photos on the Internet that clearly describe the entire process of making a sofa for a doll.
- If the sofa is made from a shoebox (for large pieces), then in this case it will be necessary to cut off one of the long sides with scissors. The result will serve as the basis for the future sofa.
- Now you will need to do the upholstery of the sofa. To do this, you can use new viscose napkins in bright colors, pieces of fabric, or you can use fragments cut from an old sweater. The upholstery fabric will need to be wrapped around the base (back and base) and then sewn together to form a cover. If paper napkins are used as furniture upholstery for the doll, then in this case they must be glued to the base. Then you need to cover the sides of the doll sofa in the same way.
- You should put a little foam rubber or cotton wool under the upholstery in the backrest. To prevent the soft part from sliding off the back, it will have to be secured with staples using a stapler.
- Now we need to take the basic measurements of the base of the sofa (our base remains rigid, although it is covered with fabric), in order to make a soft sofa cushion. A rectangle is cut out according to the given dimensions, stitched on both sides, stuffed with foam rubber and sewn up. The finished sofa cushion is placed on the sofa. That's all. You can invite dolls to visit.
You can get a little more creative and sew additional accessories for the sofa, such as small sofa cushions in a contrasting color. After all, the beauty of creating a sofa with your own hands is that you can come up with even the smallest details and embody the most unique ideas. For example, you can try to make a folding or extendable sofa from cardboard.
Sofa for dolls made of cardboard
To work you will need very simple tools and a little material:
- a hard cardboard box (for example, oatmeal);
- napkins made of viscose in two different colors;
- PVA glue;
- pencil, regular and stationery scissors, ruler.
- Cut the box lengthwise with a utility knife, taking into account the height of the seat. It should be just below the doll's knees. For regular Monster High dolls, this height is approximately 3 cm. Thus, cut one part of the box at a height of 3 cm (width and length will depend on the box), the second part - 8 cm.
- From the second part of the box, use regular scissors to cut out the armrests and back of the sofa.
- Lay the box pieces on top of each other to ensure they are compatible and the correct size, then glue them together.
- After the glue has completely dried, cut out a rectangle from a viscose napkin with a width equal to the length of the sofa and a height that will completely cover its front surface. Glue the cut out part of the napkin to the sofa.
- In the same way, cover the back of the sofa, and then the armrests on both sides.
- Trim the parts of the napkin that extend beyond the contours of the sofa.
SEE: How to make a table and chairs for dolls
To make the seat soft, you can cover it with several more layers of napkins or other soft material. The decoration for the sofa will be original sewn pillows and various small accessories.
How to make a cardboard sofa for a Barbie doll
Such a popular doll as Barbie deserves a sofa with a special bright design. If the basis for the doll furniture will be a box, then in this case you should give preference to juice containers. But the ideal option for making a sofa for such an elegant doll would be cardboard. This is a fairly thick paper, the main advantage of which is its ability to hold its shape very well. Cardboard is well suited for making a doll sofa with your own hands, from which boxes for household appliances (TV, vacuum cleaner, etc.) are made.
You can make a sofa of any size and design from cardboard. You can look for ideas for inspiration in the photo. To make a regular sofa-sofa (not a folding one), you need to cut out a 30x40 cm rectangle from cardboard (provided that the height of the finished sofa with the backrest will be 17 cm). You will also need to cut out two side parts (height 17 cm, width of the sofa 11 cm, and seat height 7.5 cm). When cutting out the parts of the sofa, you should pay attention to the fact that cardboard bends much easier, so you will have to bend the main part along its length.
Now you will need to bend the main part in accordance with the shape of the side part and glue the parts with glue. Since cardboard paper does not adhere well, you can fix the parts in the desired position using masking tape. It must be admitted that this model of sofa turns out to be particularly stable. And if you show your imagination, then based on this model you can make an extendable doll sofa with your own hands.
The next step is making the upholstery. For the Barbie sofa, you should choose pink fabric. On the main canvas, the details of the side parts and the main part are cut out (you can use the patterns that were used to cut the sofa itself, just add seam allowances of 2 cm on each side). It is also worthwhile to mark the places where the fabric is folded with notches on the details of the upholstery cut. Now you need to pin the parts together along the seam and try the cover on the frame of the sofa. If the result is satisfactory, then in this case the cut details are sewn on a sewing machine or stitched by hand. The bottom of the upholstery cover is folded and decorative stitching is performed. The cover fits on the sofa. All. The product is ready.
How to make a sofa for Monster High dolls
Recently, Monster High dolls have become especially popular among girls. For these toys, you can also make a sofa with your own hands from scrap materials. This can be a folding sofa or a sofa that cannot be transformed. Either a box or a sheet of cardboard can be used as a base. You can learn how to make a folding sofa for dolls from the video.
However, before you make a sofa for a Monster High doll, you should decide on its future design. In this case, the upholstery should be made in characteristic colors - a combination of black, crimson, yellow, silver shades. The sofa can be folding, or with a curved back, and even complemented by an ottoman. The main thing is that its design matches the style of a particular Monster High doll.
There are many thematic videos on the Internet on how to make a sofa for Monster High dolls in accordance with the style of each of the heroines. After all, unlike girls, parents are often not delighted with this doll.
Making a sofa for your daughter’s favorite doll is not just another reason to please the girl, but an opportunity to spend more time with the child, get to know his interests, and do something special together. Only in this case, a homemade sofa for a doll will become a real decoration of the dollhouse.
How to make a bedroom for dolls?
In a bedroom, even a doll's room, there is more than one sofa. There is a table, cabinets, and even a dressing table. And all this can be done from what lies in the apartment without any use and is even thrown away:
- A cabinet with drawers is made from matchboxes stacked on top of each other and glued together.
As you can see, there are a lot of ideas. Therefore, all you have to do is choose the one that is more interesting for yourself and put it into practice. And as soon as your child gets tired of the interior of the doll house, you will already know other options to change it in a matter of days.
Every girl has a dream - a dollhouse with all the accompanying furniture. Today, you can purchase one, as well as individual interior items for a small house for a doll, in any children's store. However, parents do not always have such an opportunity. But you can make interior items with your own hands, using completely ordinary available materials. In this article we will talk about how to make a toy sofa together with your child.
DIY sofa for dolls
The principle of making toy sofas is simple. It does not require any special skills. In the master classes we will offer two options for sofas for dolls. Both options can be improved and modified according to your own taste and discretion. So, by changing their base, you can play with shape and size. Cardboard boxes from shoes, toys or equipment, or washed and dried juice boxes, can be used as a base. To upholster a toy sofa, you can also use different materials: cotton wool, foam rubber, synthetic padding, plastic film with bubbles, or simply soft fabric folded several times. Upholstery fabric can be different: from a ripped bathrobe to material for upholstering real furniture. This fabric is secured in several ways: they sew the sofa cover by hand or sew it on a machine using patterns they have made themselves, or they secure measured pieces of fabric with a regular paper stapler.
Children's toy sofa
To make a toy sofa we will need:
- cardboard shoe box;
- foam;
- textile;
- stapler;
- threads;
- needle.
- Cut off one of the long sides from the cardboard box. This will be the base of our sofa.
- We try on the lining fabric, wrapping a strip of it around the “back” and bottom of the box. We cut off the excess and sew the fabric together, making it a cover. We do the same with the fabric for the sides of the sofa.
- We put the central and side covers on the corresponding sides of the box. We stuff the back of the sofa with foam rubber and then, bending the fabric, secure it with staples using a stapler.
- We measure the dimensions of the base of the resulting sofa, add the desired height and measure the required size of fabric for sewing the sofa cushion.
- We stuff the sofa cushion with foam rubber, sew it together and place it in the base of the box. Our toy sofa is ready! If desired, you can sew several small pillows for decoration.