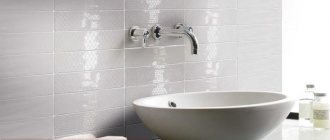
Using a special calculator, you can calculate the exact amount of tile adhesive for tiling a room
Most often, without hesitation, you buy the amount of glue that the seller names. What to do if there are doubts that 25 bags of glue of 5 kg each are a little more than required, or the words of a worker performing construction work for a client lead to doubts. Read on in the article to learn how to independently calculate the required amount of glue and not be deceived.
What affects the consumption of tile adhesive
Most often, all important decisions regarding the purchase of building materials are made directly in the store, under the influence of staff, or with the help of people who perform construction work. But what if the repairs are done on your own? Calculating in advance all the costs for all the work is a complete utopia, but separately calculating the laying of tiles and its cost is a doable task.
To begin with, it is important to remember that tile adhesive has its own unit of measurement - kilograms (kg). And the required quantity will be equal to the product of its cost per square meter (1m2) and the total installation footage. Knowing the area of the wall on which the tiles are laid, you only need to calculate the thickness of the required glue and then obtain the desired value for the required amount of glue.
Tile adhesives come in different types: cement-based, epoxy or polyurethane.
Adhesive consumption is affected by both the size of the tile surface and the tile material.
If glue containing cement is quite simple to use: 3 kg per 1 m2 of ceramic tiles, then epoxy or polyurethane ones will force you to tinker with their own characteristics. Epoxy is mixed from 2 components, and polyurethane has a fairly elastic consistency. In addition to the main elements, tile adhesive has various additives in its composition. This can improve its certain qualities when exposed to various influences, as well as change its consumption. When choosing glue, you need to carefully study the market and manufacturers.
Flow rate dependence:
- Tile surface size. If it is large, then much more glue will be wasted. Accordingly, the thickness will absorb more glue than with a standard tile size. For example, if the side of the tile is approximately 25 cm, then the thickness of the glue to hold the tile is 2-3 mm. If the surface is even larger, then the thickness must be increased.
- Tile material. Tile material has a porous surface that quickly absorbs glue. Porcelain stoneware, on the contrary, has a weak attraction to glue and does not absorb it so much.
- Surface evenness. A thinner layer of glue is needed on the flat side than on the corrugated side.
- Foundation quality.
Laying the tiles on a flat surface will help avoid uneven waste of glue, unless the glue contains particles that help level the surface. The waste of glue even depends on the skill of the installer and qualifications. If a newcomer is busy with the business, then the norm will be violated, because most of it will go to waste.
How to calculate it yourself
A calculator is a handy thing, but if you doubt the accuracy of the data provided, perform the calculations yourself. To do this, first of all you will need to determine the thickness of the adhesive layer. It varies depending on the size of the tile itself:
- small tiles, mosaic – 2-3 mm;
- average element size – 3-5 mm;
- large tiles - 6-9 mm.
If we are talking about porcelain stoneware, the layer thickness will increase to 17-20 mm, because the material is heavy and must be securely fixed.
Important! There is no need to exceed the optimal layer thickness, otherwise it will take a long time to dry. Standard indicators should be adhered to.
When making calculations, it is necessary to take into account the features of the surface itself. For example, if we are talking about finishing the floor with standard ceramic tiles, the thickness of the pillow will depend on the presence of unevenness on the base:
- flat surface – 4 mm;
- floor with minor defects – 7-9 mm;
- base with noticeable level differences - up to 20 mm.
Attention! In case of significant unevenness, the highest point should be taken as the level. So all the depressions will be filled with a special composition. If the base has large depressions, a leveling screed must first be made.
Now we begin to determine the optimal consumption of tile adhesive per 1 m2. Initially, you need to study the product packaging, finding here the standard recommendations from the manufacturer. They are indicated taking into account a layer thickness of 1 mm, as well as a flat surface. Now determine the height of the adhesive pad for your case, multiply it by the basic indicators taken from the packaging. You have received the average consumption rate of tile adhesive per 1m2. Multiply this figure by the number of squares to be finished. Be careful! Add another 10% to the existing figure to eliminate the possibility of shortages due to minor costs and unforeseen circumstances.
Approximate calculation of tile adhesive per 1m2
There are different ways to calculate the required amount of glue, without the help of sellers and construction workers. There is a special calculator from manufacturers of adhesive materials. It helps you, without difficulty, make the necessary calculations yourself, knowing the perimeter of the room, the type of tile and choosing the right brand of adhesive base (table to help).
The easiest way is when the exact brand of glue has already been chosen; work with it has been done many times, for example, the fairly well-known brands Unis 2000, Plitonit or Ceresit 3000. To more accurately calculate how much glue is needed per 1 m2, it is worth going to the resources of these brands and online Enter the tile parameters into the calculator, and of course choose the brand of the adhesive composition itself. The resulting result can be increased 10 times if instead of 1m2 10m2 are used.
You can calculate the amount of tile adhesive yourself or using a special program.
If you have no preferences in glue brands, but are wondering how much the repair will cost, then you can roughly calculate each option:
- For example, glue containing cement;
- Approximate dimensions of the tiles are 30x30 cm;
- If the layer is 2.8 mm, the glue consumption will be 5 kg per 1 m2;
- If 10 m are to be covered with tiles, then: 10x5 = 50 kg of tile adhesive.
The method used by specialists who sell tiles is in this case they add (thickness x 0.5) the average value of glue consumption per 1 mm of the brand chosen by the buyer. Information on well-known brands, such as Ceresit or Polytonit, can be found in the public domain.
If the tile has a porcelain stoneware component or is made of plitonite, then when calculating the installation, take into account its average size: it is 10 mm thick.
But based on this calculation, it is impossible to say the exact cost. It is necessary to recalculate again with more accurate data. It is always worth remembering that manufacturers keep all available and necessary information in the public domain. You can easily ask, for example, representatives of the Ceresit or Polytonit brands.
Choosing glue
To choose the right dry mixture from Eunice, carefully read the comparison table, which presents the entire range of products of this company:
- Yunis XXI tile adhesive has two release options - exclusively for internal work (place of production in Moscow), and internal and external work (place of production in Chelyabinsk and Ulyanovsk).
- Prices are as of 2020.
READ MORE: Halogen lamps for home g9, camelion, osram
Eunice Plus
The main distinguishing feature of Eunice Plus glue is its versatility. You can lay tiles, mosaics, stones, and porcelain tiles on it. Another significant advantage of this material is strength. Adhesion of ceramic tiles and porcelain stoneware is 1.25 MPa, can withstand a maximum weight of 100 kg/m2. You can carry out both internal and external work, except for cladding the basement floors.
Unis 2000
Using Unis 2000 tile adhesive, they glue wall and floor ceramic tiles and porcelain tiles measuring 60*60, and perform interior and exterior work. Can be used as a leveling layer that perfectly fills unevenness on the base during the laying process. Suitable for durable concrete, gypsum, cement and brick substrates.
In terms of safety, it is completely analogous to the previous composition.
Eunice XXI
Yunis XXI tile adhesive is used to perform standard interior and exterior work - tiling floors and walls with regular tiles. It is used in rooms with high humidity and the likelihood of freezing in winter. Suitable for laying small porcelain tiles - within 30cm and exclusively on floors.
- Maximum loads in subzero temperatures are possible only after 28 days, and then only if during this period there was no systematic contact with water.
- UNIS XXI tile adhesive has two release options - exclusively for internal work (place of production in Moscow), and internal and external work (place of production in Chelyabinsk and Ulyanovsk). If internal work is carried out, then the layer should be a maximum of 10mm, if external - 15mm. The adhesion level is 0.5 and 0.7 MPa, respectively.
Eunice HiTech
The main purpose of the HiTech mixture is to work with complex bases: ceilings, walls, floors. Laying can be done not only from the floor, but also from the ceiling. It has a fairly long solution life. Can be used in children's and medical institutions. One bag weighing 25 kg is used for 7 m2 of cladding.
Eunice Granite
Using Eunice Granite tile adhesive, large and heavy floor slabs made of natural stone and porcelain stoneware are laid. Floors, walls, facades, plinths are covered. Can be laid on top of old tiles and underfloor heating systems. The glue has a fairly thick consistency, so it does not slip during the hardening period. Can be used in children's institutions.
Yunis Granite is distinguished by increased adhesion strength - 1.5 MPa. If we compare with the same indicator from other manufacturers, we see that Hercules Elastic GM-195 has exactly the same, and Ceresit SM 17 has only 1.3 MPa.
Eunice Belfix
The Eunice Belfix mixture is available in a non-standard white color, because it is used for laying marble, glass mosaics, and natural stone, for which the usual cement mixture is strictly contraindicated. It is characterized by increased elasticity and frost resistance. Place of application: walls, floors, liquid tanks, rooms with high humidity, outdoors, heated floors. Can be used as grout. The cost is higher than other types of adhesives - for a 25 kg bag you need to pay 418 rubles.
Unis Fix
Relatively inexpensive, but not the most reliable glue. It has a fairly high consumption and does not appear on sale often. It is used for tiling work on walls and floors in the bathroom, kitchen, terrace, and balcony. Works with regular tiles.
Eunice Pool
Places where Eunice Pool glue is used are wet rooms, water tanks. Laying materials: mosaic, ceramic and stone tiles. You can perform external and internal work, complex foundations, lay on top of old cladding and heated floors.
How to calculate tile adhesive with a calculator
There is no need to go to the store for advice from the seller if the question arises about the consumption of glue for tiling work. It is enough to check all the available information by looking at reviews for various brands, which type of tile “eats” the most amount of glue, figure out why and then choose. There are many different online calculators, using which you can get the answer.
When calculating the amount of tile adhesive, special attention should be paid to its quality, brand and manufacturer
Data entered into online calculators:
- You choose what brand of glue and what it will be used for. For example, to cover a tiled floor with tiles or a certain mosaic.
- The surface area is determined. This number can be obtained by multiplying the length by the width.
- The thickness of the layer is selected; if a beginner is doing the work, then it is worth taking the thickness with a margin.
The result of such calculations will be not only the required amount of glue, but also the recommendation of the brand and how many bags.
What is the glue consumption per 1m2 for porcelain tiles?
The consumption of the ceramic or porcelain tile composition will depend on the maximum length of the sides of the tile and the size of the spatula teeth with which this glue will be distributed over the surface of the tile.
Many experts note that glue consumption may increase with increasing adhesive coating
Consumption of Ceresit brand glue:
- For Ceresit CM9 brand adhesive, for tiles with a maximum side length of 10 cm and with a spatula whose teeth have a size of 4 mm, the consumption per 1 m2 will be 2 kg. 15 cm – 5.8 mm – 3 kg, 30 cm – 9 mm – 4.3 kg.
- For tiles and porcelain stoneware: 5 cm – 2.8 mm – 1.8 kg, 10 cm – 4 mm – 2.2 kg, 25 cm – 8 mm – 3.6 kg.
- And for large tiles or porcelain stoneware: 30 cm – 9.8 mm – 4.2 kg, 60 cm – 13 mm – 6 kg.
As the adhesive coating and tiles increase, the adhesive consumption also increases. More experienced craftsmen know how to correctly distribute the glue over the tiles, holding their hand with the tool at a certain angle. This experience allows you to apply the glue evenly in a small layer.
Features and scope
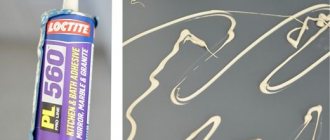
The glue is diluted according to the instructions indicated by the manufacturer on the back of the package. It must be diluted before the actual start of the work process. If the proportions specified by the seller are observed, the master produces a paste-like mass of uniform consistency. After the initial stirring, the solution is left and stirred again after 5–7 minutes.
Then they begin the main process. The glue is scooped up with a trowel and distributed over a small area of the wall (about 2-4 small tiles). Afterwards, a notched spatula is passed over it, removing excess mass. Next, take the die and spread glue on its back surface. The excess is again removed with a notched spatula.
Then the die is pressed to the base and slightly moved back and forth, after which it is installed in its place. Shifting will also allow you to get rid of excess voids. After installing the first element in place, take the second and install it next to the first in exactly the same way. However, here it is already necessary to maintain equal voids between the elements, since different distances between the parts will make the finished appearance of the cladding sloppy.
The size of the seams depends on the size of the element. Usually, the larger it is, the larger the gaps can be, however, craftsmen do not recommend making too wide seams in the finishing, since the seams themselves are a sore spot in the finished tile covering. Distances that are too narrow will result in imperfect geometry.
In order not to suffer with every distance and crosshairs, it is better to use special crosses. This will allow you to control the distance between the tiles and see when it is insufficient (the crosses should not fall out, they should be pressed well with the tiles). Upon completion of work, you must immediately wash the equipment.
After the mortar under the tiles has dried, remove all the crosses that were used during installation. Then take the grout mixture , dilute it as indicated in the instructions (usually add water too) to the consistency of sour cream. After it, all the voids between the finishing elements are filled, and then the entire surface is wiped with a dry sponge, removing excess mixture.
Standard requirements when performing facing work are temperature 5 - 30 degrees, air humidity up to 75%.
Before you begin the main work, you need to prepare the foundation:
- Completely get rid of the old finishing - tiles, plaster, screed.
- Make the base perfectly level. The maximum acceptable height difference is 1mm per 1m. To seal cracks larger than 10 mm, we use Eunice “Silin”, Eunice “Teplon” or Eunice “Standard” plaster.
- If the installation will be carried out on top of old tiles, then for better adhesion, notches should be made on it at intervals of 5 cm, adhering to a checkerboard pattern.
- The surface must be completely dry and free of grease.
- If the room is damp, then coating waterproofing is done over the entire surface using Eunice Hydroplast.
- To improve adhesion, treatment with Eunice primer is needed, which is done once, maximum twice. You need to walk with special care on surfaces made of gas silicate and foam concrete, because... they are highly absorbent.
- There is no need to wet the tiles or surfaces.
If the base is not leveled, the layer of applied mortar will not be uniform, which means shrinkage will occur differently. This threatens peeling or cracks on the surface of the tile.
Mix the solution
- The solution is mixed with a clean tool in a clean container.
- The dry mixture is gradually added to the water, adhering to the proportions specified in the instructions. The solution is mixed until a homogeneous consistency is obtained. This usually takes 3 to 5 minutes.
- After this, the solution should be left alone for about 5 minutes to ripen, and then mixed again.
- Mix the solution manually or with a mixer, turning it on at low speed. It is recommended to knead no more than 1 kg of mixture by hand.
- The sales time for the finished solution is 3 hours, if you use the HiTech mixture, then 5 hours. If the mixture thickens during the working period, it can simply be stirred without adding water.
- Ideally, maintain all proportions so as not to degrade the quality of the finished mixture.
READ MORE: Polyurethane foam Tytan 65: advantages and scope of application
Apply glue
The finished surface is covered with a layer of glue, 3 to 15 mm thick, after which it is leveled along the entire length with a comb.
If large tiles or porcelain tiles are used for installation, then the length of the comb teeth is from 8 cm. It is also necessary to monitor the weight of the tiles, which should not exceed the maximum permissible.
The tile must be pressed tightly against the adhesive layer in order to obtain its uniform distribution and avoid the formation of voids. For better installation, the tiles are pressed in by moving back and forth or tapped with a mallet. After the tile has “settled” into place, the adhesive layer should not exceed the maximum value.
The glue needs to cover exactly as much area as can be covered during the time the solution is active - this is usually from 10 to 20 minutes. After this period, adhesion will become significantly worse.
Usually the mixture is applied only to the base, but if external work is being done or marble slabs, large tiles or relief tiles are being laid, then the glue must be applied to the tile itself.
If you need to adjust the tiles, this can be done safely within 10-20 minutes after installation. Check all planes with a level. The uniformity of the seams is obtained using plastic crosses.
After a day, you can move on the tiles and grout using UNIS COLOR colored grout mixtures.
Heated floors can be started no earlier than 28 days after facing work.
For interior work, it is recommended to dry the room thoroughly. You can use a heat gun for this. The optimal temperature for styling is about 20˚C.
It is better to carry out external work in the warm season, at a temperature not lower than 5˚C and humidity not higher than 70%.
The reliability of installation and the service life of the finish depend on the quality of preparation of the base.
- Before installation, dismantle the old coating as much as possible. If it is impossible to completely get rid of the elements, level the plane with the mounting mixture. For greater strength, use metal mesh as a reinforcing component.
- After leveling, dry the surface for 24 hours.
- When working in rooms that are constantly in contact with water, apply a layer of waterproofing material and again leave to dry for at least a day;
- Next, prime the surface, dry it and mark it.
It is recommended to dilute the solution in a tall container or bucket. Do not use flat trays; the solution dries out faster in them.
Pour the dry mixture into a container and add water according to the instructions on the package.
- Use a construction mixer or a drill with a screw attachment to stir the solution for 3–7 minutes.
- Cover with a lid and leave the solution to ripen for 7–10 minutes.
- Stir again, adding a little more water if necessary.
Applying glue
After dilution, the mixture is immediately applied to the prepared surface.
- The composition is first leveled over the entire plane of contact with the finishing elements.
- Then a ribbed structure is created with a notched trowel. The depth of the grooves is calculated based on the size of the tile.
- When laying on a vertical plane, wait 7–10 minutes after applying the mixture. Then the elements are laid sequentially at a distance of 1–5 mm. from each other. To ensure the same distance, use cross-shaped dividers;
- After placing the tile, tap the tile with a rubber hammer to press it evenly into the mortar. The contact area between the installation composition and elements must be at least 60%.
- Remove excess mixture immediately with a rubber spatula and a wet cloth. The optimal installation temperature is 18–22˚С, humidity 60–70%. After finishing work, allow the solution to dry completely for at least a day.
The main components of Yunis adhesives are almost the same. They contain cement, mineral filler and modifying components. Plain or quartz sand, dolomite or gypsum are used as fillers. Special additives give the mixture certain properties, for example, they enhance adhesion, make it more plastic, frost-resistant, waterproof, etc.
The compositions exhibit good adhesive properties in relation to the following materials:
- gypsum;
- concrete, including cellular concrete;
- cement strainer;
- asphalt;
- brickwork;
- plasterboard products;
- slag and aerated concrete.
Eunice produces products for exterior use and interior decoration. The Unis series includes mixtures for heated floors, bases with complex structures, surfaces constantly in contact with water, as well as separately for glass mosaics, porcelain tiles, blocks, natural or artificial stone.
Eunice tile mixture is used in dry and damp rooms. Some types of adhesives can level surfaces with minor defects and differences in height. The use of Eunice moisture-resistant compounds is possible even in places of direct contact with water (baths, saunas, swimming pools, bathrooms).
You can start laying work at an air temperature of 5... 30°C. Humidity indoors or outdoors should not exceed 75%.
Accepted norms for tile adhesive consumption per 1 m2 of tiles
Consumption rates, as noted above, depend on various factors. In addition to skill and skill, there is also the surface itself, which is tiled, be it a floor or a wall. The temperature and its fluctuations also influence the use or purpose of the tile; certain brands of glue are selected that will hold it firmly and reliably on the surface. And taking into account operational and other requirements, glue consumption standards have been developed, which can be found in the instructions for use of this product.
When calculating the amount of tile adhesive, it is additionally necessary to take into account the accepted consumption rates of the adhesive mixture
What information should you pay attention to:
- What raw materials is the glue made from?
- What is diluted with and what is the consistency;
- What solutions for hardening the base are needed to prepare the glue for work;
- What spatula size is recommended by the supplier.
After reading the instructions and deciding on the size of the tile, choosing the right spatula, you can start working. The thickness of the layer applied with a spatula will decrease as experience is gained.
Neat seams and uniform glue consumption only cause a feeling of joy.