Review: Elastic cork sealant Bostik - Goodbye holes, cracks and sills
Hi all!
When laying laminate flooring, everyone encounters holes and cracks - it doesn’t matter whether these are specially left compensation gaps, floor dimensions not provided for standard laminate boards, or the joining of two types of laminate or a laminate-tile pair. The market offers several options for solving this problem, and after trying everything, we gave preference to cork sealant. We chose Bostik 3070, and were overall pleased with this product. So, this sealant (it may also appear on the Internet as “liquid plug” Bostik) is sold in polyethylene tubes - this way you don’t need any additional devices to squeeze it out. The packaging contains information about the areas of application of this cork sealant, and of course they are not limited only to flooring - liquid cork is also suitable for sealing joints of windows, doors and even log houses. Complete hardening time - 12 hours.
The composition is relatively environmentally friendly - cork, rubber, and solvent. The smell is a bit like glue. Moment is in a very weak concentration, so it is quite possible to use this plug in a room with children, the smell is barely audible and disappears instantly.
This cork sealant is produced in Germany; a 500 ml tube costs about 600 rubles
So, cut off the tip of the tube to get to the sealant. It consists of cork chips in a binder.
Sticky, but at the same time elastic and washes off well at the initial stage.
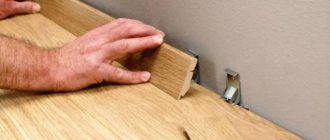
Now I’ll show it in action. So, one of our expansion seams turned out to be almost a finger thick.
I apply Bostik 3070 liquid plug into the seam, level it and compact it with a spatula. The beauty of this material is that after drying it remains elastic and will allow the laminate (or parquet) to expand and contract with changes in humidity. But, unlike acrylic floor sealants, cork sealant will not settle, meaning you won't get any dips when it dries or over time.
And here is the sealed expansion joint. Now there is no room left for dust and dirt, but it will still allow the laminate to walk.
In some places we had seams that were not even covered by the baseboard.
Since such a situation did not arise in visible places, but, for example, behind furniture, I sealed such holes with cork sealant, and then simply painted it - the manufacturer allows this. Of course, if you are sealing such a gap or joint in a visible place, you will have to work hard to match the tone of the floor covering. But I didn’t have such a task.
The same stitch six months later. Nothing has actually changed.
It's time to take stock. I liked Bostik 3070 cork sealant, and I found a number of advantages in it over acrylic sealants for floors. Firstly, it does not sag after complete drying. Secondly, it is easier to lay and the seam looks neat. It can be painted. It remains flexible and allows your floor to expand and contract while keeping the expansion joint protected from dirt and dust; when joining different types of coatings and especially different shapes, it allows you to create a nice joint and avoid installing scary and inconvenient thresholds. It has a fairly environmentally friendly composition. The only drawback I can think of is the price and the fact that when painting, it is quite difficult to match the tone of the floor. But overall, I was very pleased with this material and of course I can recommend it. Thank you for your attention, I hope my review will be useful!
Methods for joining laminate flooring
When laying laminate flooring, there will be seams in any case. After all, according to the instructions, it can be laid in one piece over an area of no more than 10 meters. That is why the best option is to make joints between rooms.
How to cover seams:
- Profiles and thresholds. For joining 2 laminates. Matched to the color of the floor covering. Attached with self-tapping screws or glued;
- Sealants - as an option for filling joints between tiles and laminate;
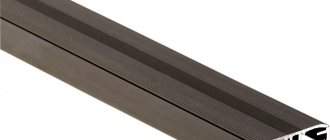
- Cork compensator. A thin strip of cork with a painted or varnished top. Inserted or glued between laminate and tiles.
It is advisable to think over the method of designing joints at the installation stage. This will allow the technician to leave the correct gap between the floor coverings. Each option has its own installation features.
Types of thresholds (profiles) for joining laminate
The connecting threshold does more than just cover the seam. It is important to beautifully design the transition between floor coverings. If materials of different colors are joined, the threshold is selected to match the tone of one of them.
- Metal. There are steel and brass thresholds on the market. However, most often they are made of aluminum, decorated in various ways:
— Laminated aluminum. A thin PVC film with a wood-like texture is tightly glued to the surface of the threshold. It does not tear when sawing, and practically does not scratch. A wide selection of colors allows you to choose a threshold for any laminate;
- Painted. Special powder paints are used that are resistant to abrasion and scratches. Decors are used that resemble the colors of the laminate. The appearance of the threshold is preserved after repeated washing of the floors;
— Anodized aluminum. These are thresholds with shades of gold, silver, copper, bronze and so on. The aluminum profile is placed in a sulfuric acid solution, after which an electric current is connected. As a result, a thin layer of a particularly strong oxide film is formed on the metal surface.
Fastening features: Aluminum products can be easily sawed with a regular metal file. In practice, you can file it and break it neatly. There are 2 mounting methods:
- Open – there are 4-5 through holes in the sill. It is enough to drill the required number of holes in the floor and insert dowels into them. After which the threshold is attached to self-tapping screws. The disadvantage of this method is that the screw heads are visible on the surface.
- Closed - on the back side of the profile there is a groove into which screw heads are inserted. Holes are drilled in the floor, then we put screws and dowels on the threshold. Then we carefully hammer in the threshold. An option for a closed fastening method is gluing the profile to the base of the floor or to the surface of the laminate.
According to the form they are distinguished:
- Straight - to join single-level coverings without differences in height. As an option, laminate and laminate are the same thickness;
- Multi-level – for connecting floor coverings of different thicknesses. For example, laminate with linoleum, carpet or high tiles;
- Corner – used when covering stairs with laminate;
- Final (edging) - used instead of plinth.
Cost - aluminum thresholds are the cheapest option to close laminate joints between rooms. A standard profile 90 cm long costs about $2. If we talk about steel or brass, such a threshold will be 3-4 times more expensive than aluminum.
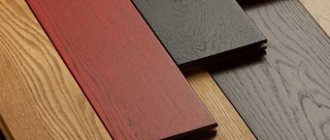
- Wooden. They are usually made from pine and spruce, less often hardwood is used. Most often they are varnished, impregnated with various oils or simply sanded. Wooden thresholds are expensive. They are mainly used for joining parquet.
Cork compensator between tiles and laminate: features of use
Installing a cork expansion joint between tiles and laminate is a popular method of creating joints between materials. Combining floor coverings helps realize bold design ideas and increases the life of the floor in areas of the most intense load. The compensator allows you to join tiles to laminate without using thresholds, which makes it possible to obtain a flat and uniform surface.
Joint options
There are several methods for joining laminate and ceramic tiles. The choice of the most suitable method depends on the presence/absence of a difference in height and the shape of the seam being created. Not all possible technologies and materials are suitable for constructing a curved joint.
You can join laminate and tiles using:
- flexible PVC profile;
- threshold made of aluminum, steel or brass
- inserts made of solid wood or MDF;
- threshold from the door frame.
You can also use liquid cork, sealant, joint compound or cork expansion joint.
Joint materials
A solid wood threshold looks best. The MDF analogue is similar in many ways, but not as durable. The metal version is reliable and durable, but does not always look aesthetically pleasing.
A door threshold is the easiest to install; it still has to be done at the transition from one room to another. However, if there is a difference in height between the tiles and the laminate, you will still have to decide how to install the interior door correctly in such a situation. You cannot leave a void underneath the jamb on one side. And if the covering is simply applied to it, and not placed under it, then it will not look very presentable.
Options for thresholds between tiles and laminate
Advantages of a cork expansion joint
Cork expansion joints are sheets of pressed cork that can be easily cut with a sharp knife. The popularity and high consumer demand of the material are due to a number of positive properties.
- Complete environmental safety of the compensator. The material is made from natural components, so it can be used in all types of residential and public spaces.
- Wide range of colors. Cork lends itself perfectly to painting in any color. With the help of special light-resistant colors it is possible to obtain surfaces of various tones and intensity.
- Easy installation and dismantling of the material. Any person, even those without experience in laying floors, can cope with the installation of a compensator. This significantly saves time and money when carrying out repairs.
- Excellent indicators of elasticity and elasticity. Compared to rubber and silicone expansion joints, cork is not subject to hardening. A unique property of cork is its ability to always return to its original form. This allows it to compensate for the regular expansion-contraction cycles of the laminate and maintain its performance throughout the entire service life of the flooring.
- High quality material. Over time, cork pre-treated with varnish does not chip or crack, which allows you to not worry about the integrity of the floor for many years.
- The low cost allows you to purchase a cork compensator at a price that is comfortable for the buyer.
- Natural antiseptic properties of cork, due to which the material is not susceptible to rotting and the appearance of mold and mildew. Cork is of no interest to insects and rodents.
- The cork expansion joint is resistant to ultraviolet radiation and is not prone to the accumulation of static electricity.
- When burned, the material does not emit phenol, chlorine, cyanide and other similar toxic substances. After treatment with a special compound, the compensator corresponds to safety class G1 (non-flammable substances).
Installation features
There are strict requirements for the transition between laminate and tile. Strict adherence to installation technology and careful execution will help achieve a positive result. The main requirement for joining surfaces is the absence of flaws on the edges of the tiles and laminate .
If the tiles are laid with the cut side facing the joint, then its edges must be thoroughly polished, and the edge of the laminate is treated with a special compound that protects the material from moisture.
In addition to tiles, laminate and expansion joint, you need to purchase wood glue and sealant, which will be needed to hide minor bending defects at the joint. The color of the veneered end of the compensator is selected in accordance with the overall color scheme of the floor covering.
Installation of a solid cork expansion joint is carried out when one type of coating has already been laid. First of all, you need to trim the height of the cork tape. This should be done using a sharp knife, having first outlined the cut location on the strip. It is better to glue the compensator with wood glue, having previously cleaned and degreased the installation site. The compensator installation algorithm is as follows:
- thorough preparation of the joint by clearing mechanical debris, removing dust and priming;
- applying a thin strip of glue near the edge of the lamellas;
- laying the compensator tape on the applied glue and fixing the end edge;
- applying sealant between the edges of the laminate and the expansion joint;
- removing excess sealant using a wet cloth and then wiping the joint dry.
Further installation of the tiles is carried out from the formed joint. This will ensure a tighter fit between the cork and the ceramic. After installation is completed and the sealant and glue have completely dried, the cork seam, which does not have a veneered end edge, is sanded and varnished.
Installation of a liquid cork expansion joint should begin by applying masking tape to all edges of already laid surfaces. The joint is cleaned of mechanical debris and dusted. Work should be carried out at an air temperature of at least 5 degrees. Installation of a liquid cork compensator consists of the following steps:
- pour the composition from the tube into a wide container;
- fill the seam with a spatula or an air gun;
- cut off excess sealant with a spatula;
- wait for the surface to completely dry, which depends on the thickness of the connector, the width of the seam and the temperature and is 24-48 hours;
- remove the masking tape and wipe off any remaining sealant from the floor.
Installing the liquid plug is very simple. The only disadvantage of installation is the need for careful and even distribution of the composition at the application stage, since it will no longer be possible to correct application defects and level the seam after the material has dried.
A cork expansion joint between the tiles and the laminate will allow you to achieve a perfect connection between the two surfaces and make the floor impressive and neat.
The entire process of installing a cork expansion joint can be seen in the following video.
Step-by-step instruction
Many craftsmen prefer to make the joint between tiles and laminate using one profile or another, since this method of closing the seam is quick to perform and durable. It can be used with any coating in color and texture. The store now has thresholds in a variety of colors.
It is strongly recommended to use a profile when the joint with the tile is located near the entrance door to a private house or apartment. This is often done - a more durable and moisture-resistant porcelain tile or equivalent is laid at the entrance, and the rest of the hallway is covered with laminate. Such a floor then turns out to be as wear-resistant as possible. And the threshold at the junction also additionally protects the home from sand and small debris brought from the street with shoes.
How to make a joint from an aluminum profile
To join floor tiles and laminate with an overlay profile, you need to:
- Expand the seam (if necessary) to 1–2 cm.
- Cut the profile to the required length.
- Drill holes for dowels in the expansion joint, the joint between the coatings.
- Try on the threshold in place so that everything looks perfect.
- Secure the profile with self-tapping screws.
How to secure a joint using self-tapping screws
In stores you can also find a flexible self-adhesive plastic threshold. To install it, it is enough to degrease the surfaces of the coatings at the joint, and then apply the overlay to the intended place, removing the film from the adhesive. Next, the plastic plate is pressed down with your hands and held for a while so that the adhesive adheres to the base.
Advantages and purpose of liquid stopper
To make this material, fine cork chips and a binding element are used. Liquid cork is used not only in construction work, but also for repairs; it can also serve as a decorative coating, insulation from external noise or insulation material. Liquid cork differs from other materials in various advantages. It is environmentally friendly, does not emit toxic substances, is resistant to mechanical damage, and has a high level of thermal insulation. Such material is not afraid of temperature changes, it does not deform, and the appearance of cracks is also excluded. Due to the fact that the material is elastic, you can carefully seal the seams without damaging the finishing surface. During renovations, cases may arise in which it is necessary to make a beautiful and smooth transition from one floor covering to another. That is, when laying different floor coverings in separate rooms or during zoning. To connect laminate and tile, these materials must be combined, and the transition must be smooth and not stand out too much.
Methods of docking without a profile
If you decide to close the joint between laminate and tile without a threshold, then the easiest way to do this is with grout or cork sealant. However, do not forget that a laminated coating, unlike a tiled one, is not firmly fixed to the floor.
Laminate slats rise and fall slightly when you walk on them. The dried putty in such a situation will quickly and inevitably crack and then crumble. It is recommended to use a variety of sealants and grouts to seal the joint between the coatings in question only if both of them are firmly fixed to the base.
A more practical option here is to use a cork compensator. This is a cork insert, the top of which is covered with paint, varnish or veneer. This modern liner is more expensive than other analogues, but the joint with it is simply perfect. Its color is matched to the color of the laminate or tile.
The cork expansion joint is secured in the gap between the coverings using wood glue. First, the cork must be cut to the desired height and then inserted into the seam. This material bends easily and can be laid in any zigzag pattern.
Wooden and metal profiles, as well as cork, are suitable not only for regular, but also for vinyl laminate. Installation in all cases is carried out using the same technology. The main thing is to correctly choose the colors of both finishes and the threshold so that they are in harmony with each other on the floor.
Joint without profile
Reasons why different floor coverings are used
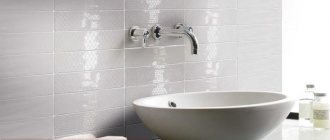
Various coverings are laid depending on the purpose of the premises in the house. For example, laminate can be used in the kitchen, in the hallway, and tiles can be laid in the bathroom, since this room is damp. That is, laminate is not suitable for a bathroom; it will be deformed and damaged due to high humidity. In such rooms, tiles are laid, and to make the connection between the coverings look beautiful, liquid cork is used.
Very often, in large rooms, two different floor coverings are used to highlight a certain area, so the kitchen can have a work area and a guest area. You can also allocate different zones in one large room for children and parents.
Choosing thresholds for laminate flooring
Laminate is a very popular flooring material. It is beautiful, comfortable, durable and easy to style.
But sometimes there is a need to divide the room into zones using different types of flooring. And this is where the problem arises - the joints.
Made from different materials, at different levels, they interfere with walking, spoil the appearance of the coating and reduce its durability.
The joints must be closed and special thresholds for laminate flooring come to the rescue.
What are they?
Laying thresholds is the final stage of floor finishing work. All types of coating are already in place, and you can safely choose the appropriate thresholds. First of all, you need to decide on the material.
Thresholds for laminate can be made of: metal, wood, plastic, cork and, in fact, laminate. They differ in both price and consumer properties.
Metal thresholds are made of steel, brass or aluminum, and their surface is decorated in various colors. Quite inexpensive, but very strong and durable, they are very popular.
Another advantage is the ability to choose thresholds to match the color of fittings, door handles, and chandeliers.
Wooden thresholds combine most harmoniously with laminate; their price is slightly higher than metal ones. Wood is a natural and environmentally friendly material. The disadvantage is their shorter service life. Sometimes they will have to be sanded and re-varnished.
Cork thresholds are used in cases where it is necessary to close the transition from laminate to stone flooring. Thanks to their flexibility, they absorb the load from the movements of the laminate and at the same time decorate the joint.
Plastic decorative thresholds for laminate flooring are the cheapest. Their advantage is a huge palette of colors.
Plastic thresholds perform their function perfectly. But, as they say, the quality matches the price.
The durability of these thresholds is a relative concept. The same as with laminate thresholds.
They fit very well into the interior, they can be matched exactly to the color of the floor - taken from the same collection as the laminate, but such thresholds are afraid of water and are not resistant to mechanical damage.
The choice of material depends on the joint:
- for example, to connect laminate and tiles, we choose metal thresholds that are resistant to water,
- and if you need to level out height differences, then cork thresholds are better suited.
One more classification of thresholds can be distinguished - according to functional purpose and form:
- Straight thresholds are designed to bridge joints that are on the same level. Can be used for any type of floor covering.
- Leveling thresholds will help close joints with a height difference of 3-4 mm.
- The final ones are angular in shape, designed to protect the edges of steps from chips and cracks, and have an anti-slip coating.
- Multi-level thresholds for laminate flooring. They are used when it is necessary to smooth out the difference in height between coatings. For example: laminate and tile, or laminate and linoleum. Thresholds of various shapes can hide differences from 4 mm to 2 cm.
Multi-level thresholds for laminate flooring can be of the following forms:
Well suited for connecting laminate to laminate, or as a threshold between laminate and linoleum. Such a threshold can be used between tiles and laminate to join them.
Equipped with an open installation system.
Fastened with dowels and self-tapping screws.
Used in cases where it is necessary to hide large differences in height on different types of coverage.
As you can see from the picture, it is attached in a hidden way.
- Complex shape. (relevant for the bathroom, kitchen).
It is also used to combine different types of coatings with large differences in height.
The advantages are a hidden fastening system and good protection against water leakage
Flexible thresholds for laminate are indispensable when creating complex design floors, when you have to combine different materials, shapes, and heights.
They are also indispensable when decorating the joints of tiles and laminate.
This combination is often found in kitchens: the work area is covered with tiles, and laminate is laid in the dining area.
Using flexible laminate thresholds, joints near niches, columns, and arches are also decorated.
Such thresholds are made of hypoallergenic plastic or cork and supplied in rolls.
They are convenient to transport and easy to stack. The minimum bending radius is 30 cm in a heated state and 60 cm in a cold state.
A little about how to install a threshold on laminate flooring
Installation of thresholds on laminate flooring can be done in different ways, depending on what type of fastening is intended for your product.
Open mount
Holes for fasteners have already been made in the threshold at the factory.
To secure such a threshold, you need to attach it to the base of the floor, make markings and drill holes.
Plugs are driven into these holes and self-tapping screws are screwed into them.
It is necessary to properly prepare the base, namely, remove the foam lining in the area of the sill and install a strip of hard plastic or plywood. This will protect against loosening of the screws and the plug itself in the base.
The open fastening method has its advantages: low cost of thresholds, ease of installation.
But there are also disadvantages. The holes spoil the appearance; over time, they will begin to break and will no longer hold the threshold in place.
If you do not want to spoil the appearance of the floor, you can use thresholds with hidden fastenings. The basis of such a threshold is a guide, which is attached to the base in various ways.
Herringbone dowels
The dowel caps are inserted into the guide on the back side of the threshold, and holes are drilled in the base (the diameter is smaller than that of the dowels). Then the threshold with dowels is inserted into the hole and driven in with a rubber mallet.
Using liquid cork to form a connection between laminate and tiles
Liquid cork contains cork chips and glue, which serves as a binder. Due to its hermetic properties, the material can firmly fix the connections between two floor coverings. Cork chips have high elasticity and flexibility, they are also soft and have an unusual texture. Carrying out the work of sealing the joints between the laminate and tiles does not seem difficult, but all seams are prepared in advance. When using this material, you need to stock up on a stationery knife and machine oil. First, it is necessary to treat the gap with oil, and then gradually fill the connection using a liquid plug. If two different coatings are located on the same level, then filling the joints will not be difficult. If there is a different level between materials, the seam must be aligned, focusing on the edge of the coating, which is located higher. After the liquid cork has dried, all excess protruding elements are cut off with a stationery knife, and then grinding work is performed.
When working with liquid stopper, you need to consider the following rules:
- The material must not be allowed to fall on the open surface of the coating, since it is difficult to clean it later, and after drying it is impossible to do this.
- The liquid plug should not be higher than the floor surface.
- The applied material should not dry completely; grinding is performed a day after filling the joints with liquid plug.
Why do it?
Some designers consider combining different floor finishes to be unjustified and unsightly. There are a lot of nuances in this combination from a purely aesthetic point of view, as well as in the issue of combining materials that differ in thickness and structure. But with skillful execution, the seams between such coverings and the entire floor turn out presentable, and often original.
The joining of laminate and tiles has to be done:
- on the border of two rooms in the doorway;
- in the middle of the room if it is zoned.
The easiest way to make such transitions is when the laminate and tiles on top are at the same level without a difference in height. But otherwise you will have to work hard. Here you will have to think not only about the aesthetics of the joint, but also its safety. If installed incorrectly, such a threshold can become a source of injury; tripping over this ledge on the floor is easy. Therefore, on the one hand, it should be beautiful, and on the other, noticeable and safe.
A joint at one level is most convenient
If tiles or porcelain tiles and laminate are simply fixed side by side without a seam, it will look clumsy. Plus, with such a connection, the coatings will begin to press on each other, which will lead to their damage in this place. In this case, it doesn’t matter whether the screed underneath is wet, prefabricated or semi-dry; the junction-transition between materials that differ in characteristics must always be somehow arranged separately.
If the tiles and laminate are at different levels, a small threshold should be followed
Basic rules for joining different floor coverings
To fill the joint between the laminate and the tiles, it is not necessary to use a threshold; you can do the job in another way, using a liquid plug. When laying coatings, the following rules must be observed:
- An important point is the order in which different types of flooring are laid. First, the tiles should be laid, and the laminate should be adjusted under it.
- When cutting tiles, there should be no chips or cracks, so the work is done carefully.
- When laying the laminate, it is necessary that the cut line be strictly straight.
- At the junction points, the backing under the laminate is cut off, and the boards must be attached to the concrete base using glue.
- After the materials have been properly joined, the connections between them are sealed using a liquid plug.
By following these rules, an even, neat seam is obtained between two different floor coverings. Liquid stopper for a smooth connection between laminate and tiles. Instead of thresholds, liquid cork is used to connect laminate and tiles. The connection between these materials is filled with a product that consists of moisture-resistant glue and fine cork chips.
Joining materials using liquid plug has its advantages
- The seams between tiles and laminate can be either straight or curved.
- Installation of such material does not require additional fixation, that is, self-tapping screws.
- Cork material combined with moisture-resistant glue has a high moisture resistance function.
- Laying such material does not require special experience or special knowledge.
Application area
Liquid cork can be used to seal any seams, joints, problem areas on floor coverings and when finishing walls. It is ideal for cork floors, laminate, parquet boards. In addition, such compositions can be used wherever insulation, sound insulation and sealing of a room are required. Here are other areas of application of the funds:
- sealing seams during repair or assembly of panel houses, interpanel joints in various structures,
- arrangement of installation joints on windows, doors,
- formation of sealing contours, expansion joints,
- sealing joints in houses made of SIP panels or wood,
- creation of gaskets for vibration damping in mobile structures,
- improving the sound insulation of interior partitions and floors.
Sealing joints with a cork-based compound in the construction of wooden houses
In addition to wood-based materials, cork sealant can be applied to concrete, glass, ceramics, metal and PVC; it does not harm even delicate substrates.
Use in thermal protection systems
Sealing joints is a mandatory component when it is necessary to enhance the thermal insulation of buildings and structures. Also, thermal protection is required to eliminate the appearance of cold bridges that can occur in hidden areas of structures. Cork sealant securely adheres to the base, forming a monolithic joint.
Thanks to its plasticity and optimal fluidity, the sealant fills even small defects and cracks, is easily inserted into the seam and smoothed out with a spatula. If the product is used to seal the joints of finishing coatings, it evens out any roughness, enhances the aesthetic appeal, and lends itself well to painting or tinting.
The product can be used to seal large seams and small cracks
Sealing of building structures
Any structures made of reinforced concrete or SIP panels have a significant drawback: they are prone to linear fluctuations when the seasons change. Many sealants are not suitable for sealing seams in such structures because they do not have the proper elasticity and quickly break down. Even the popular sealing material - polyurethane foam - gradually cracks, turns yellow and completely loses its properties. Special mastics are well suited for sealing seams, but they are quite expensive and are not environmentally friendly.
Cork sealant can replace mastics and other types of sealing compounds. It can be used to fill all seams, including locking ones, eliminate cold bridges, cover the edges of panels and the areas where they adjoin the frame. Using cork sealant, you can seal the seams inside apartments even with your own hands, which is especially important for old panel houses.
Floor finishing
Cork-based sealants are well suited for laying floor coverings, including linoleum. They reliably close the joints between the wall and the floor, without interfering with linear vibrations and protecting the room from blowing and the penetration of insects. If the floor is insulated with mineral wool, the liquid plug will prevent small fibers from being carried out.
The cork composition allows you to install a combined floor, where laminate or linoleum is joined to tiles. The sealant helps enhance the aesthetics of the seam, prevents the penetration of dirt and moisture, smoothes out deformation and vibrations of wooden coverings and shrinkage of linoleum. When laying the latter, the sealant is selected in color, which allows you not to use a threshold, but to limit yourself to the method of cold welding the joints.
Sealing the joint between tiles and laminate
Sealing installation seams
Cork is able to compensate for mechanical vibrations, so it is widely used as a part of sealant when arranging joints between partitions or other elements. Due to the elasticity of the cork, the influence of the weight of the entire building structure on partitions, especially those made of plasterboard, is reduced. Liquid cork corrects gaps of variable thickness and seals assembly joints between gypsum and aerated concrete blocks.
It must be remembered that cork compounds are not suitable for forming warm seams in wooden log houses. Linear displacements in new designs are too strong, and the adhesion of cork to wet wood is reduced, so the seams can collapse. You can apply this type of product only to the joints of mature log houses made of profiled timber.
Application in sound insulation systems
Liquid cork can be used to glue soundproofing panels and seal the seams between them. The product significantly reduces the noise level, although it does not eliminate it completely. The sealant is also suitable for laying subfloors and ceilings - it prevents floorboards and joists from creaking. Cork sealants are suitable for soundproofing cars and fixing some components and blocks. They allow you to smooth out the vibration of machine tools, vibrating tables, and generators.
Using liquid cork when installing soundproofing panels
Technology for filling joints between laminate and tiles using liquid cork
To complete the work, you need to prepare a stationery knife, oil and a tube filled with the mixture. The sharp corners of the tile are ground off, and then both coatings are wiped with oil using cotton pads or swabs. The mixture in liquid form is placed in a prepared tube, and then it is gradually squeezed into the joints between the board and the tile. Liquid cork is applied with a reserve, since it shrinks, but so that the material does not fall on the surface, it is very difficult to clean it off. If the surface of both materials is located at the same level, then the joining can be done without any special complications. With different heights of surfaces, they focus on the material that is located above, and level the cork covering over it.
After the liquid cork has hardened, the excess areas must be cut off using a utility knife; this work is done carefully so as not to damage the floor surface. This is usually done after a day, and the defects are removed immediately, before the glue dries. If the floors are oiled, this is easy to do. Then grinding and scraping are done, but the last stage will not be easy to complete. Liquid stopper is not used to protect the edges of the material, otherwise it will be firmly fixed to the base and it will be impossible to detach it. The mixture cannot be applied or leveled above the required level, as it will not fit tightly and cracks may appear. In order to perform grinding and eliminate excess, the material should not gain full strength, that is, this work is performed 24 hours after application. Thanks to the application of liquid cork into the joint between the laminate and the tile, an almost flat surface is obtained, without the use of thresholds. In the kitchen, some areas are laid with tiles, for example, near the stove, sink, washing machine, since this material is easy to clean and resistant to humidity. And the laminate is laid on the remaining surface, all connecting seams between the material are filled with liquid cork.
Installation methods
Let's take a closer look at the installation features of each option.
Cutting tiles and laminate
When the seams between two materials are straight, there are no problems with their fitting, but it is difficult to trim the curved areas. To do this, you will need to make a template from available material (cardboard, polystyrene foam, etc.), using which to mark the future joint.
- A curved cut on laminate is made using a manual or electric jigsaw.
- The tiles can be cut to fit the curves of any shape using a grinder with a diamond tile disc, or manually with a jigsaw/hacksaw with a diamond string. You can also drill as many holes as possible along the cut line and break off the excess with wire cutters.
Installation of flexible PVC profile
Installation instructions for flexible PVC profile
- After laying the tiles and laminate, there should be a gap, the thickness of which will allow you to install the fastening profile and leave a temperature gap of 5 mm next to the laminate.
- Using a hammer drill, we drill holes for dowels in the expansion joint. If you have a heated floor running through the seam, then liquid nails can be used for installation, but it is better to exclude such cases at the design stage.
- We cut off the required length of the profile using a knife/hacksaw/jigsaw.
- We screw the fastening profile to the base with self-tapping screws.
- Before laying the decorative flexible profile, you need to soften it. To do this, place it in warm water (50-70 degrees) for 15-20 minutes.
- The decorative nozzle is inserted into the mounting profile and snaps into place.
Installation of flexible metal profile
- Before starting work, calculate the thickness of the tiles and laminate, taking into account the adhesive and backing - they must match.
- We manually give the required bend to the profile.
- Cut the required length using a grinder or a hacksaw.
- The profile has special claws for attaching it to the floor, so it is best to install it simultaneously with laying the tiles. The foot will be pressed against the tile with glue, and on the other side the backing and laminate will simply be inserted.
The profile is held in place by pressing with the tiles
Installation of aluminum threshold
A regular threshold with holes is installed as follows:
- Cut the threshold to the width of the doorway.
- Mark the drilling points at the joint.
- Drill holes, insert dowels and secure the threshold with self-tapping screws on top.
- To screw in self-tapping screws, use a screwdriver or screwdriver with minimal torque, otherwise the threshold will bend.
An important nuance: the measurement is taken taking into account the platband, and not just between the two extreme points of the box. Then the threshold is trimmed to fit the trim to avoid gaps.
If the threshold has hidden fastenings:
- The holes are marked on the base.
- A self-tapping screw with a dowel is inserted into the groove on the underside of the threshold.
- Holes are made in the floor.
- The threshold with the dowels on is inserted into the holes and hammered to the end. To avoid damaging it, strike it through a block pad.
Instructions for installing a threshold with hidden fastening at the junction of laminate and tiles
To remove the backlash, take a larger dowel and file the head
- Mark the outline of the sill on the flooring to ensure it is glued evenly in the center of the joint.
- Remove the protective film from the self-adhesive base and stick it on.
Purpose
Liquid cork can be used as a sealant, sound insulator, insulation, and also as a material for cladding interior walls and facades.
This material can be used wherever it is necessary to ensure noise insulation, tightness, and thermal insulation. The sealant will cope with these tasks perfectly. In addition, the conditions for working with liquid plug are quite simple, so you can handle it yourself without the help of a specialist.
Sealant based on liquid plug
Advantages
Liquid cork sealant can be used in many areas of construction and repair. In addition, it has the following advantages:
- naturalness of the material;
- resistance to mechanical stress;
- high thermal insulation properties;
- resistance to temperature changes;
- elasticity;
- high adhesion to various materials.
Advantages of the material
Liquid cork does not shrink, so it can be used without fear of damaging the finish.
Rules for joining different coatings
Often during renovation work there is a need to join different finishing coatings, and the transition should be smooth and discreet. Depending on the purpose of the room, certain material is placed there. For example, tiles are installed in the kitchen, and laminate flooring is installed in the hallway.
Sometimes different materials are placed in the same room to divide the room into work and guest areas.
Joining tiles with parquet
Liquid stopper for laminate and tile joints is one of the options for connecting these coatings. This work is simple, but requires preliminary preparation of the seams. First, the seam is treated with oil and then filled with liquid cork. After the material has dried, the residues are carefully removed with a knife, and then the surface of the seam is sanded. These simple steps will help make the seam between different types of coatings neat and inconspicuous.
For joints
The parameters of liquid cork sealant allow it to be used for sealing joints between any coatings or a coating and a wall. Liquid cork will create a reliable and elastic adhesion between coatings, which is not afraid of either deformation of the coatings or temperature changes.
Sealant seam
This sealant can also be used to insulate window and door openings. If drafts are a concern, then treating the slopes of a window or door will help solve this problem.
For joints, it is best to use bostik 3070 sealant, which is recommended to be protected from weathering with elastic sealants.
For facades and interior walls
An excellent solution for finishing the facade would be to use soft cork. Thanks to its properties, the connecting material will prevent the façade surface from becoming dirty and will protect against moisture, noise and vibration. In addition, the appearance of the facade will look natural and quite rich, despite the cheapness of the material.
For those who have decided to change their usual wallpaper to something more original, liquid cork for interior decoration will come in handy. Interior walls will not only acquire an attractive appearance, but will also help protect the room from noise and moisture.
Application method
Liquid cork is applied to the walls using special equipment that sprays the material under compressed air pressure. The color range of the liquid stopper is also pleasing, allowing you to choose a color according to your preferences.
For parquet
When laying parquet, the problem arises of sealing the gaps between the wall and the wooden flooring. After all, during operation, parquet can change under the influence of temperature and moisture. Cork sealant can easily solve this problem. Due to its inherent elasticity, liquid cork allows parquet flooring to expand or contract depending on conditions without creating gaps.
Sealing seams
If the parquet has been lying around for a long time, then liquid cork will help eliminate cracks in the coating that have arisen over time. The sealant will help remove not only cracks in the floor covering, but also the consequence of these problems - creaking parquet.
Application technology
When working with cork sealant, you must follow the recommended sequence of actions so that the result is not satisfactory. The general procedure for installing various coatings using liquid cork is as follows:
- Clean all contact surfaces from contamination: dust, grease, dirt, stains. For this purpose, use a vacuum cleaner, soap solution, water, and degreasers.
- Prepare the necessary tools: a closed-type gun, a spatula, a sponge to remove excess. Cover the edges of the seam with masking tape.
- Using a gun, apply sealant and spread it with a nozzle. Smooth wide seams with a spatula, which should be periodically moistened with water. Remove excess product immediately with a sponge.
- Allow the completed seams to dry completely. Depending on the specific brand of product, humidity and air temperature, drying time can be 1–2 days.
All work with liquid stopper should be carried out at a temperature not lower than +5 degrees. Until the sealant has completely dried, it is necessary to protect the seams from the influence of precipitation.
Using joint sealant
The texture of the product is well suited for sealing various joints between homogeneous and dissimilar materials, walls and floors. For example, Bostik 3070 brand product has sufficient elasticity to compensate for stress when changing temperatures, and reliably seals joints from moisture and dirt.
Bostik 3070 for sealing joints when laying flooring
The filling technique is standard. It includes sweeping away dust, debris or opening an old seam. Afterwards, the gap is filled with sealant, every 1–1.5 meters they stop and level and remove excess. Typically, liquid cork is used for joints up to 3 cm wide, although filling joints of larger sizes is acceptable. After the cork has completely dried, the exposed areas can be carefully trimmed with a sharp knife.
Sealant for facades and interior walls
Cork sealants are suitable for arranging facades. They reduce noise and vibration levels, reduce heat loss, and give the wall a more natural and attractive look. On interior walls, liquid cork is used to join cork wallpaper and other wood-look roll materials. The sealant is applied using a gun with a long, thin tip, because the seams on the interior trim usually have minimal dimensions.
Finishing the facade using cork spraying
Cork for parquet
When installing parquet flooring, it is necessary to seal the seams between the wall and the floor covering itself. Cork sealant can easily cope with this task: it is elastic, expands and contracts with the base, and seals a gap of any size well.
The product can also be used to eliminate defects in old parquet if cracks or chips have already appeared on it. Liquid stopper is convenient for eliminating the squeaking of the coating if used during installation or replacement of individual sections.
Filling joints between wall and floor
Common mistakes during application
When using liquid stopper yourself, it is important to take into account the nuances that will help prevent mistakes when working with this material.
Sealant liquid plug
- Firstly, before use, you should carefully prepare the surface from moisture, dust, and grease. Otherwise, contamination will reduce the adhesion of the sealant.
- Secondly, after applying the liquid plug, its excess should be cleaned off immediately, otherwise it will harden and require mechanical removal. This can lead to damage to the coating and seam edges.
- Thirdly, you should not level the liquid plug on a surface that is higher than the level. Otherwise, there may be a lack of a tight fit and the presence of gaps.
- Fourthly, the material is not used to seal the joints of carpeting with other coverings.
Liquid cork sealant can be safely called a universal material. The range of its applications is quite wide: from wall decor to sealing seams. By purchasing a sealant at an affordable price, the result is an excellent quality material with characteristics no worse than its expensive counterparts.
vote
Article Rating