How to make a swag without a pattern
In order to lay a swag, it is not at all necessary to build patterns. It is enough to take a square piece of fabric. The size of the swag itself will depend on the size of this piece.
I won’t talk for a long time, just watch the video.
Photo of the resulting swag.
To lay the crossover, you will need to cut off a corner from the square. The length of the cut should be equal to the length of the upper sag, plus 15-20 cm for processing.
You just need to lay the first fold, maintaining the required upper sag, and only then lay it in the same way as a swag.
See also how to lay an asymmetrical swag without patterns.
If something is not clear, ask in the comments, I will answer all your questions.
Did you like the master class? I would be very grateful if you share this article with your friends on social networks by clicking on any button below.
If you would like to share your experience with the readers of the site or simply show your work, write and send a photo to me by email.
Best regards, Oksana Fadeeva.
Use of site materials only if there is an active link https://moishtori.ru
moishtori.ru
Lambrequin patterns: swags and flips
In this lesson we will look at the basic concepts and terms that are necessary to build a lambrequin pattern.
You will learn what swags and flips are, what shoulder and sag are, and we will consider the basic terms used when constructing lambrequin patterns.
Let's talk about how to correctly take measurements for future lambrequin details. You will learn what and how to measure in order to correctly construct lambrequin patterns.
By ordering a video course on how to sew a lambrequin with your own hands, you will receive ready-made swag and crossover patterns in full size as a gift. Together with ready-made patterns and a professional video course, you can learn how to sew lambrequins easily and simply. In this case, you will be freed from complex constructions.
The swag pattern and the crossover pattern that we have to build have a number of dimensions. To correctly construct these patterns, you need to know
- firstly, terminology,
- and secondly, learn how to correctly take measurements of an “imaginary lambrequin.”
In this case, the lambrequin patterns will depend on your imagination and idea of the final result.
In order to sew a lambrequin with your own hands, and it turns out beautiful, it is necessary that the swag pattern and the crossover pattern were initially correctly designed, then correctly constructed, and only then the drapery was carefully worked out. Our subsequent lessons will be devoted to how to build a pattern for a swag, a crossover, and other parts of a lambrequin.
Perhaps the swag pattern, as well as the crossover pattern, are the most popular and sought-after requests. And this is completely justified. In most cases, these elements are simply necessary to sew a lambrequin with your own hands.
So, what are the types of swags and switches? And what exactly are swag and perekid, and how do they differ from each other?
First, let's understand the terminology. Let's define what a swag and a switch are.
Swag is a lambrequin detail that is draped with folds and forms a semicircle.
The perekid differs from the swag in that it has a sag at the top.
Looking at the pictures below, you will see the difference between a swag and a crossover..
Now let’s determine what types of swags and switches there are.
Swags and transitions can be symmetrical or asymmetrical. A symmetrical swag (or crossover) has the same folds on the left and right, as in the second picture, you see a symmetrical swag. In the first picture, the crossover is asymmetrical; it has a wide row of folds on one side and a narrow row on the other.
Swags can be double, i.e. two swags joined together, but cut from one piece of fabric.
And also swags that turn into de-jabot or molds and are one-piece with them. Lambrequin patterns in these cases are made from one piece of fabric.
There are swags with horizontal folds. You can find out what horizontal swags look like and how to create a pattern for such swags by clicking on the link..
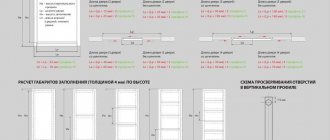
In the photographs you see many unclear numbers and inscriptions. Let’s figure out in order what they mean, and at the same time we’ll define the terminology and measurements that are necessary to create lambrequin patterns.
In the picture above, you see a swag, or rather a diagram of a swag. To create a swag pattern, you need to know the following measurements.
- Swag's shoulder (indicated by number 2 in the figure). This is the distance along the cornice where the folds are located.
- The distance along the cornice between the folds (indicated by the number 1).
- Sag height (number 3). Measured from the eaves to the lowest point of the swag.
- Sag length (number 4).
All measurements are carried out for the swag in finished form.
The dimensions of the swag (as in the photographs above) are indicated as follows.
For example, 130(45-40-45) sagged 60 cm.
Now we know what these numbers mean. 130 cm - length of the swag along the cornice, 45 cm - left shoulder, 40 cm - distance between folds, 45 cm - right shoulder, sagging height - 60 cm.
The swag pattern is based on these measurements, so it is important to take these measurements correctly.
For the transfer everything is the same. Only plus two more dimensions are added.
The height of the top sag is number 5. The distance from the cornice to the lowest point of the beginning of the folds.
Top sag length (number 6).
The jump pattern will be based on these measurements, so be careful and precise when taking measurements.
Sewing a lambrequin with your own hands is not as difficult as it might seem at first glance. The most important thing is to correctly construct lambrequin patterns. A good swag pattern and a good crossover pattern will help you quickly and efficiently sew a lambrequin with your own hands. After all, swag and switch are the main basic parts that are used in various models of hard and soft lambrequins.
The swag pattern and the crossover pattern, the construction of which are discussed in the following lessons, will be your basis. You can easily change these patterns by increasing or decreasing their height or width, as well as changing the number and depth of folds. How to change the pattern for different sizes is described in detail in the video course How to sew a lambrequin with your own hands.
This concludes our introduction to terminology and moves directly to construction in the next lesson.
<< GO TO SWAG PATTERN
www.m-kapriz.ru
Application in the interior
Initially, swags were used only for ceremonial premises. But they are so beautiful that they gradually migrated to ordinary houses. These decorations look best in a classic interior, where they complete a pompous image.
This model can also have asymmetrically laid shoulders.
Here it would be appropriate to use additional elements: fringe, lining, rhinestones. Swags will add romanticism to a room in Provence style. A product made of thin, translucent fabrics will look beautiful.
Curtains can be made even more unusual and original if you use the technique of transition to de jabot.
For the Art Nouveau style, products with a rectangular pattern of ascetic design are suitable. Scandinavian-style rooms will be decorated with multi-layered models made from fabrics of different textures - from velvet to transparent tulle. This will create an unusual play of light on the window.
Such curtains can really significantly diversify the interior.
For high-tech, you can also create stylish swags. Here it is better to choose a stiff fabric that forms creases instead of folds. This will give a complete look and an unusual look to the window.
Swag pattern with vertical shoulder
In order to build a swag pattern with a vertical shoulder, we need to decide on the size of the swag. For example, I will make a pattern for a swag with a width of 60cm, a height of 45cm and a shoulder of 25cm. Here are the three main starting sizes.
Also, to create a pattern you will need the length of the bottom sag. We determine it by measurement. In order to measure this value, we determine the depth of the sag by subtracting its shoulder from the height (depth) of the swag. In our case, the sagging depth will be 45-25 = 20 cm.
Now we hang the cord on a stick to a swag width of 60cm so that the sagging height is 20cm.
Now all that remains is to measure the resulting sag length. I got 76cm.
We have all the sizes, let's start creating the pattern.
As usual, we draw the middle line of the swag at an angle of 45 degrees. On the perpendicular to the center line we set aside the distance AA2 = AA1 (1/2 the width of the swag) + 5 cm (allowance)
AA2=30+5=35cm
Further from point A down the middle line we set aside distance AB equal to double the height of the swag
AB=45x2=90cm
From point B downwards we set aside half the depth of the sag and place point B
BV=20:2=10cm
From point B, draw a line to the side at right angles to the center line.
And from point B we draw an arc with a radius equal to half the length of the sag plus 5 cm for allowance
R=76:2+5=43cm
At the intersection of the arc and the perpendicular from point B we place point D.
We draw the bottom line so that it departs from the middle line at a right angle.
We connect points A2 and D and get the line of the swag’s shoulder.
All that remains is to calculate the folds. I decided to make six folds. Shoulder 25cm, leave one centimeter on top for the seam and divide the remaining centimeters into six folds.
(25-1):6=4cm - distance between folds.
We measure line A2G. I got 90cm.
90-25 (shoulder) = 65 cm 65:6 (folds) = 10.8 cm - depth of the folds. The width of the fold is 4 cm and if we make all the folds 10.8 cm, then the allowance of the bottom fold will peek out. Therefore, we make the depth of the lower fold 8cm (4x2). Then the depth of the remaining folds will be (65-8): 5 = 11.4 cm.
Lay down from point G upwards sequentially 4 8 4 11.4 4 11.4 4 11.4 4 11.4 4 11.4 1
The pattern is ready.
By tradition, I will make a tutorial on how to cut and assemble this swag using the received pattern. I'll try to do this soon.
If something is not clear, ask in the comments, I will answer all your questions.
Did you like the master class? I would be very grateful if you share this article with your friends on social networks by clicking on any button below.
If you would like to share your experience with the readers of the site or simply show your work, write and send a photo to me by email.
Best regards, Oksana Fadeeva.
Use of site materials only if there is an active link https://moishtori.ru
moishtori.ru
When was the house created
The new house appeared at the beginning of May 2020 and is a community of famous bloggers. Talented guys live in a separate house and produce content together on the TikTok platform.
According to Sergei Nikolaev, one of the creators and participants of JT House, the goal of the project is to build the history of Russian TikTok. Each of the guys achieved personal success. It's time for group creativity. The team will reach heights faster and more efficiently, becoming the first and best team.
Where is home
The project participants first lived in one house, now they live in another. The exact address has not been disclosed. Partial clarity about the location is provided by information on the team’s accounts on VK, Instagram and TikTok. Both three-story buildings are located near Moscow in guarded cottage communities with landscaped areas.
Houses outside and inside
The houses have completed exterior decoration, a tiled walkway and steps to the front entrance. Lawns and trees give the areas a well-groomed appearance and are pleasing to the eye. The spaces inside the buildings include everything necessary for life: kitchen, living room, bedrooms, showers and toilets, but differ in layout and interior.
May House
Just Team House participants
May was a period of getting into the project and getting used to each other for the team members. The first house, ideal in all aspects, facilitated easy adaptation and provided luxurious living conditions.
A pompous staircase with wrought iron railings solemnly leads to all floors. The first one greets you with a living room with beautiful lighting - a meeting place for the team. Soft sofas, curtains on the windows and paintings on the walls are conducive to conversation and relaxation. An electric fireplace, like a hearth, symbolizes the comfort and warmth of a home. Culinary masterpieces and a modest meal can be created in the kitchen with a cooking area and a large table for eating. The second floor with bedrooms and the third billiard room have round balconies for
outdoor gatherings. In the basement there is a swimming pool and a gym.
June House
In June, the team moved to a new house with a simplified layout and interior.
The ground floor contains an entrance hall, living room and kitchen; the second and third floors include bedrooms. There are no balconies, billiard room, gym or swimming pool. The building foundation of the house consists of: walls of soft colors, white ceilings, tiled floors in the kitchen and bathrooms, laminate flooring in the rooms. There is everything for life: tables, chairs, dishes, a stove and refrigerator, wardrobes, beds and sofas in the living room, even an electric fireplace. The house is not lived in like the first one. There are some imperfections. Rapid descent down the stairs is dangerous due to the slippery surface of the steps. Curtains and rugs are missing. After a comfortable life, the participants find themselves in a spartan environment, so they have to place orders for the necessary things for life and work. The guys bought blinds for the windows, a clothes dryer, anti-slip tapes for the steps and an inflatable pool. Life in the new house is getting better.
How to cut out a swag?
Swag is an element of window decoration, the so-called lambrequin - a draped piece of fabric that decorates the window from above. Swag can be “with sagging” or without, symmetrical or not, cut with bias and hem threads, there are a lot of options for swag draping.
The easiest way is to cut the swag at an angle; it will drape easier and flow more softly.
If we carefully look at the picture, we will see how to build a swag pattern, without complex arithmetic formulas.
1)AB is the width of the swag,
2)AB is the length of the lower sag of the swag,
SD - height (middle) of the swag.
When you take measurements from the window (what your swag should be), then count how many folds you want to make.
On the paper pattern you will need to mark the fold lines and cut along them.
We spread the paper pattern along the cut lines by twice the fold size - this is the depth of the fold. Let's say you want a fold of 5 cm, so we spread it by 10 cm.
You will get a pattern like this.
We lay out the swag pattern on the fabric and pin it with pins (it is advisable that the middle -SD- be located obliquely), cut it out with seam allowances. Allowances for processing cuts can be left at 1.5-2 cm.
All that remains is to assemble the swag - lay the folds, secure them with pins and process all the edges (fold them to the wrong side and stitch).
Using the same principle, you can cut and sew an asymmetrical swag.
This is what the asymmetrical swag pattern looks like.
Video. Master class: How to correctly assemble (lay) a swag cut along the lengthwise and oblique threads.
www.bolshoyvopros.ru