14.06.2019
In this article I will try to consider the main methods of connecting furniture parts, providing them with installation tips with diagrams and comments whenever possible.
So, the simplest option for fastening metal or plastic parts (metaboxes, coat hooks, mounting corners) to the chipboard, the chipboard sheets themselves, and the sheets to the walls are self -tapping screws
. They can be with countersunk heads (in Fig. No. 1, 3,4,5,6), with press washers (in Fig. No. 2) and dowel-nails (in Fig. No. 7), which are used for driving /screwing into walls.
Screws are marked with two meanings. The first number indicates the thread diameter, the second the total length. Naturally, the larger the diameter and length, the greater the load the self-tapping screw will withstand.
pros
- Ease of use,
- Cheapness
Minuses
:
- Relatively small load to withstand.
For tightening, a screwdriver/screwdriver with a corresponding bit is used - usually a cross-shaped one. To avoid cracking of the workpieces, it is necessary to pre-drill the mounting holes - with a drill smaller in diameter than the thread size. It is necessary to drill a recess under the cap. I usually do this with a screwdriver bat.
A reinforced version of self-tapping screws, which also looks somewhat more aesthetically pleasing, are confirmats
(or
Euroscrews
). They differ from ordinary screws in their greater thickness, thread pitch, cylindrical hexagon head and blunt end.
There are two main sizes of confirmations used: 50 mm and 75 mm. The former are more common and convenient for tightening 16 mm laminated chipboards, while the latter are better used for working with 26 mm laminated chipboards.
pros
- together,
- Significant holding force
Minuses
- Through fastening, which means a cap visible on the surface (can be covered with decorative plugs),
- Instability to assembly and disassembly (the connection after just 3-4 cycles of assembly and disassembly practically loses its fixing properties).
This fastening method allows you to repeatedly assemble and disassemble furniture, especially when using a footer, without losing the strength of the connection.
This advantage is more than compensated by the complexity of manufacturing. For installation you will need: cylindrical drills (for wood or metal) with a diameter of 5 and 8 mm (5 mm must be with a stop), with a diameter of 15 mm. It is advisable to use a furniture jig for precise assembly.
pros
- Stealth (no visible fasteners are visible from the outside)
- Possibility of tightening parts together
Minuses
- Inside the product, a fairly large eccentric remains visible - 15 mm, which needs to be hidden (with a plastic or self-adhesive plug)
- Complexity (3 parts, 3 holes, special tools)
Eccentric coupler VB35 MD/16
differs from the minifix in the structure of the eccentric and the short rod. It is used mainly for hanging shelves, although it is also great for various types of lids and tabletops. There are two options for rods: short (for hanging shelves on one side) and long (if the shelves should be on both sides of the vertical stand at the same level. In this case, the rod passes through the parts, protruding symmetrically on both sides).
The eccentric itself in this version is closed in a decorative casing (metal or plastic), the color of which can be matched to the color of the chipboard. It looks quite original, and there is no need to hide it. The eccentric is screwed in from below; if necessary, you can drill an additional hole on top of the shelf, which will then have to be closed with a plug.
pros
- Invisible from the outside
- There is no need to hide the eccentric inside the finished product
- Possibility of tightening parts
- Easy to make connections (only 2 holes, instead of three in the minifix)
- Easy installation (the shelf is simply thrown on top and then fixed)
- Possibility of repeated assembly and disassembly
Minuses
- Expensive (price about 15 rubles per set)
- The need for specialized tools (Forstner cutter)
- The attachment force is less than that of confirmatories
Furniture screed
used mainly for pulling together several cabinets into a single block (for example, in kitchens). It is a threaded connection with two heads for a Phillips and a flat-head screwdriver.
To use, you only need a drill of a suitable diameter and a screwdriver.
pros
- Significant holding force
- Easy to install
- Possibility of tightening parts
Minuses
- Narrow specialization (the ability to tighten only parallel parts),
- Visible heads
It consists of as many as five parts: the tie itself, two footers and two bolts with a countersunk head. To work, you will need a 10 mm drill, a screwdriver, a hexagon (metal fittings - screw it in) or a hammer (plastic fittings - hammer it in).
pros
- Significant connection strength
- Unpretentiousness to marking holes
- Easy to manufacture (2 holes)
- Possibility of repeated assembly and disassembly
- Invisibility from outside the product
- Possibility of tightening parts
Minuses
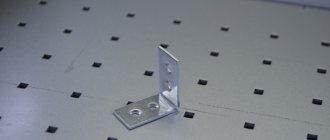
Plastic corners
a simple and cheap way to connect parts. It differs from the previous one in being more aesthetically pleasing and easier to install (no need to drill anything out at all - it is attached with simple self-tapping screws, but is much less durable. Today, a large number of colors are produced - you can match the color of the chipboard so that the element does not catch the eye.
Their variety is metal corners with a plastic cover.
have the same advantages and disadvantages with the exception of slightly higher connection strength (of course, they do not reach the level of an aluminum tie, but they are no longer a plastic corner).
Minuses
- Dimensions (interferes with the installation of other fittings),
- Poor connection strength
- Inability to tighten parts
- Impossibility of repeated assembly and disassembly,
In conclusion, I will say that to choose furniture fittings that are optimal in your case, you should remember a few simple rules:
The fittings must withstand the expected load with some margin;
The fixing elements on the finished product should be as invisible as possible;
Fastener elements accessible to the eye must be covered with decorative plugs (plastic or self-adhesive);
Consider the possibility of subsequent assembly and disassembly of the product.
FOR A BEGINNER FURNITURE MAKER, I WOULD ADVISE USING CONFIRMATIONS AND SCREWS, SOMETIMES SUPPLEMENTING THEM WITH DIFFERENT CORNERS. IN MOST CASES THIS IS ENOUGH FOR A STRONG AND NOT VERY VISIBLE CONNECTION.
Chipboards (chipboards) are made from sawdust, shavings and low-value wood by mixing them with formaldehyde resin and pressing. In addition to an affordable price, chipboard sheets have good moisture resistance, sound and heat insulation, as well as increased strength if they are glued in several layers.
In this article we will talk about how and with what to glue chipboard together and other materials.
Decorating the joint at the corner connection of slab materials.
Recently, corner joints of slab materials with a miter bevel have become increasingly popular in the manufacture of furniture. With such a connection, an attractive, barely visible joint is obtained, but it has a rather sharp angle, which is very unsafe, for example, when using such a connection in the manufacture of tables and headboards. Moreover, pointed, pronounced angular shapes are less practical to use - they are subject to deformation due to impacts and other mechanical influences. To avoid this, there are many ways, one of which I want to briefly share in my article.
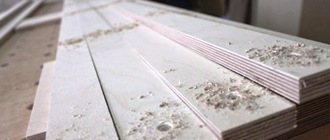
Let's try to make an adhesive corner connection of two parts from laminated chipboard, and then smooth the resulting corner with a 45° edge cutter, followed by decorating the chamfer using available tools and materials.
We will make the cut by setting the saw at an angle of 45° to the plane of the panel being cut, having first carefully secured the guide bar of the circular saw to the part.
After cutting, we get two such neat “blanks” with which we have to carry out small operations that are quite feasible even for novice craftsmen.
Next, using an inexpensive lamella router, we will make recesses in the beveled ends of the parts for inserting flat furniture dowels (lamellas), such dowels serve to prevent the parts from shifting during connection when gluing, and also contribute to a stronger and more reliable connection.
The dowels have an oval shape and are made specifically for milling cutters with disc cutters; these cutters are very similar to the saw blade of an ordinary circular saw, only with a much smaller diameter.
Dowels are supplied in various sizes, depending on the thickness of the panel and the type of connection. The photo also shows the front side of the “sole” of the router and the saw blade (cutter) itself.
And this is what the lamellar router itself looks like. This is not an expensive model, but quite suitable for small jobs in a home workshop.
Trying on the parts to be glued.
And we apply glue to the surfaces to be glued, in this case I used Homakol glue, the brand (article) of which is more suitable for gluing sheet plastics, so it is a little “gummy” and not entirely suitable for this type of gluing, but for my example it will work quite well (laziness was to open the container with the required glue).
We connect the parts with clamps, in general it is better to use special body clamps and clamps for fastening surfaces, modifications and manufacturers of which exist in nature in quite a few (for example, the BESSEY company, the clamps of this company are located in the photo at the top), but more on this in the following publications .
We get the desired “semi-finished product”, at the junction there is visible excess glue that was squeezed out, which I did not initially remove, still there is still further work to be done to smooth out the sharp corner and the remaining glue will be removed by itself.
To remove (edge) an acute angle, we will use the cutter shown or cutters with other blade shapes and configurations.
After milling, we have something like this, it can, in principle, be painted over in any color you like, but the internal structure of the chipboard is quite porous and the paint will simply be absorbed, and the surface of the chamfer will have an uneven coating, which is very, very unattractive.
To level the surface of the laminated chipboard core, I will use the usual automotive putty that I have on hand at the time of the experiment, although it contains fiberglass, which is not very good in our case; it is advisable to use a homogeneous mass for a more uniform coverage of the cut.
We clean and degrease the places where the putty is applied, using a solvent or alcohol, but not with water-containing compounds.
And using a spatula or any other similar tool, apply a small layer of putty in order to fill all the recesses and pores of the milled surface.
Using a die on the surface of which sandpaper is glued, remove excess putty and then sand it with finer-grain sandpaper.
For painting, it is more convenient to use aerosol paint in cans, preferably acrylic, but I again used what I had on hand - inexpensive paint for household use.
We paint the edge in two or three stages and let it dry.
And for greater reliability and wear resistance, we cover the painted surface with acrylic varnish. In general, when carrying out painting work, it is always recommended to apply a protective layer of varnish to the painted products.
Cut off any varnish streaks with a utility knife. That's probably all.
Furniture connecting fittings
For the manufacture and assembly of cabinet furniture, various methods of connecting parts together are used. The type of furniture fastenings significantly affects the cost of the furniture itself, and the buyer does not pay special attention to such a detail. However, it should be noted that fastening affects the quality of the product, its service life, as well as its aesthetics.
Furniture connecting fittings vary in purpose, cost, reliability and installation complexity .
There are many types of furniture connecting fittings. We will consider only the most common connecting elements.
Furniture corner
A furniture corner is the simplest and most inexpensive way to connect cabinet and upholstered furniture. Furniture corners are used in different shapes, sizes, plastic and metal. They are very easy to install . One of the main advantages of a furniture corner is reliability .
Confirmat or screw tie, single-element fastening, one of the most reliable and at the same time inexpensive furniture connections . Resistant to mechanical stress and fracture. Installation does not require precision drilling or fixtures. For installation, a hole is drilled with a special confirmation drill having three diameters, but you can also drill with three ordinary drills of different diameters. It is used for both wooden structures and chipboards. Disadvantage is the risk of damage to the thread during repeated disassembly and assembly of furniture; it requires through drilling of parts, which violates their integrity; the head will be visible. Can be plugged for aesthetics with a plug.
Build errors
Making cabinet furniture with your own hands is a creative and exciting activity. But if you neglect the instructions, diagram and advice of professionals, you can ruin the material and render the finished product unusable.
Making cabinet furniture with your own hands is not very common.
- Do not make pencil marks by eye. This will lead to inconsistencies or distortion of entire blocks of cabinet furniture. In this matter, accuracy and precision must come first.
- Carefully match the left and right parts of the parts. These are different elements. They must be installed each on their own side.
- Check the numbering of parts, fasteners and fittings again before final fixing them. Write in pencil if you don't rely on memory.
- If the connecting fittings are not secured all the way, this will eventually lead to loosening of the elements. Fix well and check the block for strength and stability.
- Learn to make precise and even holes. Not only the appearance of the furniture, but also its strength and wear resistance depends on their quality.
- Train yourself to fix small fasteners first, and then larger ones.
- Check the installation by measuring the diagonal of the structure. Otherwise, the furniture will warp and collapse under its own weight.
Anyone can learn how to assemble furniture well. It is enough to acquire high-quality tools, patience and the habit of checking your measurements several times.
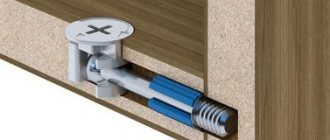
Minifix (Eccentric coupler)
Minifix is one of the most common furniture joints. Minifix is designed for connecting furniture parts at right angles. However, there is a corner minifix that allows you to connect parts at different angles.
The minifix consists of a rod and an eccentric. Sometimes a plastic coupling is used under the rod.
Disadvantages: requires precise drilling, high price, affecting the cost of furniture.
Advantages: 1. Furniture can be assembled quickly with one screwdriver. 2. Designed for many cycles of furniture assembly and disassembly without harm to the furniture. 3. Hidden fastening, which is valuable for visible parts of furniture, such as the facade, sidewall of furniture.
Confirmat
The most common type of fastener is confirmat.
At the same time the easiest to use. With its help, assembling furniture is easier and faster than using other types of furniture screed. Especially if during assembly you have to drill holes for fasteners yourself. Using a confirmat, two parts are connected at an angle of 90 degrees. Fig.1.
Confirmat - used to connect parts at an angle of 90 degrees. The two parts are connected with 2 confirmed screws. The confirmat is installed at a distance of 3-7 cm from the end of the parts to be connected. To install 1 confirmation screw, you must first drill 2 holes in the parts to be joined: in the end of the first part for threads (drill diameter 5 mm), in the second part for the head (drill diameter 6 mm).
In order to tighten the two parts, you need to drill two holes. One in one part, with a diameter equal to the diameter of the confirmator head, the other, at the end of the second part, with a smaller diameter equal to the diameter of the threaded part.
As a rule, drills with a diameter of 6 and 5 mm are used for this, respectively. However, there is a combination drill available for drilling holes at the same time. It is very comfortable. There is no need to constantly rearrange drill bits or use two drills at the same time.
Fig.2.
Drill for confirmation. Allows you to make a hole for 1 confirmat screw in two parts at once, and also forms a recess for the confirmat head. Increases the speed of furniture assembly by at least 50%.
Confirmat is a universal fastener, but it has some disadvantages and application features.
Confirmat should be used simultaneously with the use of dowels.
A dowel is a wooden rod with a diameter of 6-8 mm and a length of 20-30 mm (in the photo below, next to the confirmation). The dowel acts as a guide and does not allow parts to move during tightening. Fig.3.
Connecting the parts using a dowel with a diameter of 6-8 mm and a confirmat. This joining method is used in factory furniture, for example furniture from IKEA. Provides high accuracy of joining parts.
Despite the fact that furniture assembled using confiramate can be assembled or disassembled, furniture made from laminated chipboard does not tolerate this very well. As a rule, after one disassembly, the furniture screed no longer holds well.
The confirmation should be wrapped carefully.
The best option is by hand or with a screwdriver at low speed. Otherwise, the confirmation thread turns into a drill, which breaks the hole. Fig.4.
Tightening of parts with confirmation. The tie is performed with a hand wrench or a screwdriver with a low rotation speed of the chuck. The screwdriver must have the correct tightening torque to prevent thread stripping.
In order to recess the head into the body of the furniture part, you should use a wrench and do it carefully, otherwise there is a possibility of the thread breaking. Sometimes it is necessary to pre-calculate.
Rod (chopik, dowel)
Rod - a cylindrical wooden rod with chamfers and rounded ends. Made from hard wood or plastic. The chamfers serve for air passage when using glue, as well as for better adhesion. Reflections (chamfers) can have different patterns: straight, circular (transverse), screw. It can also be noted that the rod comes in different lengths and diameters.
The rod can be used with or without PVA glue. When using glue, such fastening is more reliable, but no longer dismountable.
The rod also serves as an additional, backup fastening when assembling furniture on minifixes.
The advantage of a dowel
Low price, simplicity, completely hidden connection.
Disadvantages of dowel
Drilling for the dowel must be extremely accurate.
Used instead of intersection screed. In order to hide the head of the screw, they are used to tighten the sections together in those places where the mounting strip of the furniture hinge will be installed or the shelf will stand.
Convenience of screeding with self-tapping screws - speed, low price
Disadvantage of self-tapping ties - weak fastening
Intersectional screed: installation
To connect the sections, the parallel or standing walls to be fastened are secured to each other using clamps. Holes with a diameter suitable for the fasteners are drilled through at a distance of approximately 8-15 cm from any corner of the walls. The intersectional screed is inserted into the hole and the fasteners are screwed in. Thanks to the relief located under the top of the nut, there is no possibility of turning when tightening, but in some cases fixation with a screwdriver is necessary.
It is worth considering that the heads of the couplers will be noticeably visible on the front side. You can now find masking overlays in stores, but they are presented in a fairly narrow range, and it is not always possible to choose a decorative overlay for the required chipboard finishing option.
If the order of installation of the sections as stated by the manufacturer is not followed, problems with fastening are possible. This may not be a full opening of the cabinet doors, which will require tightening the hinges.
Furniture ties: laying out the essence
Assembling furniture is a non-trivial task when it comes to non-standard and interesting solutions. But there are clear rules for how the elements are attached to each other. At a certain point, dowels were common, and they are still used until that time. There are other solutions for fixation, which will be discussed in the article.
Purpose
When assembling a furniture product, the location of the connected parts of the structure must be checked so that its integrity is not compromised during operation. This is what a furniture tie is intended for - a fastener that makes it possible to tightly and firmly connect structural elements located in a certain position (most often at a right angle) relative to each other. If previously furniture was assembled mainly using screws and self-tapping screws, now different types of ties are used for this.
This replacement is due to three reasons:
- Increasing the aesthetics of furniture, thanks to the use of ties, the fastening of parts becomes invisible;
- Each disassembly of furniture assembled with screws reduces reliability;
- Sometimes the use of conventional fasteners is simply impossible for structural reasons.
And finally, the use of furniture ties allows for quick and durable assembly of the product.