How to install swing and sliding doors in a closet with your own hands
In a spacious or small apartment there are always wardrobes, cupboards, and bedside tables that provide places for organizing and securely storing clothes, dishes, books, and other necessary things behind a closed facade.
This is why cabinet doors perform one of the most important structural functions. Today it is proposed to use various methods of fastening traditional swing doors, as well as sliding ones, which are installed mainly in sliding wardrobes. You can install any doors into a closet with your own hands if you familiarize yourself with the mechanisms of their operation and follow detailed instructions.
Installation of a swing facade on furniture hinges
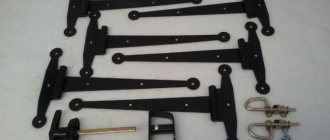
Today there are the following types of door hinges:
- hinged;
- four-hinged (overhead, semi-overhead or inset);
- products for glass structures;
- corner;
- inverse.
How to mount a door leaf on hinges
Before installing hinges on the door and cabinet wall, you need to take into account the material the furniture is made of, and also determine how many door hinges will be needed. The number of products used depends on the size of the door and its weight. For example, with a facade height of about 1500-2000 cm, which weighs up to 13 kg, you will need 3 hinges.
Get ready for work
You should select the following tools with which you can hang swing doors in a closet with your own hands. Prepare:
- electric drill and drill corresponding to the diameter of the mounting screw;
- milling machine, nozzle of equal diameter;
- tape measure, pencil for marking;
- building level;
- We screwed it with a regular screwdriver that fits the size of the fasteners.
Procedure
- Mark the location on the door to install the hinges. The distance between the loops depends on the height of the fabric, and 8-15 cm should be measured from the edge.
- Place the hinge on the door and use a pencil to mark the location for the cup of the fixture.
- Drill out niches for the cup using a router with an attachment. Use the sharpest possible tool, drilling to a depth of 13mm.
- Insert the loop inside the finished recess, align the device horizontally. Mark the locations for preparing holes for fastenings.
- Drill holes for fasteners.
- Attach the hinge to the door surface.
- Place the door against the cabinet body with your own hands, align the position of the panel, and mark the cabinets where the strike plate should be installed.
- Drill through the cabinet at the marked points.
- Install the strike plate onto the screws.
- Connect both parts of the loops.
- Use a screwdriver to adjust the hinge to the correct position.
How to install card loops correctly
Hello, dear readers and DIYers!
Some of you make small wooden cabinets, boxes, caskets, the functioning of which requires a hinge in the form of a hinge. In this article, the author of the YouTube channel “GenealogistWoodworker” will share with you his experience of inserting card loops. The operation seems to be simple, however, there are several subtleties in this matter.
This method is quite simple and is performed exclusively using hand tools.
Materials. — Brass card loops, wood screws — Natural beeswax.
Tools used by the author. — Self-centering drills — Combined angle ruler — Chisels — Clamps — Screwdriver — Marking knife — Screwdriver, mallet. Manufacturing process. In this project we will use brass card loops: they are slightly thicker than usual and their quality is an order of magnitude higher. The angle of maximum opening of both loops is the same - 95 degrees. This is the optimal value that ensures maximum functionality of the casket, casket and any other folding box.
First of all, the master places the hinges on the frame of the box in the required places, having previously opened them. In this form, he can use the hinge joint as a guide.
The hinge itself is placed exactly on the welt line of the box, after which a line is drawn around each side of the hinge wing with a marking knife.
You can make such a marking knife yourself by reading the following article.
To determine the depth of the required excavation, the author uses a combination measuring square. First, he applies it to the loop itself, measuring its thickness, and then transfers the measurements to a wooden box, using the same marking knife.
Once the bulk of the material is removed, you can switch back to the wide chisel to trim the socket. Make sure that the cut surface is completely flat.
When the turn reaches the marking line, you should place the chisel perpendicular to the surface and, using light tapping with a hammer, drive the tip of the tool to a depth from which it will be possible to remove excess wood flush with the rest of the surface of the socket.
Since the hinges themselves are made of brass (and brass is known to be a soft material), the author uses steel screws to cut the threads in the holes.
To reduce the friction force when screwing in screws, you can also use this trick: apply a small amount of wax to the screws themselves. Then they will go into the wood like a knife into butter!
All that remains is to screw the hinges to the door itself, connecting it to the frame itself.
Good mood, good health, and interesting ideas to everyone!
The author's video can be found here.
Source
Sliding wardrobe panels
The sliding wardrobe is the most popular furniture today. This is facilitated by the ability to rationally use living space. Often the closet occupies the entire space from floor to ceiling, has a large capacity and, when using a sliding door, does not at all interfere with the movement next to it.
In order for such storage furniture to serve for a long time and without failure, it is important to correctly assemble the entire structure. The main role belongs to the flawless installation of sliding facades. By precisely fulfilling the requirements and recommendations of specialists, a person with the skills to use special tools can install the cabinet door system with his own hands.
What do you need for work?
Before you start installing the door yourself, check that you have the necessary components for the sliding system in the closet. In addition to the facades themselves, the following must be prepared:
- Bottom and top rails or guide profiles. These are the main parts that ensure the movement of the door leaf.
- Motion limiters and stoppers. Parts that help the door move smoothly along the guide rail and stop the movement at a certain point.
- Closers are mechanisms that ensure the sliding of the door panel.
- Accessories for façade systems. For example, seals, screws, rollers, etc.
Prepare your tools:
- electric drill;
- metal drill with a diameter of 4 mm;
- a set of straight and Phillips screwdrivers;
- spirit building level;
- imbus key;
- plumb line;
- sandpaper;
- pliers;
- hammer;
- stationery knife;
- roulette.
Carefully familiarize yourself with the main structural elements of the sliding wardrobe door and their location.
Step-by-step instruction
You can begin installing sliding facades with your own hands only after the installation of the wardrobe itself has already been completely completed. The doors of the structure must be set according to the level. When performing work, be extremely careful and careful, as components can be easily damaged.
- Measure the width of the cabinet opening at the top as accurately as possible. The top guide rail will be mounted there. You need to subtract 1-2 mm from the obtained value.
- Use a ruler (square) to accurately mark the cutting line perpendicularly according to the obtained size. Cut the profile using a grinder or a hacksaw.
- We prepare mounting holes for self-tapping screws. Along the entire length of the guide profile, at regular intervals of about 40-60 cm, mark the holes for the screws; they should be located on the same line.
- To avoid damaging the profile while drilling, use a chair, table, etc. as a support. Drill the holes, then sand the edges with sandpaper.
- Install the finished guide profile in the upper opening of the wardrobe. Use screws or self-tapping screws for this.
- Trim the lower profile in the same way as the top one. Mark the mounting holes, then drill and sand the edges of the cuts.
- Install a stopper at both ends of the profile guide. The device is designed to fix the state of the cabinet door leaf in the closed position. For the latch to function correctly, it must be inserted: in the right panel - in the recess on the right, in the left panel - in the recess on the left.
- We use a plumb line to check the correct position of the profile.
- Installing a door on profiles in a wardrobe. Alignment of the position of the facade canvas.
The sliding system used involves the use of special rollers, which are placed on both sides of the facade (top and bottom). The upper elements are stationary; they fix the door leaf. The lower rollers perform the function of workers - the door moves along them.
- Carefully insert the upper rollers with your own hands into a special place in the upper profile, and the lower wheels into the groove of the lower profile rail. The diagram clearly illustrates installation locations and methods.
- The sliding wardrobe doors are installed, it's time to adjust their position. For this, there are special wheels that are located on both sides of each door leaf. To properly adjust the balance, the cabinet doors must be in the closed position.
How to strengthen door hinges
The process of strengthening door hinges The process of strengthening hinges itself consists of several main stages, the sequence of which plays a rather important role.
1. First you need to remove the door leaf from the hinges. It is best to do this together, since almost every door weighs quite a lot.
2. Using a hammer, you need to knock out the rod of the lower, and then the upper loop.
3. Using a screwdriver, you need to unscrew the screws that hold both hinges. This should be done very carefully, trying not to damage the fasteners, since they will also be needed when attaching the hinges.
4. If there is loosening of the screws, then it is necessary to drive pre-prepared wooden wedges or matches into the holes that remain after unscrewing the fasteners. It is worth noting that these wooden products must first be thoroughly lubricated with wood glue.
5. The remainder of the matches or pegs that do not fit into the screw holes must be cut off with a well-sharpened cutter. This must be done very carefully so as not to cut yourself.
6. Before screwing in a new screw, you need to drill a pilot hole with a small diameter drill, and lubricate the screw itself with wood glue. Thus, it will be possible to increase the accuracy of installation of the fastener, and hence the strength of the fastening.
7. The final stage will be the installation of hinges and the subsequent installation of the door leaf in its rightful place. It is also necessary to check the door for functionality.
Having completed all such work, you can eliminate various kinds of squeaks, as well as sagging of the door leaf.
It should be noted that in some cases the cause of creaking and also warping of the door may not be the weakening of the hinges, but an error in their installation. For example, by recessing such elements into a doorway, you may accidentally remove more material than necessary. You can correct this situation and eliminate all problems by simply making special linings yourself.
Materials and tools
To carry out the process of making the backing for the hinges, you will need cardboard, which will be used as the main material, as well as scissors and a screwdriver.
Substrate manufacturing process
1. First you need to remove the door and unscrew the hinges (this process can be carried out in parallel with strengthening the hinges).
2. Next, you should cut out a piece of cardboard prepared in advance, which will be the same size as the cutout for the loop. This very cardboard element must be placed in the cutout and the loops re-attached. It should be noted that wood glue can also be used as an additional fastener.
3. The next step will be to install the door leaf and check its functionality. If the door is still “dangling” or other consequences of weakening hinges are observed, then you can add more cardboard to the backing.
It should be noted that hinges, as mentioned above, are a very important element of any door leaf. Therefore, it is very important to prevent weakening of such elements in a timely manner and carry out all the necessary work to eliminate such defects. If none of the above methods can resolve the problems with the hinges, then you need to re-attach them to the door leaf. Of course, it is imperative to choose a new installation location at the end of the door leaf, where the wood has not yet cracked.
By carrying out all the necessary repair procedures on door hinges in a timely manner, you can be sure that such a door will last for many more decades. It is very important, when carrying out any of the above methods of repairing hinges, to strictly adhere to the sequence of actions, as well as the accuracy and precision of execution.
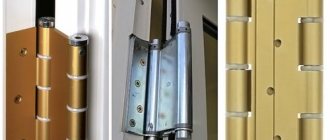
Purpose of hinges for kitchen facades
First of all, hinges for furniture doors are needed to secure the facades to the body. They also make it possible to open and close swing doors. The possibility of adjusting the facades themselves (thick, radius), the degree of fixation of the doors, the maximum possible angle of the doors when opening, the smoothness of the free movement of the doors, the absence of creaks, distortions and other possible defects depends on which hinges will be selected.
Mounting device and features
The most popular model for the facades of kitchen cabinets are four-hinge hinges, popularly called “frogs”. This design is very durable, has the ability to adjust the position of the facade and a stopper to prevent arbitrary opening of the doors. You can read about the standard sizes of kitchen units in this material.
The production of four-hinged hinges occurs by stamping sheet metal (steel). The product is covered with a layer of galvanic coating on top, which provides an aesthetic appearance and protection against rusting (corrosion). They can also be covered with various decorative coatings, making the surface matte, chrome or colored.
Parts of a four-joint hinge:
- Cup. It has a square shape with rounded corners. Inserts into the hinge hole on the inside of the door. And it is attached using self-tapping screws; it is possible to use an additive.
- Shoulder. Four-joint mechanism that acts as a lever for opening/closing.
- Mounting plate required for installation. The hinge body is attached to the strike plate. Special screws can be used to adjust the position of the facade.
Additionally, the kit may include:
- Bowl covers.
- Shoulder pads.
- Closers (allow the hinge to close smoothly).
Types and sizes
- Invoices. When attaching the hinges to the facade in this way, it is completely closed on the side, eliminating gaps. When the door is closed, the angle between the facade and the side of the box is 90 degrees. When the door is open, this angle is 110 degrees. This fastening option is used in cases where it is necessary to cover the open part of the box with one or two doors.
- Semi-overhead. Such loops have a bend at their base. Installed on the facade, they cover half of the side of the box. The hinge angle when closed is 90 degrees, when open it is 110 degrees. They are used if there is a need to install hinges on one partition in order to open the doors in different directions (when installing overhead hinges, the doors will not be able to open).
- Deposits. They are installed inside the box and have a large bend at the base. When using these types of hinges, the sides of the box are visible. The hinge angle when closed is 90 degrees, when open it is 100 degrees. They can be attached to the sides of the box or to its partitions.
- Angular. Hinges are used for installation on corner drawers. In this case, the width of the side parts that are located next to the facade must be the same. The hinge angle when closed is 45 degrees, when open it is 95 degrees.
- Inverse. Installed when it is necessary to open the door completely. The angle of the hinge when open is 180 degrees, the facade is located on the same straight line with the sidewall of the box.
- Piano hinges are single-hinged. They are rarely used because without an additionally installed magnet the doors do not close completely. Most often they are mounted on furniture with a top-opening door.
- Card. The structure is similar to piano hinges: two hinge plates are mounted parallel to the hinge. Installed on retro style furniture.
- Mezzanine. Used when it is necessary to open the facade upwards. The principle of operation is similar to door closers, only the mezzanine ones have a spring installed, which allows the doors to smoothly open and close.
- Secret. They are arranged according to the principle of piano and card games. Installed on furniture whose doors open downwards.
- Ombre. Installed on folding facades. Often used to make kitchen folding tables.
- Pendulum (bar). Spring hinges, which are similar in structure to piano hinges. They ensure the opening of facades by 180 degrees (following the principle of fittings for bar counters in Mexican countries).
- Heel. They are used extremely rarely, because to install such hinges the door must be light in weight, mainly for small corner kitchens.
Types of piano hinges and their installation
Piano hinges are selected to match the design and dimensions of the furniture. Fastening elements may vary in length, width and thickness. In addition, hinges can be made of brass, nickel, stainless steel and aluminum. In order to install a piano hinge, you will need the element itself, 3*16 screws, a screwdriver (screwdriver), an awl and an 8 mm drill. The first thing you need to do is screw the piano hinge onto the inside of the facade. This is done using self-tapping screws.
Next, the facade with a loop is screwed to the end of the body with millimeter precision. After this, the outermost screws are screwed in and it is checked whether the door closes well after the operations performed. If everything is correct, you can tighten all the remaining screws. That's it, the installation of the piano hinges, and at the same time the furniture element (door, seat), is completed. To prevent the hinges from creaking after a certain period of time, they can be lubricated with a special aerosol or oil.
How to install on corner or non-standard furniture
As a rule, kitchen furniture doors are already ready for installing hinges, but if you need to install a non-standard door or install new hinges, then first you need to take measurements. You can find out about a rattan chair here.
To drill the hole for the bowl, you will need a Forstner drill bit. Also required for installation: calipers, drill and wood drill bit, screws, locking brackets.
First, we make markings on the door depending on the number of hinges required. We retreat 21 or 22 mm from the edge. In the designated places, use a pencil to mark the center of the future holes. Drill holes using a Forstner drill. The diameter of the hole for the bowl is 35 mm, depth 12 mm. Before you start drilling, you need to make sure that the drill will not go through.
Now you can attach the hinge base in the drilled hole. Fastening occurs with two self-tapping screws on both sides of the hole.
We fix the central screw on the hinge body (in the center of the groove) so that we can adjust the hinge back and forth.
We bring the door to the side wall of the box and mark the attachment points. The strike plate is fixed at a distance of 37 mm from the edge. Leave about 1.5-2 mm between the door and the body. We tighten the self-tapping screws and adjusting screws.
Tips for installing hinges and closers
Depending on the size of the door, the number of hinges that need to be installed varies:
- Door length up to 90 cm, weight about 4 kg - 2 hinges.
- Length from 90 cm to 160 cm, weight up to 13 kg - 3 loops.
- Door length from 160 cm to 200 cm, weight up to 17 kg - 4 hinges.
- Length from 200 cm to 240 cm, weight up to 20 kg - 5 loops.
- When marking, the top and bottom hinges should be at a distance of 70 to 120 mm from the top and bottom edges of the door, respectively.
- When marking and placing hinges, you need to make sure that shelves and partitions will not be located in these places.
- Before starting installation, it is necessary to measure the thickness of the hinge so that it fits firmly into the drilled hole.
When installing internal hinges, markings are made from the inside of the door, taking into account the gap between the door and the frame of 2 mm.
Video: how to replace hinges on kitchen cabinet doors
Replacing the hinge on a cabinet door:
DIY repair
Over time, furniture hinges may fall out of their installation sockets. There is no need to immediately throw out the closet or change furniture fronts. First you need to remove the loop and carefully widen the hole (10 mm deep). Next, you need to lubricate the wooden dowel with wood glue (or PVA) and drive it into the resulting hole.
We do everything carefully so as not to pierce the material through. After the glue has completely dried, we cut off the protruding part of the dowel with a hacksaw. We tighten the screws that secure the loops directly into the dowels.
Manufacturers of furniture fittings
Bloom furniture hinges, advantages and disadvantages:
- SCILM. An Italian company that produces high-quality furniture fittings and components, frame profiles, plinths and other products that are used in furniture production.
- Boyard. Ekaterinburg company supplying furniture fittings from China.
- "RosAks" . Moscow manufacturer of furniture fittings.
- VIBO . An Italian company, the largest manufacturer of accessories in its country.
- BLUM. Austrian manufacturer of fittings and solid wood furniture.
- FENNEL . For many years, the Ukrainian company has been a leader in the supply of furniture fittings to more than 60 countries.
- TBM. Domestic manufacturer of metal furniture fittings.
You can read more about the features and range of Blum fittings in our article.
Tips for choosing furniture fittings for the kitchen:
When choosing hinges for cabinet fronts and fillers, you need to pay attention to the following factors:
- Required opening angle and cabinet location.
- Type of lockers (corner, with doors opening up/down, etc.).
- Door weight and length.
- The quality of the metal from which the hinge is made (it is recommended to choose a brass-zinc alloy for covering furniture).
The hinges on the doors may not be the brightest detail of the kitchen façade, but they are one of the most important. After all, the comfortable and reliable use of a furniture set depends on the quality of cabinet fittings. See also information about handles for kitchen furniture here.
Criterias of choice
Hinges are used not only for metal gates, but also for wooden ones. These products are designed to withstand constant heavy loads during operation. With many positive properties, these hinges have affordable prices, so everyone can buy them. Those who are going to buy hinges for making doors themselves should decide on the size of the fasteners.
For accurate calculations, it is necessary to draw up a drawing of the gate and mark on it all the relevant values (weight, height, thickness of the leaves, etc.).
When making calculations, you need to take into account the traffic of the gate and the frequency of its use. By drawing up an accurate drawing of the gate and carrying out calculations, you can understand what type of hinges will be appropriate for a particular gate.
High-quality garage hinges should have the following functional features:
Example of garage door hinges
- no noise when the doors move;
- softness of turning;
- inadmissibility of arbitrary door movement;
- complete absence of door subsidence;
- resistance to vandalism.
Before you buy a suitable hinge, you need to clarify what weight load is declared by the manufacturer for this product. For wooden doors or a simple gate made of corrugated sheets, a hinge with a diameter of 25 mm or more is sufficient. The length of the product is calculated based on the width of the sash. For garage doors, where an average pressure of 250 kg is applied to the hinges, it is best to buy fasteners with a diameter of 45 mm and a length of 170 mm.
The number of fasteners is also determined by the force of the load that is applied to them.
Elements of simple gate hinges
For example, if the weight of the gate is above 250 kg, which is important for forged structures made of artistic metal, then for 1 leaf you need to buy 3 hinges, instead of 2. To buy suitable fasteners, when going to the store, it is advisable to take with you the drawn up drawing , according to which the seller will help you choose a hinge.
A correctly selected and welded hinge ensures easy movement of gates of any weight without jamming. It is this that sets the opening radius for the doors, so it should be installed exclusively according to the rules. Since these fasteners are a collapsible structure, when working with them you need to make sure that they will not “come off their hinges” when locked.
Return to contents
Rules for installing furniture hinges
As in the article about the types of furniture hinges, we will consider the installation of four-hinged fasteners, with three degrees of adjustment.
The four-hinged hinge consists of two detachable parts:
- The fastening (mounting) strip is attached to the body. At the same time, there is a difference in the markings for internal (inset) and overhead loops.
- The hinge itself is fixed on the facade by installing it in a special technological hole. The depth of the hole is about 12-13 mm, the diameter depends on the size of the bowl. Mostly, fittings with a bowl with a diameter of 35 mm are used, less often - 26 mm.
Correct installation of furniture hinges with your own hands involves preliminary calculation of the required quantity, depending on the height and width of the door, and its weight.
Hinges with a quantity of three or more per swing door are distributed at an equal distance from each other, and you need to follow the markings so that the fastening strip does not “get” into the shelf.
The distance from the edge of the façade along the body is usually 100 mm. Since the door is always 3-4 mm smaller, for the overhead version the distance to the center of the hole for the bowl is about 98 mm.
Other varieties
Despite the wide popularity of four-hinged furniture hinges, their use for fastening facades is not always possible. In some cases, to implement a specific project, it becomes necessary to use fittings with a fundamentally different design solution.
Card fasteners
Drawing of an ombre loop.
Furniture hinges of this type are the most ancient and inherit the tradition of forged hinged hinges with an elongated overlay. Structurally, card hinges are similar to conventional door hinges, but are much smaller in size. Typically, such a loop consists of two metal plates with holes connected parallel to each other by means of a hinge rod. Card mechanisms can be either collapsible (two-tubular) or non-collapsible (multi-tubular). In most cases, devices of this type are used in the manufacture of furniture in the “retro” style, and the plates can often have different shaped shapes (in the form of a “butterfly”, etc.).
Piano elements
Piano hinges are a somewhat outdated type of furniture fittings, structurally similar to the design of card hinges. They consist of two relatively thin and narrow strips of steel, brass or other metal, attached to a central axis. Such hinges can often be seen on samples of antique furniture, retro-style furniture, and folding book tables. The keyboard covers of grand pianos and pianos are attached using just such hinges (hence the name). Currently, this type of fastening is used extremely rarely due to its low reliability.
Mezzanine mechanisms
Mezzanine hinges are used to fasten horizontal facades that open upwards.
This type of arrangement of facades is typical for mezzanines and wall kitchen cabinets. The design of mezzanine hinges is in many ways similar to the design of four-hinged overhead hinges. The main working element is a spring, which ensures smooth opening and closing of the sash.
Ombre options
This type is used mainly for hanging folding facades, which when open form an angle of 180º with the base plane. The card loop is attached with an insert to the ends of both parts of the furniture structure. A typical example of the use of card loops is a folding kitchen table.
Secretory loops
Secretory-type devices are very similar to card or piano devices, but at the point of connection with each other they have an additional insert with two hinges. This type is used when installing horizontal facades that open downwards, and the fastening can be carried out either with or without an insert.
In addition to the above, there are other types of movable furniture fittings that provide a wide variety of ways to fasten facades, depending on the design and design features of a particular product. These are, in particular, adit, bar (pendulum), heel furniture hinges. For hanging glass doors of sets, special designs with plastic inserts have been developed to prevent the occurrence of cracks and chips.
Thus, after carefully familiarizing yourself with each of the presented types separately, you can finally decide which façade mounting options are the most optimal.
Scheme for calculating the number of furniture hinges for installation
There is no clear answer to the question of how many hinges need to be installed on one swing façade. Each manufacturer of fittings and components gives its own recommendations. Typically, the scheme for calculating the number of furniture hinges is based on two values, the size and weight of the door:
- The height of the door determines the number of connection points to the frame. If the number of hinges is insufficient, the door may bend over time. Its width is no less important. It is recommended not to design facades whose width is too large relative to their height.
- The weight of the door also plays a role. It is logical to assume that a facade made of laminated chipboard, on top of which a mirror sheet will also be glued, will require additional fasteners. Installing a standard number of furniture hinges may not be able to withstand the increased weight - this will require reinforcement.
The standard installation scheme for furniture hinges is as follows.
It can be followed if there are no other recommendations from the manufacturer.
Installation of overhead furniture hinges with markings
Before installation, it would be a good idea to make markings so as not to make mistakes when drilling and fastening the mounting strip and bowl. You can use a ready-made template (conductor) or measure it manually. We take into account the following nuances:
- The overlay facade does not completely cover the frame. Taking into account the gap, for example, for a kitchen cabinet with a height of 720 mm and a width of 400 mm, it will have dimensions of 716x396 mm. This means that if along the box for installing the fastening strip there is a 100 mm indentation from the edge, then along the façade the indentation will be less, equal to 98 mm.
- A hole 11 mm deep is selected for the four-hinged hinge on the door. This can be done using a Forster drill with a scoring edge and a spout designed specifically for installing furniture hinges (diameter 26 or 35 mm). Special drills have a limiter that will prevent you from piercing the front part through when milling. Provided, of course, that the thickness of the facade is at least 16 mm.
- The depth of attachment of the mounting strip from the edge of the cabinet side when installing an overhead furniture hinge is 37 mm. The distance between the holes at the bar is 32 mm.
Processing a loop on a jeans belt: tips and life hacks
If you are sewing jeans from fairly thick denim, processing the buttonhole on the waistband may cause problems. The machine may begin to act up due to the large thickness and density of the material in several folds; the loop may not come out as neat as we would like. And this place is in plain sight! The tips below will help you create a beautiful buttonhole, whether your machine has a dedicated buttonhole function or not.
How to hem jeans and make scuffs: master class
General recommendations
- Whether you are duplicating the belt itself or not, it is better to reinforce the places where the button will be installed and the loop will be made with duplicating material.
- In order not to create excess thickness, it is better to cut off the allowances, as shown in the photo above. However, it is better not to leave allowances less than 0.5-0.6 cm, so that the belt does not later tear in this place.
- Another way to reduce the thickness, making it easier for the machine to work, is to unscrew the belt and tap it with a hammer. Place something solid under the work.
- The loop on the jeans belt should start no less than 0.6-0.7 cm from the edge.
- The peculiarity of denim buttons is that the loop length for them needs to be chosen a little longer than for ordinary buttons of the same diameter. To get an idea of how your denim will behave with your button, make a test buttonhole. At the same time, reproduce all the original data: duplicate the denim and fold it in two layers. Cut a loop and try to thread a button through it. Then it will become clear how much the loop needs to be lengthened.
- If your machine does not work well on the selected denim when sewing a buttonhole, this will be visible in the test buttonhole or buttonholes you make. Then for the buttonhole you can choose not contrasting threads, but threads in the color of denim: this way, possible flaws will be less noticeable.
- Before cutting through the buttonhole, use an edge treatment to prevent fraying, such as Pryme's Fray Check glue or similar. This glue is transparent, will be invisible on denim after drying, and can withstand washing well. Apply glue to the outside and inside of the loop and wait until it dries before cutting through the loop. The glue will make the loop more stable and durable and will prevent deformation even if you make a slight mistake when cutting it.
- A special loop cutting knife will help you cut the loop carefully. It can be purchased separately (in the photo it is in the center) or, for example, in a set. The loop is cut using a knife like this: the work with the loop is placed on the work surface, a knife is placed on top and pressure is applied. The blade width of this knife is 3 mm, so the action must be repeated to cut the entire length of the loop.
Closed seam like jeans
Making a buttonhole with cord/lobe thread
This type of loop (also called a tied loop) is used on loose and dense fabrics, including thick denim. It turns out to be more convex than a regular loop, more decorative, plus the cord inside gives the loop strength and prevents it from warping (the latter is more important for loose fabrics, but it is also important for a loop on a jeans belt).
The foot for sewing such a loop has special parts on which a thin cord or thread is attached, which will be inside the loop:
The loop is sewn as usual:
Then the ends of the cord or thread must be tightened, and then they and the ends of the working thread must be brought out on the wrong side, secured and cut.
How to sew stretch denim: life hacks and tips
Making a buttonhole on denim using a zigzag stitch
This method is suitable for machines that do not have an automatic or semi-automatic buttonhole function, or if a machine with such a function does not want to work adequately with thick, dense denim. Then you can sweep out the loop using a zigzag.
First mark the loop. You can draw one line and lay seams parallel to the right and left of it, you can draw 2 parallel lines side by side, marking 2 lines, or 1 line in the center and 2 parallel lines on the sides of it, as is more convenient.
Here the loop starts with a tack, but you can start on one of the long sides of the loop. The point is that you need to make 2 parallel lines with a narrow zigzag with a small step, and at the ends combine these lines with wider bartacks. You can also further strengthen the loop by first sewing a simple stitch around its perimeter. This method is described in detail in this master class of ours.
Here the loop is made in a zigzag without additional stitching. The operating procedure is as follows:
- we make a fastening of 5-6 stitches in one place, stitch width 0.5 cm, length 0 (or you can set the length to 0.5-1 mm and make 3 stitches back and forth);
— choose a zigzag with a smaller width, 2 mm, and a step of 5 mm, set the needle so that the stitch does not extend beyond the edge of the bartack, and sew one long side of the loop;
— select the same zigzag settings as for the first tack, and set the second one in the same way as the first;
— turn the work 180 degrees, select the zigzag settings to make the long side of the loop, check how the needle is positioned so that the stitch does not go beyond the edge of the bartack, and make the second side of the loop.
Bring the ends of the threads to the wrong side, fasten and cut. You can also topstitch the finished loop along the outer perimeter with a simple stitch with a short stitch length, for example, 2 mm. This stitch will further strengthen the loop, plus the loop will look smoother and neater.
Embroidering on denim: tricks and tips
Making a buttonhole by hand
Another way: the loop is strengthened with machine stitching and then covered with hand stitches.
Mark the loop. Parallel to the marking line, sew 2 simple lines with a short stitch length on the machine. There are bartacks at the beginning and end of the lines. Then carefully cut the loop without going beyond the markings on the right and left.
Hand sew the buttonhole with a tight buttonhole stitch. Read how to do it here.
Photo and source: closetcorepatterns.com
We sew jeans and trousers in denim style: a selection of patterns
How denim conquered the world: 15 facts about jeans
What to sew for children from denim: 27 patterns for children's models made from denim
Adjusting furniture hinges with your own hands
According to the diagram for installing furniture hinges, a mounting plate is separately attached to two 3x16 mm screws and a bowl (also to two screws), on the side of the frame and on the inside of the door, respectively. After the furniture is placed in the designated place, they begin to hang the facades. To do this, the arm of the hinge with the bowl is threaded into the fastening bar and tightened with a fixing screw. There is no need to tighten the fasteners too much near the plank - all of them are involved in the process of adjusting the furniture hinge with your own hands.
If the floors are piled towards the center, then most likely the doors will not press tightly against the frame. Adjusting the furniture hinges in depth allows you to tighten them more tightly or, conversely, loosen the pressure.
For uneven floors, lateral adjustment (horizontal) in combination with vertical adjustment may be useful. With its help, you can even out gaps on double facades and align them more evenly relative to the frame.
Also, the adjustment “removes” unpleasant squeaks when opening and closing. It is worth tightening the screws on the hinges from time to time - furniture doors inevitably sag under their own weight. Timely adjustment will extend the service life of fastening fittings.
How to weld the hinges yourself
Welding hinges is not an easy task, especially for beginners. But, if you have patience and desire, you can cope with such work even in the absence of serious experience.
To work you will need the following tools:
- metal tape measure;
- level;
- hammer;
- welding machine;
- Sander;
- special mask;
- gloves for welding work.
Rules:
- When working with a welding machine, you must strictly follow safety rules. A protective mask and gloves must be used.
- In accordance with fire safety standards, welding is prohibited near flammable liquids and objects.
- When hinges are welded to the gate, they need to be lightly “grabbed” by welding.
- Since the hinges are welded to the door leaf, when drawing up the drawing, you need to take into account that the distance from the lower edge of the leaf to the lower hinges, as well as from the upper edge to the upper hinges, must be at least 20 cm. On the wings, the place where the hinges are attached is marked with a pencil.
- Fasteners should be thoroughly lubricated with grease. This measure will protect them from cracking when exposed to high temperatures.
- It is believed that if a match is placed along the edges of the hinges, the door will not jam during welding.
- You need to wedge the doors so that when closed they are level. To level the sashes, use a building level.
Stages of work:
- First, the hinge part located at the bottom is welded. The gate hinge must be fixed in the direction from bottom to top. During the welding process, the electrode should be moved horizontally and with extremely smooth movements.
Temporary fastening of hinges to gates for welding
- After the first seam, the gate leaves must be wedged to check their operation. The hinges are fully welded only after the quality of opening and closing the doors has been checked.
- After welding is completed, the frame must be removed from its hinges, generously lubricated with grease and returned to its place.
- All welding seams must be processed with a grinding machine, and then covered with metal paint.
- Properly welded hinges provide the structure with quick, delay-free opening.
You can also close such gates easily - with one movement of your hand.
Additional features:
- During welding, only serviceable equipment should be used. A faulty device must be repaired by a qualified technician.
- The work of welding hinges to the gate cannot be carried out alone.
- It is prohibited to weld on metal whose surface has traces of fresh paint.
- If there are traces of gasoline, fats, or oil on the protective overalls or gloves, they must be changed. The presence of flammable liquids on clothing is considered unacceptable.
- It is prohibited to weld vessels under pressure.
- Do not place rags soaked in oil on the cylinders, as such carelessness always leads to a fire.
Return to contents