Windows in the house are covered with curtains or curtains. Their main function is to close openings and decorate the room. Properly executed window decoration can create an atmosphere of comfort in the home.
Curtain rods can highlight the beauty of curtains and effectively complement the interior
How to hang a curtain so that installation does not take much time and effort? You need to know the intricacies of the work and the main elements. You don't have to turn to professionals. You will need tools and a desire to add some zest to the interior. The beauty of a home comes from perfect renovations and small touches that can make a room unique.
Description
Curtains are curtains made of thin and soft fabric. Used to close a window or doorway. In almost all models, the canvas reaches the floor, but there are short curtains. Hang separately or combine models.
Curtains and cornices should be in harmony with each other and match the overall style of the room
Kinds:
- Classic curtain shape. They are called scissor curtains. Go down to the floor with the same length on both sides.
- Narrow, long scarf curtains.
- Thiers, curtains covering several parts of the window.
- Swags are curtains with a complex shape. Decorative variety with two hanging edges.
- A canopy is a decorative, elegant element.
To curtain windows and doors, the first option is often used - classic scissors, and the rest are used as decorative decorations for the interior.
Classic curtains are most often used to decorate door and window openings
The main function is to decorate the room, but there are also significant purposes.
Functions:
- decorative purpose;
- give comfort and tranquility;
- easily allow air to pass through;
- protect from the sun and cold air;
- prevent interior elements from fading;
- protect the room from prying eyes.
Combining destination functions, they become an integral part of the room. They are able to preserve the unique features of a separate room and add the finishing touch to the interior.
Curtains are a great way to give your interior a new lease of life.
Materials for making cornices
What materials are cornices made from? Usually in construction stores you can find products made from:
- Metal.
- Plastic.
- Tree.
Wood and metal are “classics” that were loved in the last century and that are loved now. They are beautiful, usually suitable for the decoration of a room if there is at least one wooden or metal item in the interior (and there definitely is, because many people prefer to make wooden cabinets and buy metal fittings or pieces of furniture like a bedside table/nightstand for their rooms).
Both curtains made of thick fabric and light, airy curtains will look great on such products.
Plastic cornice is also a common option, first of all, because of its neutral appearance, and secondly, because of its very low cost. Compared to wood and metal, plastic structures are much cheaper and therefore are now in great demand.
Installation of curtains. Mounting methods
Universal curtain rods can be attached to any type of surface. Installation is carried out on walls and ceilings. The methods exist in two versions. The choice must be made based on personal preferences. Based on combination with suitable room decoration devices.
Wall mounted
A common type of curtain fastening. They are easy to install. Can be installed by a non-professional. Consolidation does not take much time and effort. The design is reliable and can withstand heavy curtains. But the walls chosen are strong, not made of plasterboard.
Wall cornice is indispensable for suspended or suspended ceilings
A wide range of materials and styles makes the method popular. Allows you to select the appropriate design for a specific design. The planks fit into any interior.
Wall views:
- single row;
- double row;
- three-row.
Single row cornice
Double row cornice
Three-row cornice
It is important to apply depending on the number of curtains. Mix and match tulles with thick fabrics.
Ceiling
Wall-mounted models began to be replaced due to the fact that stretch ceilings began to become popular. Ceiling mounting corresponds to the style of suspended ceilings.
Ceiling models are fixed directly to the ceiling of the room
They have a number of advantages:
- Suitable for small rooms. Visually expand the space and increase the height of the room.
- Hiding defects. Thick, long curtains can cover the opening from ceiling to floor.
- Hide errors on a window or wall.
- Can withstand heavy, voluminous curtain models.
- Installation is carried out on any type of surface.
- Protection from the sun and cold air. Thick ones do not allow the wind to pass through and protect from the bright sun.
- Look ideal in rooms with high window openings.
- You can choose from: types of designs, colors, materials.
Concealed ceiling cornice with heavy straight curtains
Types of designs:
- Rod, round bars. Consist of a round rod. Inserted into a fixed bracket in the wall. There are round stoppers on both sides at the end.
- Profile. A universal option for plastic windows.
- Baguettes. Presented in the form of a design where part is hidden behind a decorative strip.
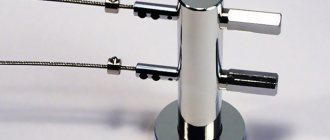
- Strings. The common type is popular. Consists of two metal parts. Light curtains are hung, and heavy ones begin to sag in the center.
- Telescopic. The model is presented in the form of a narrow tube. Suitable for narrow, small windows.
Plastic profile cornice for ceiling-type curtains
A string cornice has practically no alternative when the wall near the window opening is very narrow and there is simply no room on it to place a rod
How to make a curtain wide
The filling of curtains is calculated as follows: you need to go to the window and see how much space they will take up on the walls. Constantly curtaining the window will make it difficult to perceive; over time, the curtain will still move onto the wall opening.
Such solutions can add additional zest to the room.
Let's assume the width desired for decoration is 0.5 meters. The optimal filling ratio is 1:3. It comes out to 1.5 meters. This is the required width of the canvas. More is possible, but it’s not worth it: the fabric forms too many gathers when the window is open.
If the curtains are closed only at night, you can fill the curtains with a minimum width. It will be equal to the width of the cornice, plus 20-30 cm.
It is necessary to have an idea of what options for solving the problem already exist, and what nuances must be taken into account during the work process.
What to do when a smaller error is made in calculating the width. There will be ways out.
- Add an additional, contrasting curtain.
- Sew additional strips on the sides to the curtains. They can be the same color or a contrasting one, with or without a pattern.
- Use additional curtains: Roman, Japanese or blinds, and from narrow curtains you can create static Italian curtains with tiebacks in a classic style.
The colors must be combined, otherwise the whole image will turn out unfinished or will even leave the impression of bad taste.
Important! Be careful when calculating the width of the curtains so that you don’t have to look for options to correct the mistake.
Wall Mounting Bracket
It is necessary to select the size according to the width of the wall. It is advisable to leave a gap from the wall to the cornice. It should not rest closely against the wall.
When installing above a window, you will need to measure the width of the window opening and add 0.4 cm to the result. The installation cannot be carried out by a professional. You will need elements and tools for the job.
The installation method depends on the design of the cornice
Elements:
- Cornice. Dimensions are chosen according to the parameters of the room.
- 2 brackets.
- Tips.
The cornice is a decorative and functional element designed to secure curtains above the window
Cornices
They can have different lengths, shapes, and materials of manufacture. The appropriate material is selected in accordance with the interior design.
Kinds:
- Wooden;
- Metal;
- Aluminum;
- Plastic.
Wooden cornice
Metal cornice
Aluminum cornice
Plastic cornice
Shapes:
- Straight;
- Angular;
- Rounded.
Straight cornice
Corner cornice
Rounded cornice
Tools:
- Pencil, marker. Be sure to mark the measured distance. It is not recommended to build in at random. Curtains will not be able to hide errors in installation.
- Ruler, tape measure. It is recommended to measure with a margin of up to 0.5 cm.
- Fastening parts: screws, nails, brackets, self-tapping screws.
- Screwdriver. Helps to firmly fix elements.
- Drill. It is difficult to make a hole in the wall using a screwdriver. The drill remains an unchanged tool in construction work.
- Ladder. Needed when mounting at height.
Roulette
Hammer drill
Plastic dowels
Screwdriver
How to lengthen curtains with your own hands
At first glance, the question of how to lengthen the curtains may seem impossible to fix on your own: it will turn out sloppy, because the work is complex. However, there are ways in which the curtain can be extended so that no one would guess that it has undergone some changes.
You can make inserts in the middle of the canvas - one or more, both below and along the entire length.
For a better perception, we have selected photos showing how to lengthen curtains from the bottom or top with your own hands.
Fabric strip and eyelets
Eyelets are a great option for saving the situation. It looks good on tulle curtains, which require the insertion of a denser material that is ready to withstand heavy fittings. A combination of fabrics of different textures is a necessity, but it looks impressive. The cornices must have a round cross-section so that grommets can be put on them.
Sew a strip of fabric on top that matches the color and design, and then insert the eyelets.
Attention! The fabric of the sewn strip must contain the shade of the base material.
Inserts
You can insert oblique transverse strips from another fabric into the fabric. But this option is more demanding - the material will have to be cut out very precisely.
Inserts are a way out for housewives who sew well: they know how to cut out and sew on a machine with even, neat stitches.
They combine inserts from different materials in one product.
First you need to decide where exactly to make the inserts. It's better not to do it in the center. You should choose the top or bottom part of the curtain.
Pro Tips:
- for a classic style, choose light fabrics, preferably plain ones;
- bright inserts are good in combination with decorative elements;
- the drawing is matched to what is on the wallpaper.
Add a piece of fabric to the bottom. In this case, this is often designed as an additional strip.
Sew on fabric loops
The easiest way is to lengthen the curtains at the top using loops. Even someone who knows nothing about tailoring can do this. The fabric is matched to the tone of the curtain, with a similar texture.
Beautiful loops will not only make the curtain longer, but will also add originality to the product.
Algorithm for making loops.
- Strips 4-5 cm wide are cut. The length depends on how much you need to add, with an addition of 2 cm for allowances. If additional decorative elements (fasteners, buttons) are sewn on, add a couple more centimeters.
- Ready-made loops are sewn on or tied using beautiful ties or bows.
- The product is hung on a tubular cornice.
Even a person who has nothing to do with sewing can cope with such work.
Add a lambrequin
Lambrequins visually increase the length of the curtain. The main thing is that the cornice is suitable, for example, a profile 2-row or 3-row.
This is also not a rare decision, because many housewives consider it useful to diversify the decor with fresh new clothes.
You can make a lambrequin your own using an algorithm.
- The material is selected for the inner (lining) and outer sides.
- A template is made using measurements of the length of the window opening, oriented towards the center.
- The parts are cut out with an allowance of 2 cm.
- The parts are sewn from the inside out, the finished product is turned inside out, and ironed through gauze.
- The finished product is installed on the cornice.
The materials must have approximately the same characteristics so that aesthetics are not compromised in the future.
Please note: this solution is suitable for craftswomen who know how to sew well.
Rip out the bottom allowance
Ripping seam allowances is the most common and easiest way to increase the length of a curtain. This method is available to anyone and does not require any skills.
To add 4-6 cm to the curtains, just open them from the bottom. This option is suitable when the curtain is just short enough to reach the required length.
If you open the bottom seam and iron it properly, you can achieve the desired length.
Usually the bottom edge is hemmed with a margin. If you carefully rip it apart and then iron it with an iron, the difference will not be noticeable.
Please note: if the bottom edge is fairly worn or faded, this method is not a solution.
We add ruffles
This option is good for a country-style room or a romantic design.
- First, measure the width of the curtain and multiply the number by two.
- Then a strip of the obtained length is cut out, its width is 10 cm. It may be more. It depends on how much ruffle you need and the missing length. Add some fabric to the seam allowances.
- 2 cm from the edge of the cut strip, baste the fabric into one thread.
- The assembly is done along the width of the curtain, the ends of the thread are secured.
- The ruffles are basted to the bottom edge of the curtain and sewn on a machine. The seam can be hidden with a beautiful ribbon or delicate lace.
This option is suitable if you want to fit old curtains into the new romantic interior of the living room or bedroom.
Remember! The fabric for the frills should be in harmony with the material of the curtains. If a contrasting color material is chosen, it should be duplicated in other elements of the curtain.
Adding decor
Using decor is a frequently used option to lengthen a curtain. For this purpose, decorative details, whole or consisting of several small elements (beads, embroidery, etc.), are sewn to the bottom of the canvas. This decor will be good for modern as well as classic interiors.
Ruffles look romantic and light, so they will suit many types of interior, especially the Provence style.
Brushes are often used, which are a continuous strip along the bottom and sides. Variability is achieved through the size of decorative elements and their color.
The use of decorative tassels is popular, and they are usually attached with one continuous strip along the sides and bottom of the curtain.
Step by step guide for beginners
Attaching to the curtain is carried out in 2 stages.
Stage 1. Marking
The installation begins with markings. The same distance is measured in the center. A distance of 35 to 40 cm is left from the edge of the wall to the cornice.
Marking diagram for attaching the cornice to the wall
Attention! It is necessary to maintain a distance of 10-15 cm between the ceiling and the wall. Otherwise, the cornices look awkward.
The fastening points must be located on the same horizontal line, so when marking you must use a level
Mark the drilling points with a pencil
Stage 2. Fastening cornices
The plank is assembled not from one crossbar, but from two parts, and then hung on brackets. The joint of the planks is not visible.
The fixation points are measured. A drill is used to drill holes in the wall. The brackets are screwed on and the bar is inserted. It should have rings and hooks. If they are not there, then you need to take care of this first. But, as a rule, they are sold already as a set.
Drilling holes
Installing dowels
We fix the bar
Installing the bracket
Fixing the bracket
Place the cornice
Hang tulle using rings with hooks. How tightly it will hold depends on the strength of the clamp.
How to lengthen short tulle
Let's find out how to lengthen tulle when its length is insufficient.
There are several proven methods. Fantasy is also appropriate in such a creative endeavor.
- It looks beautiful when lace is sewn to the bottom of the tulle. Why not take advantage of this? It is advisable to choose fabrics that are identical in texture.
- Using a lambrequin. An excellent option for increasing the length of any curtain, including tulle. The main thing is that the cornice is suitable for this solution.
- Decorating the lower edge with pendants assembled from beads or seed beads. Such pendants are appropriate in a house without pets and small children.
A short curtain is not a problem. The problem of increasing the length can be solved using one of the proposed methods. When you lack imagination and your hands don’t obey you, there is a reason to turn to a curtain sewing professional.
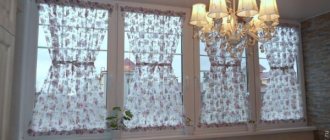
Photo of curtains
Curtains Wall curtain rods: three-row, two-row, designer
Next
CurtainsTypes of components for roller blinds for plastic windows
Home renovation and improvement
If you purchased a cornice that is shorter than necessary, you can sometimes get out of the situation by inserting another strong pipe inside the hollow pipe of the cornice.
Composite cornice - made using a ski pole
I inserted an aluminum ski pole about 10 centimeters inside the steel cornice (first I screwed the ski pole in until I had enough strength, then I hammered it in with a hammer, hitting the steel pipe, propping the aluminum end of the cornice on the ceiling). After making sure that the aluminum pipe was firmly seated in the steel pipe (and could be hammered in with great difficulty), I stopped hammering one pipe into the other and began trimming the ends of the resulting composite cornice. Because the threads were flattened at the point where the hammer hit the end of the steel cornice, I sawed off 3 millimeters of the flattened end of the steel cornice with a regular hacksaw. Then I sawed off the aluminum end. I made the length of the cornice maximum (in my case it was 268 centimeters), it turned out to be slightly less than the distance from the wall to the farthest point of attachment of the cornice to the wall.
General view of a composite cornice
The most fragile place in such a composite cornice is the junction point.
The junction of a composite cornice is its most fragile place
If there is no heavy load on the sections of the cornice close to the junction point, such a cornice can last a long time.
Brackets
Please note that the brackets vary in length. If the length exceeds the distance from the window to the ceiling, then it will not be possible to place the bracket above the window opening - it simply will not fit. In such a situation, they can be placed below the window. This option is called placement “partially above the window opening.”
The distance between fastenings must be at least one and a half meters and should not exceed two meters. Then the cornice will be securely fastened: this will help avoid deformation and the curtains will not sag.
Where to begin
Deciding on the mounting location
Even before buying a cornice, you need to think about where it will be fixed: on the wall or on the ceiling. In terms of aesthetics, the ceiling installation option is more attractive. Mounting on the ceiling allows you to cover the entire wall from top to bottom with fabric.
In addition, this option has a hidden system of curtain fasteners. The wall-mounted version is reliable and versatile, since any building has walls into which brackets can be mounted, but not everywhere there is open access to the ceilings. For example, in the case of a suspended ceiling there is no such access, which means installation on the wall is the only possible option in this case.
Marking
For proper installation of any system, it is necessary to first mark the supporting surface. Therefore, the first step is to find the center of the wall that is supposed to be curtained, and from there, using a tape measure, set equal intervals to its edges. The distance between the edge of the wall and the bracket should be about 35-45 cm. If it is smaller, even the assembled curtains will still slightly overlap the window, which is extremely undesirable.
Also, they should not be located close to the window itself, since then they will not allow its windows to be fully opened. The distance to the ceiling, as a rule, is 10-15 cm, but this parameter has little effect, so it can change in each specific case as desired.
When making markings, they are always oriented, first of all, to the wall, and only then to the window opening or level, because the plane of the wall itself is often uneven, which means that even strict adherence to the level cannot protect against the crooked position of the baguette.
Preparation of necessary tools and materials
To install such a system, you will need a standard set of tools, most of which are found in every home, however, if you don’t have any, it’s easy to purchase them or ask your neighbors:
- Hammer or drill.
- Hammer.
- Tape measure and pencil.
- Level and plumb.
- Ladder.
When purchased, parts for fixing it are usually supplied as a kit, however, even despite their presence, it is recommended to stock up separately with additional materials for installation: dowels and screws.