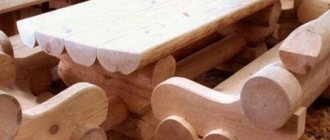
Master class on making unusual wooden boxes
Elegance of form, unusual style, modern design - all these qualities are inherent in the work of master Michael Cullen, who creates original wooden boxes. In this master class we will tell you how to make such wooden boxes with your own hands.
Creative projects do not require a lot of time, complex measurements and planning. The boxes do not have carpentry joints, and the starting material for their manufacture can be unnecessary scraps lying around in the workshop.
The creation of lightweight, durable and elegant boxes is based on extremely simple technology. The products are cut out on a band saw or jigsaw from a single piece of wood, sawn into two parts and glued back together. Plywood allows you to relieve internal stress, eliminating deformation and cracking of the box as the wood dries out. After this, a lid is made and the bottom is glued in.
All boxes are made using the same technology, however, each of them has its own unique style. These projects welcome creativity. Experiment with limitless variations of shape and decoration, creating unusual and stylish boxes for jewelry, rings, watches and other small, and if desired, large items.
Painting a wooden box
When taking on various options and types of needlework, I always avoided painting on wood, because the process seemed incredibly technically complex and incomprehensible. However, having nevertheless decided to try, I realized that any beginner can paint a box, tray, cup stand or any other wooden piece of furniture. Of course, it is unlikely that you will create a brilliant masterpiece right away, but it is indeed possible to understand the basics of wood painting techniques and decorate the interior with a useful and original item, decorated with your own hands. In this master class, I invite you to paint a wooden box or any other blank you find for your home, familiarizing yourself with several techniques for decorating wooden surfaces.
To paint the box you will need: a wooden blank (they are sold in any art store, although it is easy to make a box yourself) acrylic paint for decoration (I used about 6 colors, but this number can be any) primer for acrylic paints a flat synthetic brush and a thin brush for drawing a pattern (synthetics or columns) painting tape for craquelure (optional) pencil, eraser, palette Painting on wood We select the original wooden blank for work and roughly determine the color scheme of the future product. It’s better if you can immediately imagine the finished appearance of the painting in order to select the right paints, decide on the order of applying the colors and prepare a sketch. You can start from the color scheme of the interior, your favorite color if the box will be presented as a gift, or simply from the paints available. I immediately made a rough sketch of the painting for the lid. Similar motifs could be continued on the sides of the box, but I decided to decorate them with craquelure, which will be discussed in detail below. If you do not have much experience in drawing, you can copy a suitable pattern from a book or find it on the Internet. Some, especially repeating, elements can be conveniently cut out of paper and subsequently used as a template. When the appearance of the box has more or less formed before your eyes, we move on to preparing the wooden surface. If it is not too smooth, the wood can be lightly sanded before starting work. Reminder: before working with primer and paint, do not forget to cover the surface of the table with a sheet of paper so as not to stain it. We carefully cover the leveled surface with primer for acrylic paints, which is easy to find in any art supply store. Let the soil dry completely. Now we proceed directly to painting the shaktulka. The sides, bottom and inside of the box can be painted in one or different colors or painted in two layers of paint. I want to make the sides a different color and with the effect of “aged cracks” - craquelures. To do this, I apply a layer of acrylic paint on top of the primer with a flat, wide brush. If I wanted to make the inner bottom a different color, while painting the sides it would be worth covering the edges with masking tape so that the line of joints of different colors would be neat. I paint the box and lid in the desired colors and let them dry. If, in general, any acrylic paint is suitable for painting the main part of the box (they are sold in separate jars, tubes and bottles so that you can purchase only the shades you need), then for painting the lid I would recommend using thicker and higher quality paint from imported manufacturers so that the background paint layer does not show through. However, you will need very little paint. Before starting work, redraw the sketch on a wooden surface. You can apply it to light paint with light strokes with a simple pencil, to dark paint, like mine, with a white or any other light pencil.
Artistic acrylic paints do not require water or special solvents. You can mix them on the palette or use them in their “pure form”. To work on small details, it is convenient to use a thin round brush with hard bristles (for example, synthetic or kolinsky No. 2, No. 3). Reminder: acrylic paints have a covering effect, which means that if you make a mistake or inaccuracy, after the paint has dried, this place can be rewritten.
While the pattern on the lid of our box dries, let's start decorating its sides. This method helps create interesting visual effects and should especially appeal to those who do not know how to draw at all, since it does not require any artistic skills. To create cracks, we need a special craquelure varnish, which can also be easily found in any art supply store. Please read the package directions carefully as they may vary significantly. The basic rules of the craquelure technique: apply the varnish with a regular brush to a dry surface already covered with paint in order to speed up the process, the varnish can be dried with a hot hairdryer; when the varnish is completely dry, apply a second layer of paint of a different color in which after half a minute cracks will begin to appear; the direction of the craquelure depends on how you applied paint (if along the surface, then horizontally, if across, vertically) the thickness of the craquelure depends on the paint layer, the thicker it is, the larger the crack will be, the paint should be applied evenly with one movement of the brush, if the brush is passed over the same place several times, craquelure may not work. The effect of shabby red paint on the lid of the box was created without any varnish; it is enough to apply an almost dry brush with the remains of the paint of the desired color to get these kind of abrasions. If you want the effect of aging to appear in the drawing, before applying the design, it should also be treated with varnish; in this case, the pattern should be applied on the first try. When the paint is completely dry and the work is completed, you can use the box or make a whole set of items with a similar design, for example, to decorate a kitchen or children's room. Source
Double-walled cherry box
Drawing of a cherry box
Quick sketch . On the processed workpiece, cut lines are drawn with a pencil. A simpler option is to paste a pre-printed drawing with dimensions onto the upper plane of the workpiece. When transferring the sketch, it is important to maintain the longitudinal orientation of the fibers.
Blank for the lid . A flat longitudinal part 15-20 mm thick is sawed off from the main workpiece, which will later become the lid of the box.
Changing the inclination of the saw table . The angle of the table is changed by several degrees.
Cutting out internal waste . Having changed the tilt of the table by 2-3°, the part is cut in two and the internal waste part is cut out, forming a conical cavity of the box.
Plywood . The two halves are glued back together. Plywood allows you to relieve internal stress, preventing deformation and cracking of the wooden box. The glue is applied in a thin and even layer. Excess that bleeds through is very difficult to clean inside the box.
Drying . The glued workpiece is carefully placed under the clamps, carefully checking the absence of displacements and distortions.
Blanks for the lid and bottom . Having returned the table to a horizontal position, two sections are sawed off from the waste part. This will be the lid element and the bottom of the box.
Drawing of the blank for the lid and bottom
Cavity coloring . If you want to decorate a wooden box not only on the outside, but also on the inside, paint its cavity while there is easy access on both sides.
Sawing out the outer walls . Returning the saw table to an inclined position, make cuts along the outer contour.
Bottom gluing . A thin layer of glue is applied to the ends of the bottom and inserted into the lower part of the box, pressing with your fingers until it stops.
Cover stopper . The element intended for the lid of the box is glued onto the blank made at the very beginning.
Sawing out the cover . After the glue has dried, trace the main outline of the lid and cut out this final part.
The presented technology is universal. It allows you to experiment with design and unusual shapes, creating at home beautiful and original boxes that are not similar to each other.
Wooden boxes
Blanks and accessories →
Wooden boxes - blanks for decoration
Cute wooden boxes with or without a lock clasp will become the basis for many decorative techniques .
You can apply acrylic paint or any other paint to the wood - this will be the base. Next, you are offered a choice: decoupage , stencil technique , crackle , gilding , finishing with structural pastes or something else suggested by your imagination.
A little more varnish to consolidate the result. As a result, you will receive an elegant box that you can proudly put on your dressing table or give as a gift to a friend.
You can buy wooden boxes of different shapes: rectangular, in the shape of a chest, casket or book. The blanks are made from various types of wood: pine, birch, linden, etc.
- Subcategories:
- Solid birch boxes (1)
- Solid linden boxes (41)
- Pine boxes (36)
- Plywood boxes (17)
Number of goods: 99
- Sort:
- Name
- Price
- Bestsellers
- Date added
- In stock
- Wooden banknote holder, L-105
Dimensions 180 x 90 x 25 mm. Plywood and solid linden. A very neat box for banknotes.
- Large rectangular box with 12 compartments
Dimensions of the box: 32 x 22 x 10 cm. Chamfer along the edge of the lid. The partitions are coming out!
- Large chest made of solid linden, 350
Made to order, lead time about 2 weeks. Solid linden. High quality. Dimensions 35 x 25 x...
- Figured banknote holder, solid linden
Dimensions 195 x 105 x 55 mm. Entirely solid linden. Perfectly decorated in Russian and Oriental…
- Wooden box for documents (A4)
External size 33x24x7 cm. Internal size 30x22x4 cm. Plywood and solid pine. Magnetic lock,…
- Solid linden bureau-chest of drawers
The convex lid opens upward. 3 drawers. On legs. Dimensions 235 x 150 x 260 mm.
- Chest 25 cm, wooden box, solid linden
Solid linden. Dimensions 250x180x125 mm.
- Wooden box for money, with a chamfer on the lid
Dimensions 180x95x48 mm
- Wooden box, pine, 14x10 cm
Dimensions 145x105x75 mm. Pine, plywood.
- Casket, tea box with 4 compartments, 22x17 cm
The dimensions of the box are 225x170x100 mm. Solid pine, plywood top. The partitions cannot be removed...
- Square box 15 cm
Dimensions 15x15x6 cm. Solid pine and plywood.
- Wooden box (solid linden) figured casket, 25 cm
Solid linden. Dimensions 250x180x100 mm. Big size. Excellent quality, interesting shape...
- Wooden case - pencil case for wine and champagne
Pine. Dimensions 350x105x95 mm. An excellent option for a New Year's gift: a bottle of CHAMPAGNE in…
- Wooden key cabinet, shelf-drawer on top
Solid pine and plywood. Dimensions 17 x 7 x 28 cm. Inside there are hooks for keys. At the back there are loops for...
- Rectangular box, linden, with a chamfer on the lid, 165
Solid linden. Lock. Internal loops. Dimensions 16.5 x 12 x 9 cm.
- Casket-chest, solid linden, with lock, 165
Solid linden. Dimensions 165x120x85 mm.
- Banknote holder on legs, solid linden
Solid linden. Dimensions: 18x9x4 cm. Blank case for a cash gift.
- Book-box with flexible accordion spine, 10 cm
Dimensions 10 x 7.5 x 3 cm.
- Large rectangular box with 8 compartments
Solid pine and plywood. The dimensions of the box are 32x17x9 cm. 8 sections. The partitions are removed. It will become...
- Banknote box, box for banknote size
Solid linden. Dimensions: 18x9x4 cm.
- Square box, solid linden, 100x100 mm
Solid linden. Dimensions 100x100x80 mm.
- Square box 21 cm, with beveled lid, wood, solid pine
Dimensions 21 x 21 x 10.5 cm.
- Open tea bag stand, 6 compartments
Solid pine, partitions can be removed. 25x18x15 cm.
- Casket-casket, solid linden, 160
Solid linden. Dimensions 160x120x100 mm.
- Wooden key cabinet, XL
Solid birch. Excellent quality of wood processing. Dimensions 34 x 23 x 5 cm. Inside there are hooks...
- Solid linden chest of drawers, 3 drawers and a box
The top cover opens. 3 drawers. On legs. Dimensions 235 x 150 x 260 mm.
- Rectangular box with turned lid, 160
Solid linden. Dimensions 16 x 12 x 10 cm.
- Round box (snuffbox), with lid, 6.5 cm
Tightly sealed lid. Solid linden. External diameter 6.5 cm. Height with lid 4 cm.
- Wooden box (solid linden), figured casket, square 15x15 cm
Solid linden. Size 150 x 150 x 95 mm. A wonderful wooden blank for decoration in the Russian style.
- Gift box, plywood case
Dimensions 75x75x60 mm. You will get an elegant case for a small gift and jewelry.
Simple walnut box
A similar sequence of actions underlies the next project - a four-wall wooden box. Thanks to its unusual curved shape, its design looks stylish and modern.
Drawing of a walnut box
Casket with concave lid
Drawing of a box with a concave lid
How to decorate a wooden box with your own hands
Despite the external attractiveness of the form, the truly original style of the box acquires after decoration. The technique of relief carving gives unlimited freedom for creativity in this matter.
Using basic carving techniques, unique textures are created on the surface of the boxes. These can be either simple textures or complex ornamental or geometric compositions.
- Using a semicircular chisel to texture the box with small dimples.
- Making the lid of the box with grooves made with an angle chisel.
These photos show more complex decoration options using geometric patterns and complex textures.
Making a box
At the first stage, prepare everything you need: a small cardboard box, always with a lid, fabric of different colors, scissors, glue and lace.
It is best to do the craft on a comfortable desk. Then you can carefully lay out everything and not damage the workpieces.
When making a box, follow the sequence of instructions.
- Clear the box of any labels, stickers, glue or tape residue.
- Strengthen the bottom by additionally gluing the base.
- From any fabric, cut a rectangle in the shape of a bottom. Then glue the fabric to the cardboard.
- The most interesting creative stage is decorating the box with fabric. It is advisable to choose colors two shades brighter than the source material. Here you can safely conduct creative experiments.
- Next we glue the outer side and the lid with lace. To do this as carefully as possible, you should find a video on how to make a box with your own hands. You need to apply the glue delicately, because... As a result, traces of glue may remain on the box.
- You can add appliqués or designs inside for an organic combination. For example, in the shape of a heart in a bright scarlet shade.
Leave your craft to dry for a while and that’s it, your box is ready.
Box carving
No matter what tool you use to cut wood, the result will always depend on the direction, i.e. on how the cutting edge moves relative to the location of the wood fibers. Longitudinal cutting requires more energy, the tool will heat up more, but the surface will be smoother. And if you cut across the fibers, less heat is generated, but it is more difficult to avoid roughness and chips.
Step-by-step execution of work:
- It is more correct to decorate the blank (casket), onto which the sketch has already been transferred, with carvings from the back panel. There are loads from the force of pressing on the tool, and there is also a risk of damaging the threads on the surface resting on the plane. Therefore, while you are just getting the hang of it, start from the back panel, where errors will not be so noticeable.
- With flat-relief geometric threads, defects (chips, undercuts) are not excluded, especially in places of the transverse path of the thread protrusions relative to the fibers. In order not to destroy the pattern and strengthen it, the master can use regular superglue. It is well absorbed into the carved surface and becomes a neutral plastic film on it. The glue is not applied everywhere, but in the places where the lines converge.
- After the back surface of the box, cut out the sides. And only at the very end, when your hand has already felt the strength and you know how the material behaves, start carving the lid.
So, in words, it’s not very difficult to try your hand at making handmade carved wooden boxes. In practice, of course, you have to work hard: but this is the case when no detailed theoretical algorithm can replace real work with the material.
You can see how the master works, carving a pattern on a wooden box, in this video.
How to make a paper box
Some people wonder how to make a paper box with their own hands. Everything here is also very simple, the algorithm of actions is similar.
The only difference is that the box that we took ready-made must be glued together yourself. To do this, you need to make blanks using molds, carefully treat everything with glue and connect them. The product must dry well.
This box is perfect for storing all kinds of small items or can be used as holiday packaging. You can complicate it and add beads, beads, rhinestones, decorative feathers and artificial flowers.
DIY chest made of wood for the bedroom and nursery
Quite often, there is a catastrophic lack of space in the bedroom to store pillows, blankets and blankets. Of course, most people solve this problem by simply storing bedding in the closet, but this approach is irrational, since this greatly reduces the capacity of the closet. Therefore, making a chest with your own hands for storing bedding will be the best option that will help you solve the problem of lack of space.
- 1 Where to start
- 2 Side walls
- 3 Bottom and side walls
- 4 Cover
- 5 Some tips for beginners
- 6 Toy chest
Side walls
It is best to start making a wooden chest from the side walls. Below you can see a drawing of the side wall and the dimensions of the parts you need to make to fold it.
There's really nothing complicated here, just follow the instructions and use quality dry wood. Be sure to monitor the depth and width of the tongues (grooves) for the liners. You can make them in many ways, but the best way is to use a simple hand router. The most important thing is to use a cutter of the appropriate size and side stops that will allow you to make even grooves. It is best to clamp the workpiece itself in a vice while working, since otherwise you simply will not be able to hold it in your hands.
It is important that when the side wall of the chest dries, on its inside, you will need to make tongues for attaching the bottom and side walls. Since the entire structure is held on by glue, so as not to spoil the appearance of the product.
You may be interested in: How to make a canopy over a bed with your own hands
Bottom and side walls
The cheapest option is to make the bottom of the chest from plywood, since anyway this element will simply be invisible when the product is ready. Making it from plywood with your own hands is not difficult, since it is enough to simply cut out a sheet of the required size and, accordingly, make tongues for it on all side walls.
The side walls will be somewhat more difficult to make; they are also shaped. But if you follow the drawings, you won’t have any problems; the most important thing is to just adjust all the details and make sure you don’t run away from the dimensions. Therefore, we do everything step by step and check their fit accordingly.
An equally important point is the correct tongue and groove on all walls so that the product can be folded correctly. After the side, front and back walls of the chest are ready, you can put them together and put them on glue so that the chest frame is completely ready.
Let's start creating
First prime the item.
Before you decorate a wooden box with your own hands, carefully inspect it.
It will probably require some light repairs and sanding down any rough spots.
- Dents and chips are often observed on the surfaces of old things. They need to be puttied. After drying, go through the sandpaper again, removing all the unevenness.
- Now the item needs to be primed for better adhesion of the wooden product to the paint or varnish, as well as for protection. After priming, dry and sand the product again.
- Apply a layer of glue and let it sit for an hour. During this time, cut out the desired design from the napkin and, if necessary, peel off the backing.
- Lay out the first fragment of the applique, carefully cover it with a sheet of parchment or a cotton cloth. Press on top with a hot iron, it will heat up the glue, and the napkin will stick to it tightly.
Gluing the picture.
- Finally smooth the napkin with a brush or finger dipped in glue. Don't be alarmed by the wrinkles that form; they will disappear after varnishing.
- Next, you should add color to the ends of the product. It would be a good idea to paint a wooden box with acrylic paints in the shade you like.
- To give a vintage style to the item, add patina to the edges. Experts prefer the “antique” color for these purposes. It ages the products naturally.
- Once dry, coat the sides with acrylic varnish and set the box aside again. Afterwards you will have to go over it again with fine sandpaper, then the sides will become perfect.
- We decorate the sides in the same way as the top - iron the attached napkin through a rag with a hot iron.
- Don’t forget that the box also needs to be tidied up inside. You can cover it with velvet cloth, paper, or apply a stencil design to the already cleaned sides, lid and bottom.
Applying varnish.
- Cover the fully decorated and dry box with varnish. Make sure there are no leaks. There can be from 1-2 to a dozen layers with drying. Each subsequent layer will give the surface more shine.
Lid
To make the chest lid beautiful, it is best to make it not from plywood, but from boards.
In order not to cut chamfers and tongues on each board, it is best to make it on transverse ties. Thus, the lid will not only look beautiful, but will also be more reliable. The design of such a cover is very simple; you just need to screw the cover on the inside using self-tapping screws of the appropriate size.
Click to enlarge
To secure the lid, overhead hinges are used, and in addition to them, shock absorbers are used so that the lid opens and closes smoothly. A chest made in this way will be very easy to handle and will not create noise, which is important in the bedroom.
Decoupage
For work you will need the following materials:
- napkins, magazine clippings or scraps of fabric;
- PVA glue;
- acrylic paint;
- brushes;
- varnish;
- scissors;
- sandpaper.
At the first stage, the box is prepared for decoration. The surface must be perfectly smooth, as subsequently all defects may become more noticeable. When the product is prepared and dried, you can start decorating:
- Cut out and try on elements of the composition from napkins or fabric.
- Place the cutout on the surface and carefully apply glue, smoothing the paper from the center to the edges. If fabric is used in the decoupage technique, then glue will not work; it is better to take a stapler and attach the fabric to the inner coverings of the box.
- Dry the product.
- Apply varnish (if using fabric, this step is not necessary).
We invite you to familiarize yourself with the Tit with a tuft on its head
Using the decoupage technique, the box can be decorated both outside and inside.
Advice! For decoupage you can use various photographs. But first it is better to remove the bottom layer so that the paper is thinner.
Stylish vintage never goes out of style
A box with mohair fabric will be both practical and an excellent interior decor
Some tips for beginners
The most important thing in how to make a chest from wood is its final processing. This includes sanding, tinting and varnishing. Even if you have small gaps or knots in the material, you can easily hide them using a special wood putty. After all, thanks to it, the tree retains its beautiful appearance, and at the same time practically no flaws are visible on it.
You may be interested in: DIY book shelf - an ideal solution for storing knowledge
Also, if you want, you can change the size of the chest, and not make it exactly the same size as in the drawings. The main thing here is not to confuse anything with the drawings. Just be careful and attentive, and everything will work out for you.
Wood painting
To paint a product, it is not necessary to have the talent of an artist. In addition, stencils can be used to decorate the box. You can choose absolutely any image, it all depends on your imagination and preferences. To work you will need:
- casket or box;
- primer;
- acrylic paints;
- brushes;
- stencil (you can make it yourself or buy it at a specialty store);
- masking tape;
- sandpaper.
We invite you to familiarize yourself with Cabbage seeds
Advice! It is better to pre-treat the box with sandpaper and varnish it.
One of the features of the shabby chic style is floral motifs.
Standard mustard-colored box with ribbons - simple and beautiful
Stylish scale made using decoupage technique
The work includes several stages:
- Primer coating.
- Sanding.
- Tape the bottom corners with tape.
- Coating the product with light acrylic paint.
Important! Acrylic is applied evenly.
- After drying, the surface is treated with sandpaper and a layer of paint is applied a tone darker. This layer should be liquid so that you can then blot it with a sponge, giving the surface texture.
- Secure the base with varnish.
- Use masking tape to cover the parts of the box that will not be decorated.
- The selected stencil is fixed.
- The drawing is carefully painted over. The paint should be thick and water should be used in minimal quantities.
It is possible that after drying the drawing will have to be repainted, since the color will most likely be pale the first time. If the stencil is a small element of the composition, then the action will have to be repeated several times. After the painting has dried, the box is coated with varnish.
This master class allows you to create a product whose surface looks like fabric. This is achieved due to the fact that between the main layers the box is varnished, and the paint does not saturate the wood.
The box decorated with beads and leaves looks very beautiful
This type of decor for the box will be an excellent addition to the interior or an original gift.
We select the initial wooden blank for work and roughly decide on the color scheme of the future product. It’s better if you can immediately imagine the finished appearance of the painting in order to select the right paints, decide on the order of applying the colors and prepare a sketch. You can start from the color scheme of the interior, your favorite color if the box will be presented as a gift, or simply from the paints available.
If you do not have much experience in drawing, you can copy a suitable pattern from a book or find it on the Internet. Some, especially repeating, elements can be conveniently cut out of paper and subsequently used as a template.
When the appearance of the box has more or less formed before your eyes, we move on to preparing the wooden surface. If it is not too smooth, the wood can be lightly sanded before starting work.
Reminder: before working with primer and paint, do not forget to cover the surface of the table with a sheet of paper so as not to stain it.
We carefully cover the leveled surface with primer for acrylic paints, which is easy to find in any art supply store. Let the soil dry completely.
We invite you to familiarize yourself with Crafts for the garden: 10 best master classes
Now we proceed directly to painting the shaktulka. The sides, bottom and inside of the box can be painted in one or different colors or painted in two layers of paint. I want to make the sides a different color and with the effect of “aged cracks” - craquelures. To do this, I apply a layer of acrylic paint on top of the primer with a flat, wide brush.
If I wanted to make the inner bottom a different color, while painting the sides it would be worth covering the edges with masking tape so that the line of joints of different colors would be neat.
I paint the box and lid in the desired colors and let them dry. If, in general, any acrylic paint is suitable for painting the main part of the box (they are sold in separate jars, tubes and bottles so that you can purchase only the shades you need), then for painting the lid I would recommend using thicker and higher quality paint from imported manufacturers so that the background paint layer does not show through. However, you will need very little paint.
Before starting work, redraw the sketch on a wooden surface. You can apply it to light paint with light strokes with a simple pencil, to dark paint, like mine, with a white or any other light pencil.
Artistic acrylic paints do not require water or special solvents. You can mix them on the palette or use them in their “pure form”. To work on small details, it is convenient to use a thin round brush with hard bristles (for example, synthetic or kolinsky No. 2, No. 3).
Reminder: acrylic paints have a covering effect, which means that if you make a mistake or inaccuracy, after the paint has dried, this place can be rewritten.
While the pattern on the lid of our box dries, let's start decorating its sides. This method helps create interesting visual effects and should especially appeal to those who do not know how to draw at all, since it does not require any artistic skills.
To create cracks, we need a special craquelure varnish, which can also be easily found in any art supply store. Please read the package directions carefully as they may vary significantly.