How to make a hinged cabinet door
Hello, dear readers and DIYers!
There are quite a lot of different mechanisms by which you can implement a folding door for a cabinet. However, they are quite expensive. In this article, the author of the YouTube channel “Woodworking Tips and Tricks” will tell you about a very simple and affordable method of making a mechanism for a hinged door.
In addition, this door can be completely hidden at the top of the shelf, providing full access to its contents.
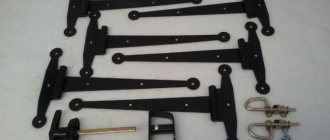
Materials. — Sheet plywood — Rollers from drawer guides — Wood screws.
I thank the author for the unusual and simple design of a folding door for a closet!
If you have interesting homemade products, share them on this site. Here you will receive a real reward, and not a “bunch of green stuff” on an entertainment forum.
Good mood, good luck, and interesting ideas to everyone!
The author's video can be found here.
Source: usamodelkina.ru
How to install swing and sliding doors in a closet with your own hands
In a spacious or small apartment there are always wardrobes, cupboards, and bedside tables that provide places for organizing and securely storing clothes, dishes, books, and other necessary things behind a closed facade. This is why cabinet doors perform one of the most important structural functions.
Today it is proposed to use various methods of fastening traditional swing doors, as well as sliding ones, which are installed mainly in sliding wardrobes. You can install any doors into a closet with your own hands if you familiarize yourself with the mechanisms of their operation and follow detailed instructions.
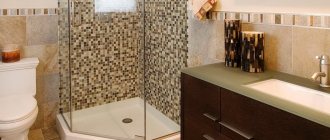
Sliding glass fittings: purpose
The functional purpose of sliding fittings is to ensure tightness. The peculiarity of showers is that the water flow always remains inside, otherwise the very principle of operation of the product will be violated: a local water procedure.
Therefore, all components that are used during installation work are designed taking into account the need for tight fixation of the glass sheet. For example, a ready-made kit for a sliding shower screen includes not only a roller for securing the curtain and a lower guide, but also special seals.
The same can be said about the lower guides and connecting pipes. If the glass sheet plays in the grooves, the structure will not receive the proper degree of stability.
The design may fail, which will lead to the creation of hazardous situations. We must never forget that glass is a unique material that does not tolerate careless handling. Glass sliding partitions are strong and reliable, but they can be damaged by careless mechanical impact.
Fittings for sliding glass doors not only provide an aesthetically pleasing design, but also create conditions for safe operation.
Installation of a swing facade on furniture hinges
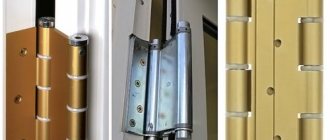
Today there are the following types of door hinges:
- hinged;
- four-hinged (overhead, semi-overhead or inset);
- products for glass structures;
- corner;
- inverse.
How to mount a door leaf on hinges
Before installing hinges on the door and cabinet wall, you need to take into account the material the furniture is made of, and also determine how many door hinges will be needed. The number of products used depends on the size of the door and its weight. For example, with a facade height of about 1500-2000 cm, which weighs up to 13 kg, you will need 3 hinges.
Get ready for work
You should select the following tools with which you can hang swing doors in a closet with your own hands. Prepare:
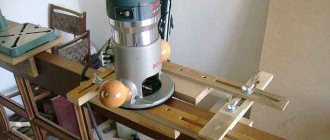
- electric drill and drill corresponding to the diameter of the mounting screw;
- milling machine, nozzle of equal diameter;
- tape measure, pencil for marking;
- building level;
- We screwed it with a regular screwdriver that fits the size of the fasteners.
Procedure
- Mark the location on the door to install the hinges. The distance between the loops depends on the height of the fabric, and 8-15 cm should be measured from the edge.
- Place the hinge on the door and use a pencil to mark the location for the cup of the fixture.
- Drill out niches for the cup using a router with an attachment. Use the sharpest possible tool, drilling to a depth of 13mm.
- Insert the loop inside the finished recess, align the device horizontally. Mark the locations for preparing holes for fastenings.
- Drill holes for fasteners.
- Attach the hinge to the door surface.
- Place the door against the cabinet body with your own hands, align the position of the panel, and mark the cabinets where the strike plate should be installed.
- Drill through the cabinet at the marked points.
- Install the strike plate onto the screws.
- Connect both parts of the loops.
- Use a screwdriver to adjust the hinge to the correct position.
Mortise
Hinges for hanging glass doors with drilling are regular mortise hinges. Their fastening requires drilling mounting holes. They differ from ordinary ones in the material of the cups mounted on the surface of the sash. They are made of rubber, soft plastics, etc. The outside is covered with decorative caps. When installing furniture glass facades, simple hinged or four-hinged canopies are often used. Four-hinged hinges secure glass doors in different positions relative to the cabinet walls.
The furniture hinge for glass facades consists of the following parts:
- mounting plate;
- the loop itself;
- o-ring - designed to connect the hinge to the glass, which is inserted between these two elements and then clamped with screws;
- decorative overlay - necessary for installation on the mechanism from the outside.
Fastening with drilling is applied to the base of the product in different ways. According to the method of application they are distinguished:
- overhead - the mechanism is applied to the ends of the side parts of the case or box;
- semi-overlay - the main hinge mechanism is half-overlaid on the ends of the sides of the case or frame; such canopies are suitable if two doors are installed on the same part of the case;
- inset - the loop part is superimposed on the side part;
- angular - designed for hanging doors at an obtuse angle relative to the side of the product.
Methods of applying
canopies to the body, installed with an overlap - suitable for hanging a glass door on a base, when it is necessary to ensure an opening angle of 180 degrees; they are more often used in shower cabins, especially curved ones.
Canopies with overlap
Innovation - a hinge with the ability to 3D adjust the position of the door leaf. A sash with such canopies can be easily adjusted during installation or during operation in three directions: horizontally, vertically, and for pressure.
Sliding wardrobe panels
The sliding wardrobe is the most popular furniture today. This is facilitated by the ability to rationally use living space. Often the closet occupies the entire space from floor to ceiling, has a large capacity and, when using a sliding door, does not at all interfere with the movement next to it.
In order for such storage furniture to serve for a long time and without failure, it is important to correctly assemble the entire structure. The main role belongs to the flawless installation of sliding facades. By precisely fulfilling the requirements and recommendations of specialists, a person with the skills to use special tools can install the cabinet door system with his own hands.
What do you need for work?
Before you start installing the door yourself, check that you have the necessary components for the sliding system in the closet. In addition to the facades themselves, the following must be prepared:
- Bottom and top rails or guide profiles. These are the main parts that ensure the movement of the door leaf.
- Motion limiters and stoppers. Parts that help the door move smoothly along the guide rail and stop the movement at a certain point.
- Closers are mechanisms that ensure the sliding of the door panel.
- Accessories for façade systems. For example, seals, screws, rollers, etc.
Prepare your tools:
- electric drill;
- metal drill with a diameter of 4 mm;
- a set of straight and Phillips screwdrivers;
- spirit building level;
- imbus key;
- plumb line;
- sandpaper;
- pliers;
- hammer;
- stationery knife;
- roulette.
Carefully familiarize yourself with the main structural elements of the sliding wardrobe door and their location.
Step-by-step instruction
You can begin installing sliding facades with your own hands only after the installation of the wardrobe itself has already been completely completed. The doors of the structure must be set according to the level. When performing work, be extremely careful and careful, as components can be easily damaged.
- Measure the width of the cabinet opening at the top as accurately as possible. The top guide rail will be mounted there. You need to subtract 1-2 mm from the obtained value.
- Use a ruler (square) to accurately mark the cutting line perpendicularly according to the obtained size. Cut the profile using a grinder or a hacksaw.
- We prepare mounting holes for self-tapping screws. Along the entire length of the guide profile, at regular intervals of about 40-60 cm, mark the holes for the screws; they should be located on the same line.
- To avoid damaging the profile while drilling, use a chair, table, etc. as a support. Drill the holes, then sand the edges with sandpaper.
- Install the finished guide profile in the upper opening of the wardrobe. Use screws or self-tapping screws for this.
- Trim the lower profile in the same way as the top one. Mark the mounting holes, then drill and sand the edges of the cuts.
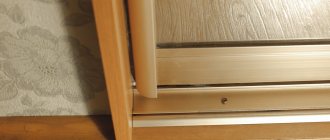
- Install a stopper at both ends of the profile guide. The device is designed to fix the state of the cabinet door leaf in the closed position. For the latch to function correctly, it must be inserted: in the right panel - in the recess on the right, in the left panel - in the recess on the left.
- We use a plumb line to check the correct position of the profile.
- Installing a door on profiles in a wardrobe. Alignment of the position of the facade canvas.
The sliding system used involves the use of special rollers, which are placed on both sides of the facade (top and bottom). The upper elements are stationary; they fix the door leaf. The lower rollers perform the function of workers - the door moves along them.
- Carefully insert the upper rollers with your own hands into a special place in the upper profile, and the lower wheels into the groove of the lower profile rail. The diagram clearly illustrates installation locations and methods.
- The sliding wardrobe doors are installed, it's time to adjust their position. For this, there are special wheels that are located on both sides of each door leaf. To properly adjust the balance, the cabinet doors must be in the closed position.
What is Schlegel for cabinets, its types and installation instructions
One of the reasons for the incorrect operation of the sliding system in sliding wardrobes may be the lack of a seal. During assembly, careless craftsmen, out of savings or accidentally forget to put in the Schlegel. Let’s look at what lies behind the name “schlegel”, which is outlandish for the common man, what is the purpose of this fittings and how difficult it is to secure it with your own hands.
Despite its unprepossessing appearance, the schlegel is an important accessory for a coupe cafe.
Application of Schlegel for sliding wardrobes
The door seal is not as simple as it seems. In the professional world, this type of fittings is divided according to a number of parameters, but before moving on to the intricacies of choice and purpose, let's look at the definition.
What is a furniture door seal?
Schlegel is a narrow fleecy strip that is glued to the side vertical profiles of sliding wardrobe doors.
This strip has a dual purpose: firstly, it softens the impact of the side vertical profile on an adjacent surface (cabinet wall or adjacent door), and secondly, it blocks the movement of house dust both from the cabinet and into the cabinet.
Nowadays, seals are produced for all types of side door profiles.
What other names does Schlegel have?
Craftsmen call such fittings differently; the most common names include the following:
- Boot - these tapes have a pile length from 7 mm to 15 mm, as the name implies, the main purpose is protection from dust;
- Seal – the length of the pile of the seals does not exceed 6 mm. At the dawn of mass production of sliding wardrobes, there were attempts to attach soft rubber, foam rubber and silicone stickers to the end of the doors, but practice has shown that in operation the pile is an order of magnitude ahead of its competitors;
- The shock-proof brush, buffer strip and shock-absorbing strip are, in fact, speech analogues of the above-mentioned sealing tape.
The most popular are schlegels with a width of 7 mm.
Functions
- Noise protection - the smooth movement of the door leaf along the guides indicates the quality of the roller system, but the door itself is heavy and even with a slight push it hits the side obstacle hard. Without schlegels, the “music” of opening doors will be heard by all the neighbors in the area, not to mention the household;
- Shockproof protection - sliding wardrobes are assembled from laminated chipboard, MDF, veneered furniture board and natural wood. None of these materials are considered shockproof. And if we also take into account that the blows of the door profile will be applied constantly and at one point, then without compaction within six months the side wall will lose all attractiveness;
Glass and mirror doors have become popular lately. Acrylic glass is not afraid of impacts, but ordinary quartz glass can crack if hit hard. In addition, shockproof tempered glass has critical points at the ends and a light blow to such a point leads to multi-link destruction of the glass sheet.
Reputable manufacturers produce sealing tapes in a wide range of colors.
- Dust protection - at least 70% of sliding wardrobes are used for storing clothes, bed linen and other similar things. Simply put, any clothes closet is a large dust collector. House dust is one of the ten allergens dangerous to humans, and any protection against it will not be superfluous.
What materials are door shock absorbers made of?
The first models of shock-absorbing gaskets for doors were made of felt; the material is good, but short-lived. Now the share of felt models has decreased to 15–20%. The main market is occupied by synthetic polypropylene tapes with different densities.
Source: obustroeno.com
Design features and operating mechanism
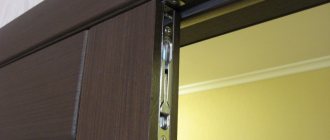
The loop consists of the following elements: cup (1), shoulder (2), striker (3). The cup is inserted into a blind hole in the door, which is drilled with a milling cutter and fixed with two self-tapping screws through holes located on the flange (5).
A counterplate is fixed to the furniture wall with self-tapping screws, which is attached to the arm (2) and the cup using a mounting screw (6) and a mounting groove (7). An adjustment screw (8) is located on the arm to adjust the height of the arm relative to the strike plate and align the door after installation.
Design features of furniture hinges
To work you will need:
- drill: thin drills, milling attachment with a diameter of 35 mm;
- pencil, tape measure (ruler);
- screwdriver or Phillips screwdriver;
- building level.
Adjustment and Leveling
At this stage, you need to work at the construction level - determine the correspondence of the frame parts to the door leaf. To do this, the level is applied to 3 planes - to the two sides and to the front. They should be as even as possible. That is, there should be no gaps or deviations between the frame and the door leaf.
Alignment begins with adjusting the vertical gap. To do this, pressing the facade against the frame, tighten the fixing screws on the strip. Then close the door and check the possible angles of inclination with a building level.
By adjusting the screws, all gaps between the facade and the frame are eliminated. For example, if the upper corner is tilted to the right, tighten the screws on the upper hinge and loosen the screws on the lower one.
Then they begin to adjust the doors according to their height. Two self-tapping screws located on the “ears” of the strike plate are responsible for this. To begin with, loosen the screws on all hinges, raise or lower the canvas (depending on the situation). Then tighten the screws until they stop, holding the facade in the desired position.
Tips for choosing
When choosing fittings for glass doors, you need to pay attention to the following features and characteristics.
- Element material. Depending on what metal the loop is made of, it can support less or more weight. If the door leaf thickness is no more than 8 mm, aluminum or zinc fasteners are sufficient. If its thickness exceeds 10-12 millimeters, then you should take a closer look at bronze and brass hinges.
- Difficult to install. If it is not possible to call specialists, then you should choose the simplest fastenings that can be easily hung alone or together with an assistant. In the absence of special tools for drilling holes in glass, you should not buy mortise structures.
- Appearance. If there are no patterns or designs on the glass door, then the eye will very quickly move from the transparent panel to the fittings. It should be combined with the design of both the door itself and the interior of the rest of the room. You can choose fasteners to match the main color or make it a contrasting element.
In addition, it is necessary to pay attention to the quality of the finishing coating of the element. In a sauna or shower, the loop will have to constantly be in contact with water of different temperatures and humid air, so the paint must be of suitable quality.
- Manufacturer reliability. High-quality products from a famous manufacturer always have good and informative packaging. The accompanying documentation or on the box itself must indicate the maximum weight that one loop can withstand. In addition, special self-tapping screws or screws with nuts should be included with the mortise elements. Also, a reliable manufacturer will always give a guarantee for their product, so it is important not to forget to check with the seller about its availability.
- Price. The most expensive product in the store is not always the highest quality, but very cheap hinges cannot be reliable. It is worth determining the budget framework so that it includes several products of the middle price category, and from them you can select those hinges that suit their characteristics.
Installing hinges on glass doors
Four-hinged hinges for glass doors are distinguished by the presence of a special tab for attaching the cup and a cover for masking the device from the outside.
If you have no experience working with glass, it is better to turn to specialists to drill holes. Before this, you need to establish preliminary markings of the locations of the loop cups. At the same time, they also take into account the hole where the handle will be hung.
Overhead hinges are also used for glass doors, which can be hung without drilling glass.
You need to place and secure the cup in the drilled holes using a tab, and attach the counter plate to the box with self-tapping screws. Afterwards the door is aligned along three planes.
For glass doors, overhead hinges are also used, which can be hung and fastened without drilling the glass. They are mounted inside the box; accordingly, all shelves in the closet must be recessed inward. Suitable for light sashes only. For example, for the bookcase department.
Four-hinged hinges come in different modifications, which can be selected depending on the location of the panel relative to the box and the cabinet itself in the room.
Invoice
The canvas attached to this loop is completely perpendicular to the body and covers the stand. Used when the door overlaps the side rail of the cabinet.
Invoice
Half waybill
It is used when two doors need to be hung on one rack. Each facade overlaps the end of the rack by half.
Insert
The door leaf is perpendicular to the post, but does not overlap its end.
The overhead hinges also differ in the angle of inclination. This is necessary for installing corner cabinet doors. Depending on the difference between the angle of the facade and the perpendicular to the stand, you can select hinges with an opening angle: -25 °, 30 °, 45 °, -45 °, 90 °.
Insert
Transformer
Used to create composite facades from several doors or in cabinets with drawers that are hidden
Eight-joint
It has all the characteristics of a four-hinged hinge, only without inserting the cup into the facade body. It is attached with self-tapping screws, so it is only suitable for fabrics with a dense texture.
Eight-joint
Installation and adjustment
Methods for installing and adjusting fittings on a glass door depend on its type. The easiest way to install clamping hinges yourself is that they do not require pre-drilling the glass. First you need to take all the measurements and choose the location for installing the loop. If there are two loops, they are placed at a distance of at least 5-7 centimeters from the horizontal edge. After applying all the markings on the glass itself and the door frame (or cabinet body), all the necessary holes are drilled and the part of the hinge that will be located on the wall (or cabinet body) is fixed. Fixation is done using a screwdriver or a regular screwdriver.
The glass is inserted into the clamps on a fixed loop, after which the clamps are tightened. It is quite difficult to carry out this operation alone; an additional assistant is needed. It is better to tighten the clamps on the glass by hand rather than with a power tool. This is necessary in order to feel that the glass is securely fastened and does not move in the loop. After adjustment and correction of all possible defects, decorative overlays can be attached over the installed hinges, hiding the internal structure of the mechanism.
Installation with drilling is more complicated and requires special equipment. First of all, all measurements are taken and the area for installing the hinge on the glass and door frame is marked. In the marked area, the glass is drilled using a regular diamond drill bit or in a special workshop. The hinge cup is installed in the resulting hole and connected to the mating part using bolts. Bolts of the required size should be included in the kit upon purchase, but you can buy them yourself and select them according to size.
Holes are also drilled on the door frame with a conventional drill and a strike plate for the hinge is installed. The door is attached to the wall, its position is adjusted with a regular screwdriver. For such adjustment, special bolts are located on the hinge body. The position of the door is adjustable both horizontally and vertically. A properly hung door should not dangle, but it should not get stuck when opening or closing. The tightness and smoothness of the ride are also adjustable. The hole in which the cup is fixed is closed from above with a special cap. It not only maintains the integrity of the structure, but also performs a decorative function and also protects the cup from dust or moisture.
In the next video you will find step-by-step instructions for installing a hinge on a glass door.
A glass door is no longer a luxury available only to certain segments of society. Modern technologies have made it possible not only to reduce the cost and simplify the manufacturing process, but also to make such a door safer.
You should be especially careful when choosing the right and reliable high-quality fittings. If it is done correctly, the installed door will not need repairs or additional adjustments for many years.
In the next video you will see the installation of hinges for glass doors.
Other types of furniture hinges
Card, piano, and hinge hinges are rarely used for installing cabinet doors. They do not have three-level adjustment and do not lock the door in the open and closed position. An additional fastener is needed. Today they are more often used as an additional decorative element. For example, antique.
Mezzanine
For installation of horizontal overhead panels that open upwards.
Mezzanine
Secretaries
Used for hanging downward opening facades.
Secretary room
We have learned in our practice how proper installation and adjustment of hinges affects the operation of the cabinet as a whole. Some time after assembly, the door of the wardrobe or kitchen cabinet stopped closing - the upper part of the door rested on the frame.
To correct the misalignment and use the cabinet normally, I had to readjust all the hinges. Therefore, during installation, it is advisable to prevent any deviations; any gap can lead to deformation of the entire cabinet structure.
Source: bezkovrov.com
Types of valves
Niche doors are made from various materials. Thus, the stores offer designs from:
You can choose from glass, metal, plastic or wood
The choice of door depends on the style of the room. Wood always looks good, but is expensive. Instead of solid wood products, you can choose options made from MDF or plastic. These materials also last a long time and have their own advantages.
Glass panels are suitable for a recess, beautifully decorated inside. If an electric meter is installed in it, pipes and wires pass through it, then it is better to make a cabinet with an opaque door.
Wooden
Wood is more suitable for decorating interiors in a house in a classic style, as well as Provence, country, Mediterranean, Scandinavian, and ethnic. You can choose doors of any design: varnished, stained, acrylic painted.
Wooden doors are not suitable for the bathroom. There is high humidity here, which can soon cause the wood to become deformed. In a rustic kitchen, you can make a cabinet in a niche and close it with a wooden door in olive or cream color. Canvases made of thin wooden slats are suitable for the bedroom and hallway - wicker baskets with things can be stored in such a recess.
Installation and operation
The glass structure differs from other analogues only in appearance. If we talk about fastening, it is worth noting that its installation is carried out according to the same principle as the installation of, for example, a wooden door of a similar design and opening option. However, the installation of a glass door comes with a number of nuances that you need to be aware of. Especially when you plan to install the glass yourself.
Installation Features
An all-glass panel is much heavier in weight than a wooden one, which means it’s difficult to mount it without a couple of extra hands. A finished door cannot be “cut” to the appropriate size, so the glass structure is made to order, inviting a specialist to take measurements after finishing the opening.
For the manufacture of all-glass door systems, tempered or laminated glass is used, but despite this, any mechanical impact can damage it
Therefore, during fitting, installation and other manipulations with glass, you need to be careful and careful. All-glass is mounted in a box, you can do without it by installing hinges in the wall or on the floor and ceiling
The box can be wooden or metal, the latter in combination with solid glass even looks harmonious.
In order to ensure a long service life of the glass structure in premises intended for public, administrative, sports and other purposes, it is necessary to use a pendulum mechanism, and the systems are attached not to the frame, but to the ceiling and floor of the opening. This installation is considered wear-resistant.
Features of operation
If the door is installed correctly, then there should be no problems with operation. Caring for a glass structure comes down to cleaning the canvas and auxiliary parts from dirt, as well as regular inspection, which allows you to detect possible breakages, sagging and loose fasteners. Repair of all-glass structures may be necessary when:
- The fittings do not meet the stated requirements
- The door or fasteners are installed incorrectly.
- The fittings do not match the weight of the glass sheet.
- The building is shrinking.
Summarizing the above, we conclude; Installing a glass door is a matter that requires a responsible approach, relevant experience and knowledge of the design features.
Selecting the appropriate fittings and proper installation is the work of specialists. If you save on purchasing fasteners, then in the future, with a high degree of probability, you will have to deal with sagging of a bulky door.
Cosmetic repairs are a matter of chance, since with proper use, the attractive appearance of glass doors is maintained throughout its entire service life.
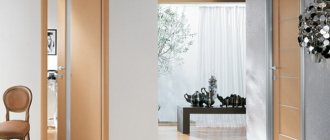
Types of doors
Canvases come in different designs. The most commonly installed types are:
For a classic-style interior, choose wooden doors with a mirror. This will make the room appear larger.
All these designs are very compact. With the exception of swing doors: they do not open like standard interior doors. The wooden (or plastic) sheet is usually carefully moved or assembled. Therefore, all designs are suitable for installation and installation in small spaces.
Swing
This design is a door leaf to which a handle is attached. There are such doors in every apartment. They can be placed in a niche only if the room is spacious and the opening door will not interfere or rest against furniture or a wall.
Swing models are suitable for placement in the corridor or on the balcony. You can put a double-leaf structure here - it looks even more interesting. Single doors are suitable for recesses approximately the same width as the doorway.
Sliding
If the niche is too wide, it can be hidden behind sliding doors. The canvas is mounted on a rail and can move in any direction. This is the design of the wardrobe.
Such canvases are ideal for a closet or dressing room. They can be placed in an opening of any width.
Sliding doors for niches do not take up much space and are suitable for any room. Usually behind them there is a hidden dressing room or wardrobe for outerwear. You can attach a mirror to one of the canvases.
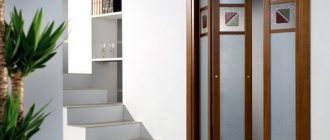
Folding
Such canvases consist of two identical halves, which are assembled with an accordion in one movement. This is a very compact and convenient design, which when opened creates a wide doorway.
Folding products are often installed in the hallway, bedroom or on the balcony. For the corridor, it is better to order models of the same design as the interior ones. Then they will not violate the overall concept of the interior.
Louvre
They are ideal for small recesses converted into cabinets. They can be used to close a square or arched opening. It is better to choose louver structures made of wood or colored plastic. Iron blinds are suitable for office interiors.
In a niche with such doors you can put beautiful cardboard boxes or rattan baskets. They will be visible through the blinds. Such canvases are also suitable for the kitchen. You can hide jars of cereals and spices behind them.
Glass door adjustment
Glass door adjustment
. Most often, a simple adjustment of all-glass doors solves problems when the glass door sags or sag, touches the edges of the doorway or scrapes along the floor, and this sagging is not very large. The cost of simple adjustment is from 1500 rubles.
Difficult adjustment of glass doors
. More complex glass door adjustments are required if the hinges need to be disassembled. Especially the lower loop group. This is required in situations where the glass door does not close, does not open, or the glass door is completely jammed. The cost of complex adjustments starts from 3,000 rubles.
Glass door lock repair
. Most often, the lock begins to move tightly due to the fact that the cylinder breaks. Sometimes the lock just needs a good cleaning and lubrication. Another common situation is replacing the lock strike plate of a glass door.
The cost of replacing the cylinder from 1500 rubles The cost of replacing the decorative lining from 1500 rubles The cost of cleaning and lubricating the lock from 2000 rubles The cost of replacing/fixing/repairing the lock strike plate from 1000 rubles
Replacing a lock on a glass door
. It all depends on the castle. Locks for glass doors are larger and smaller, Chinese and American, corner, side, central, built-in and overhead. As a result, they are cheaper and more expensive, in stock and only to order. The cost of replacing a lock is from 8,000 rubles.
Replacement of decorative overlays on hinges for glass doors
. Decorative hinge covers for glass doors always get lost somewhere. Especially in high-traffic stores. As a result, the door takes on an extremely unsightly appearance. The cost of replacing a decorative overlay is from 1,500 rubles.
Replacement of fittings for all-glass doors
. Replacing glass door hinges is required if the doors have sagged significantly and can no longer be adjusted. Or if the hinges broke and fell apart due to damage or time. The cost of replacing a loop group is from 6,000 rubles.
Replacement of all-glass door handles
. Replacement of handles for glass doors is required if the handle is completely loose, the threads on the fastening elements are broken, or the handle is severely mechanically damaged or worn out. The cost of replacing handles for glass doors starts from 2000 rubles.
Replacing the seal for frameless glazing and glass doors
. Over time, the seal hardens greatly, cracks and crumbles (especially in frameless glazing), and it has to be replaced. The cost of replacing the seal for glass doors and frameless glazing starts from 1,500 rubles per clearance.
Replacing a glass door leaf
. Replacing the door leaf may require either severe mechanical damage (or if the door is completely broken), or if necessary, change the opening methods and type of fittings - in this case, new milling is required, and the door leaf will have to be made again. The cost of replacing an all-glass door leaf depends on many factors - the thickness and dimensions of the leaf, the complexity of milling, the presence of tinting, decorative film or sandblasting.
CALL: +7812-640-16-01
, consult and invite our specialist to your place (
measurement and diagnostics are free
). After inspecting the object, the master will guide you on how to solve your problems, deadlines and costs. If any of the above does not suit you, the master leaves and you pay nothing. Top of page
Okonka is a specialized organization for solving glazing problems for both private and corporate customers. We specialize in repair, modernization, reconstruction, insulation and sealing of all types of windows, doors, balconies, loggias and facade systems.
Door leaf design
There are a lot of door design options. Solid wood products are coated with varnish or paint, and a composition is selected that will highlight the texture of the wood. So, in a Provence-style kitchen, olive or lilac-colored doors will look good, and brown wooden doors are suitable for the bedroom.
Accent on a dark corner of the kitchen
Doors made of MDF can be with inserted frosted glass, decorated with patterns. They are placed in the corridor or hallway. Iron doors are rarely decorated with decorative elements, because they are installed in minimalist interiors.
Plastic is also in demand. It comes in different colors and works well. Products that imitate wood are popular; designs made of bright plastic also look original, but they are not suitable for all styles. Glass sheets can be made of transparent or darkened material.
Installation of doors in a niche
It is not recommended for those who do not have experience in carrying out repairs to attach the sashes into a niche themselves. Precision is important in this work. If the measurements are taken incorrectly, there may be a gap between the door leaf and the wall, and it will end up crooked.
If you plan to install the doors yourself, carefully follow the instructions that can now be found on the Internet. So, for sliding structures, you need to properly secure the ceiling and floor guides. In blind products it is attached to the ceiling.
Even if the apartment does not have the best layout, you should try to make the most of all square meters of space. If there are still empty niches in the house, it’s time to turn them into convenient storage areas: convert them into a dressing room or a closet for small items.
Source: cozyblog.ru
Installation of an interior door with glass depends on the type of door
We have already written about the installation of glass pendulum and sliding doors (read the article: Installing glass partitions with your own hands). Now is the “star time” for swing-type canvases.
Hinged interior doors made of glass (or with glass) are often installed in a frame. Aluminum, wood or plastic - there is not much difference.
>Installation instructions are as follows:
If you are installing a wooden door with glass, rather than a completely glass one, you can assemble it like this: by inserting cardboard between the door and the frame
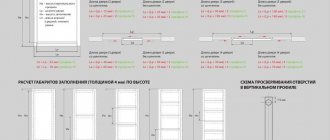
>1. Place the door on a flat surface. And around it, assemble the elements of the box: the sides, the top, the threshold - as if it were already ready. Of course, you can do without this. But it’s much more accurate when you immediately see what you can (or can’t) succeed in.>2. Mark all the crossbars so that they are equal to the adjacent sides of the door.
Remember that there should be a gap of 3 mm between the door and the frame. And this is plus another 6 mm to each crossbar. If possible, place 3mm cardboard between the canvas and the box - it’s much more convenient!
When marking the bottom side of the box, you also need to take into account the thickness of the threshold.
The sides of the box are cut at an angle of 45 degrees, and at the same angle they are fastened with screws
>3. They start putting together the box from the top. According to the markings, saw off the top crossbar and the sides of the sides adjacent to it at an angle of 45 degrees with a hacksaw, circular saw or miter box - this is a tool for cutting timber at a certain degree.>4. Secure the top parts of the box together. To do this, alternately clamp the adjacent corners with a clamp (if your friend holds it, it may turn out crooked). Drill through holes with a diameter of 2.5 mm in them.
Remove the clamp and tighten the box elements with self-tapping screws.
Aluminum profile with a seal that protects the glass door from slamming and additional
>5. It's time for the threshold. As a rule, it is cut at a right angle, and then installed between the sides and secured with screws - through the same sides.>6. Place the frame for the glass door in the opening on dowels - one nail every 30-40 cm. And be sure to check it with a level. Then, to prevent the box from “moving apart” in the future, drive wooden wedges between it and the opening, 3-4 for the sides, and 2 at the top.
Apply polyurethane foam dotted between the box and the opening - with a gap between drops of 8-10 mm. If you foam more, the box will “break apart”.
Attaching a glass door hinge to a wooden frame
>7. While the foam dries, attach the hinges to the door (their other side is secured with self-tapping screws on the frame) and the handle with the lock. If the door is completely glass, then this is easier than ever. After all, as a rule, holes for fittings are made in factories.
If you have a traditional wooden door with glass, install the hinges on self-tapping screws. And cut out the holes for the handles and the lock yourself using attachments: a crown and a feather drill.
>8. The final stage is the installation of platbands. They are glued to liquid nails, nailed with small “non-liquid” nails, or a tenon is inserted into the groove (if the platbands and the box itself are adapted for this).
The glass door with your own hands is ready!
>How to install sliding interior doors, watch the video:
What is the cost of interior glass doors? See the review of door shops in the capital.
You can read about installing glass in an interior door at the link: https://oknanagoda.com/steklo/steklo-dveri/glassdoor-exchange.html
If you are going to buy a glass partition, you simply need instructions for installing it! If you don’t install it yourself, you’ll have to supervise the technicians.