Peculiarities
Mosaic is a special type of facing material. This tile consists of small elements, which is why it looks special in the interior. In appearance, this is an ordinary rectangular tile, which has a different base, thanks to which all the small segments stick together. The base can be made of mesh, paper or silicone. Thanks to it, you can easily install tiles.
The main feature of this material is that it can be used independently (create a continuous installation over the entire surface). In addition, it is suitable for partially decorating surfaces. It can be used as decorative fragments, combining mosaics with regular tiles or some other finishing material. Often, mosaic slabs are used for cladding bathtubs or sinks, after which boring plumbing items begin to play with new colors, becoming the center of attention in the interior.
This type of tile is durable and easy to maintain.
Today, global manufacturers and well-known brands offer a very wide selection of mosaic tiles.
There are different tiles on sale (tile, decorative, marble, glass, mirror, gold) :
- The most popular type is tile or ceramic tile . Like regular facing tiles, the mosaic surface can be different. It can be matte, glossy, rough, pearlescent surface. The color palette pleasantly surprises, allowing you to choose not only classic shades, but also interesting color combinations. This type of tile can be used in a variety of rooms. It is used for finishing ceilings, walls or floors, decorating facades, and fireplaces. The material is very versatile, which is why it is in great demand.
- Glass mosaic has been very popular since ancient times. This finishing material is durable and impact resistant. The color of this tile may vary. During its production, glass melt is painted in different shades. This material will look great in the bathroom.
- Today, stone It can be granite, marble. The uniqueness of this material lies in its texture, thanks to which you can create unique decorative elements. This type of tile is often used to decorate the floor; it can even create a stone carpet.
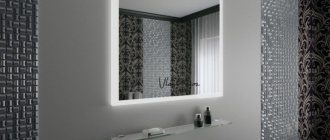
- Mirror mosaics are used when they want to not only add some zest to the room, but visually expand it. This material is completely safe for health, like all others. In addition, such tiles are easy to install.
It is easy to care for it using modern means. It looks very original in the interior.
Glue selection
The quality of attachment of the material to the surface, as well as the final result of the work itself, depends on the correct choice of glue. When choosing an adhesive, you should consider the material from which the tiles are made. An important role is played by the thickness of the facing material and its transparency. You can choose a special glue, which is sold in every hardware store and is intended for all types of mosaics.
As a rule, this glue contains sand, which is why it has a gray tint. This type of glue is suitable if the material is opaque and is glued to a familiar surface (floor or wall). If the mosaic is transparent, it is better to pay attention to glue with a similar composition and white color.
This glue can be used during installation of glass material.
Epoxy glue is one of the more reliable. It can be used for cladding those surfaces that will be subject to frequent use. For example, this glue is often used for laying floors.
You can pay attention to the hard or deformable composition:
- The first option can be used for concrete or brick surfaces. As a rule, this glue is chosen for walls.
- Deformation will be needed if the house is subject to frequent vibrations (for example, if a railway passes nearby). This type is suitable for finishing surfaces that are subject to temperature changes.
It is not difficult to correctly calculate the glue consumption for the selected surface. If you have already purchased adhesive for mosaic installation, it is enough to carefully study the instructions, which usually indicate all such nuances. To make an approximate calculation of glue consumption, you can multiply half the thickness of the selected tile by the average glue consumption (1.3). As a result, you will get the result for consumption per 1 sq. m. As a rule, the average glue consumption is from 1 to 2 kg.
It is important to consider the thickness and dimensions of the material itself: the larger the slab, the thicker the adhesive layer should be. For example, a tile measuring 30 x 30 cm requires an adhesive layer of more than 4 mm.
Laying nuances
Laying mosaics is not as difficult as it might seem at first glance. However, without preliminary preparation of the base, the result will be much worse.
Surface preparation
Before starting any tiling work, we recommend that you properly prepare the surface. First, the surface must be cleaned of debris and small dust particles. This can be done using a paint brush or any large brush.
Mosaic tiles must be laid on an extremely flat surface. To achieve this, you need to remove the old coating. Then the base is leveled, getting rid of potholes, chips, holes and even small cracks. They can also affect the final appearance of the finished cladding. After the starting coating has dried, it is trimmed and covered with a layer of primer. It is needed to strengthen the adhesion of the mosaic to the prepared base.
You can glue the trim only after the primer has dried. If you do this earlier, you can disrupt the formation of the crystal lattice formed from the soil during the drying process.
If the surface requires special leveling, the plaster mixture is applied in several layers. In an attempt to save time, you can lose quality training. A thick layer of plaster will fall off along with the mosaic within the first year after repair. In addition, it will crack, which will lead to the issue of dismantling the mosaic.
What glue to use for mosaic
Mosaic coating allows you to realize more design ideas than large-sized tiles. Therefore, the material is used both as a separate decorative element of the interior and for continuous cladding of the room. What glue to use for mosaics and what does the design process look like?
Which mosaic glue to choose? It is important that the composition is resistant to moisture, has good adhesion, and dries quickly. Depending on the degree of transparency of the tile, the color of the solution is also relevant. If the base has slight differences, then attention is paid to elasticity, leveling ability and degree of shrinkage.
What to glue the mosaic onto? The main criterion for a material is the binder (base). So, there are 3 main types:
- cement (sold dry);
- dispersion (ready-made mosaic adhesive with the addition of acrylic);
- two-component adhesive or reactive (epoxy or polyurethane based, prepared before use).
What types of grouts are there and how they differ
Grout for tiles and mosaics are available in two versions. Cement and epoxy. Cement grout is easy to apply and remove, and its cost is not high.
When applied, the grout is diluted with water or liquid latex. Cement grout can be used on joints no more than half a centimeter wide.
Disadvantages of cement grout: they are not suitable for enameled tiles as they will leave scratches. Also, the color of cement grout has a small range of colors.
The most popular grouts are those with an epoxy composition. They contain cement and resin. Epoxy mass is plastic and easy to work with. It will not fade over time, and quartz sand is used instead of color filler.
The color palette is very rich, and you can choose any shade, as well as gold or silver. The grout sparkling and shimmering in the sun and in the rays of artificial light makes the mosaic even more luxurious.
Although it seems that the difference in grout is not very noticeable, nevertheless, it is there. Epoxy retains its original appearance longer and looks very beautiful.
What are the other advantages of epoxy grout:
- sets quickly;
- it is resistant to chemical attack;
- epoxy is elastic, easy to work with, and the seams do not crack after application4
- the material is durable, does not crumble or crumble over time;
- has a moisture-resistant composition, ensures water resistance;
- the possibility of tinting the seams, which allows you to hide unevenness and roughness of the floor;
- if the mosaic is mirror or glass, made in the form of a photo collage, then the grout should be transparent. Only epoxy grout can do this.
For grouting floor tiles, gray or brown grout colors are most often used, but it can be in other shades, depending on the design of the room.
It is best to purchase grout together with the mosaic to see how the shade matches the tone of the tile. When applying grout to the pattern, use compositions of neutral colors.
TOP 5 best glues
What is the best mosaic adhesive? Trusted brands, numerous customer reviews and discussions on forums allow us to highlight several specific compositions.
Russian glue is suitable for both ceramic and glass mosaics. It has leveling ability (up to 15 mm) and is used for work inside and outside the building. Has high adhesion to all materials, including natural stone. The finished solution can be used for 3 hours, the tiles can be adjusted within 3 minutes. Walking is allowed after 24 hours. The seams are rubbed out after 2 days.
Ceresit CM 115
German brand of domestic production. The main advantage is the perfectly white color of the glue. In addition, they have an environmentally friendly composition, elasticity (you can lay “warm floors”) and water resistance. The working time of the finished mixture is 2 hours, it begins to harden after 20-25 minutes. The layer is limited to 4 mm. The base must be carefully leveled.
Litocol Litoplus K55
Italy supplies adhesive for mosaic tiles on a white cement-based grid for laying transparent, colored mosaics and natural stone. A wide range of permissible temperatures (from -25°C to 60°C) allows the composition to be used inside any room and outside the building. Walking is possible within 24 hours, but full operation is possible only after 14 days. The working time of the solution is 8 hours, adjustments are possible within 40 minutes.
Russian glue is made on the basis of gray or white cement. The scope of application has no restrictions. Laying on concrete and brick, as well as on plasterboard, is allowed. If the solution is prepared with the addition of latex, then you can create open water storage facilities (swimming pool, tank). Working time is 2 hours with adjustments up to 15 minutes.
One-component white adhesive from Ukraine based on acrylic is sold in finished form. Suitable for all types of mosaics. It is not afraid of dynamic loads, water and serves for a long time without losing its characteristics. You can lay tiles on the wall, floor and ceiling. Cladding of thermal insulation boards (expanded polystyrene, hardboard, MDVP) is allowed.
How to glue mosaic tiles
The beauty of the mosaic, its originality, the ability to create bizarre and unique compositions contribute to the fact that it constantly has many supporters. However, laying mosaics with glue requires special knowledge, skills and accuracy.
Today, you can buy mosaics in ready-made sets. Most often they are made of glass, ceramic tiles or natural stone. The elements that form ornaments and patterns are connected to each other with a plastic mesh or special paper. Thanks to this, the tiler's work becomes easier and faster, but still requires skill and special knowledge. So let's figure out how to glue mosaic tiles and what glue to use for this.
Before gluing the mosaic, it is worth carefully planning its composition and the location of the pattern so that the main theme is placed in the most visible places.
Preparing the base
The base for the mosaic must be perfectly level. The mosaic is glued onto a thin layer of mortar; a comb-trowel with fine teeth is used for this. A layer of glue that is too thick can cause the mosaic pieces to “sink” into the solution. And as a result, the appearance of excess glue, which will come out of the seams.
If the mosaic cladding comes into contact with another tile whose thickness is greater, it is necessary to prepare the base so that in the final result these planes are on the same level. The easiest way to do this is by inserting a sheet of fiberglass reinforced drywall.
What glue to use for mosaic tiles
Atlas elastic adhesive is well suited for gluing mosaics to all mineral substrates, such as cement plaster. For gluing to plasterboard boards, you should use a solution with increased adhesion and elasticity, for example Atlas Plus. In the case of marble mosaics, adhesive mixtures based on white cement, such as Atlas Plus White, should be used. This adhesive does not cause discoloration of the coating.
Mosaic tiling of washbasin
Mosaic is great for finishing curved elements. On convex bends, the width of the seam increases significantly, and on concave bends, on the contrary, the edges of the gap move closer to each other. Aligning them takes a lot of time, therefore, when gluing mosaics on curves, you need to use long-drying glue (Atlas Plus). When using it, you will have enough time to align the mosaic and the width of its seams.
No trimming
When designing a mosaic pattern, it is advisable to calculate it so that it is a multiple of the individual tile elements. This way you avoid cutting. This is a very complex and time-consuming and therefore expensive task. Cutting between elements can be done with a knife, but cutting the elements themselves is much more difficult. It is mainly done using a grinder; you need to cut each tile separately (watch the video).
After laying the mosaic and aligning the seams, it must be carefully pressed with a foam float and another tool convenient for you. This must be done very carefully, since any sudden movement can lead to the seams slipping.
What should be the surface for laying
On what surface can mosaics be glued? The facing material is small in size. Therefore, all unevenness of the base will be emphasized by the facing material. If this is what the designer intended, then you should choose adhesives with high adhesion rates and a short hardening time. The thickness of the mosaic adhesive is small in order to avoid “floating” the tiles. It is also important to take into account the fact that the seams should be left unfilled until the glue has completely dried.
When designing a plane, the surface must be pre-leveled. Mortars for laying mosaics may have filling ability without shrinkage, but leveling the mosaic with a large layer of glue will be inconvenient. It is worth noting that cheap materials lose the volume specified by the master during drying. This leads to the fact that the tiles will not give an even plane.
Stages of laying mosaics
Laying mosaics differs from tiles in the mobility of the finished product. The glue is applied in a uniform thin layer, and the coating is leveled using a level and a rubber roller (or trowel).
Do not put too much pressure on the mosaic. This will lead to premature filling of the seams, which will have to be cleaned out.
How to glue mosaics on a mesh:
- Preparing the base. It is important that the surface is smooth and even. The applied primer must dry.
- The markings will ensure that the installation is even.
- Mosaic adhesive is applied to the mesh with a notched trowel in 3 mm increments. It is recommended to cover a small area as the solution hardens relatively quickly.
- The canvas is pressed with a rubberized tool. This cannot be done by hand, otherwise individual elements will be recessed to a greater extent than required.
As a rule, mosaics on a grid are covered with a protective layer of paper on the front side. After the glue sets, it is washed with water using a sponge and removed.
How to remove excess glue from a mosaic? To do this, you can use a dry waffle towel or a rubber spatula. If the solution is completely dry, you will have to remove the excess mechanically (with a blade).
Depending on the glue used, grouting of joints is allowed 12-48 hours after installation. The task is performed using a rubber spatula of medium hardness (can be soft). After 20 minutes, the excess is removed with a dry cloth.
Listen carefully to the opinion of the professional in the video:
You need to choose adhesive based on the materials of the base and tiles. The evenness of the surface is also taken into account. For glass mosaics, it is better to buy a white or colorless composition. Almost anyone can implement the event themselves with their own hands. The main thing is to maintain uniform pressure and control the seams. Then the result will be high quality and durable.
Features of mosaic laying technology
The differences between ordinary tiles and mosaic tiles have already been slightly mentioned above; now it is worth studying in more detail the technology of laying mosaic tiles on the wall, taking these features into account.
Glue preparation
During the preparation of adhesive compositions, it is necessary to ensure the complete absence of lumps. The consistency should be somewhat thicker, otherwise the mosaic will slide under its own weight. There are no spacer crosses, which means it will wrinkle, and this is already a defect, which in any case will have to be “long and tediously” eliminated.
Drawing up a drawing
You need to draw a picture on the prepared wall. If all the lines are straight, their intersection angle is 90°, then the work is somewhat simplified.
The main thing is that the joints of the multi-colored mosaics are located at the seams, so that you do not have to cut small tiles into pieces.
If the design has curved shapes, then the mosaic will have to be cut with a grinder with a diamond tile disc.
This is a complex matter and requires practical skills. Otherwise there will be a lot of marriage. If you don’t have enough experience, then it’s better to try curved cutting on a defective mosaic sheet.
Applying glue
You only need to work with a comb, the thickness of the adhesive is no more than 2-3 millimeters. Otherwise, excess glue will get between the tiles, and this is a big problem.
There is no need to immediately apply glue to large walls; its surface will weather a little and adhesion will weaken significantly.
When applying glue, the lines of the design must not be touched; you must work around them carefully and leave the design visible.
Gluing mosaic tiles
You should work very carefully; the sheets are aligned in different directions; you can use wide tools. Never press them with your palms.
It must be remembered that in many cases mosaic sheets cannot be torn off and laid a second time (like ordinary tiles); alignment must be done on the first try. This is where a lot of practical experience in laying tiles comes in handy.
Grouting joints
This work can only be started the next day; the strength of the adhesive should not allow the tiles to move. It is better to grout the joints with a rubber spatula; the color of the grout is selected taking into account the color and type of mosaic tiles.
If necessary, you need to clean the seams from any remaining glue; this can be done with a wooden stick or a toothbrush. You need to get your bearings on the spot, taking into account the hardness of the glue, its quantity, etc. The grout is applied with smooth movements in different directions.
After it has dried a little, the excess should be removed with a damp cloth or sponge, and then wipe the surface with a clean, dry cloth.
Polishing tiles
This operation can be done manually using a soft cloth. If the surface of the tile is far from ideal, you will have to use electric polishing machines. But such a need arises only when the master did not have sufficient qualifications and allowed defects in the work.
The difference between mosaics on paper and on mesh, the stages of laying these tiles on walls and floors
Mosaic tiles have long been used as finishing material for kitchens and bathrooms. Previously, craftsmen had to lay out each individual element, so laying the mosaic took a lot of time. Now the process has been significantly simplified thanks to mosaics produced on mesh or paper.
Distinguished by its originality compared to ceramic tiles, mosaics allow you to decorate a room and realize your boldest fantasies in the interior. In order to decorate a wall or floor with mosaics in a high-quality manner, you need to understand the features of this process.
Preparing to lay mosaic tiles
First you need to prepare for work. Purchase the required amount of tiles and special glue. It is best to choose high-quality glue, with the addition of plasticizers. This way the mosaic will hold firmly enough. In addition to tiles and glue, you will need the following tools:
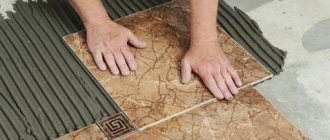
Laying mosaic tiles: 1 – Surface preparation, applying adhesive; 2 – Gluing tiles; 3 – Leveling the tiles.
- rubber hammer;
- soft sponge and rag;
- construction knife;
- building level and plumb line;
- roulette;
- a simple pencil for marking walls;
- double-sided glue spatula;
- tile grout;
- brush;
- primer for walls;
- warm water.
You should immediately take into account how a tile of this type can be cut if it does not fit exactly in size. In fact, cutting mosaic tiles is much easier than cutting regular ceramic tiles. The only thing that might be difficult is the need to cut part of one of the small squares. This happens rarely, but if you have to deal with this, it is better to use an electric tile cutter so as not to ruin the entire canvas. In other cases, you can limit yourself to an ordinary construction knife, with which you can easily cut off the required number of small squares from the base of the canvas.
The difference between mosaics on paper and on mesh
Mosaic tiles on mesh and paper backing are the most popular types of finishes. The second option is cheaper, but it does not allow you to control the seams between individual elements.
Each type has its own rules. The mosaic on the mesh is glued face down, and after the glue has dried, you can immediately proceed to grouting the joints. To install paper-based mosaics, the sheets are applied to the surface with the paper side up, after which you must wait at least a day to continue the process.
Cladding stages
The use of mosaic tiles is quite common: they are used both for finishing a room and for decorating individual elements. In this case, the tiles can be laid on the floor, on the wall, on the ceiling, on the windowsill and on the countertop.
The technology of laying mosaics is not very different from laying tiles, but requires more responsibility. A convenient point when gluing mosaic tiles is their flexibility, which allows you to stretch or narrow the seams.
Glass mosaic is most often used for swimming pools, although it can also be found quite often on walls and floors as panels. The installation of glass mosaics should be planned taking into account lighting, because... horizontal backlight will display all errors.
Tools required for installation:
- 2 spatulas (smooth and serrated edge);
- roller or rubber grater;
- building level;
- knife;
- pencil and ruler.
To lay tiles on the floor, it is better to use a more durable material: stone, marble or porcelain stoneware. Laying marble mosaics is an ideal option for a bathroom interior. This is the most durable material used for flooring. In this case, it is necessary to monitor the color of the selected glue: it should be white, not gray. This is due to the fact that marble quickly absorbs everything and changes its color shade forever.
When arranging a kitchen, bathhouse, or cafe, wooden mosaic cladding is used. This option has a lot of positive properties: strength, soundproofing, durability and uniqueness.
Preparing the foundation
Mosaic tiles should only be laid on a prepared base. After removing the remnants of wallpaper, paint and other coatings, you need to check the plaster. A prerequisite when preparing to lay tiles is to apply a primer to hide traces of dust and improve adhesive properties. After priming and checking the walls using a level, you can proceed to the next stage.
We carry out the markings
After the primer has completely dried, the surface is marked. First of all, you need to decide how the mosaic will be laid. The choice will depend on your imagination and preferences. In addition to the classic one, there are other options for laying out mosaic tiles:
- alternating matte and glossy types;
- combining mosaics with tiles;
- pixel mosaic;
- panels and paintings;
- use of hexagonal mosaic.
The location of the mosaic pieces must be carefully marked. When drawing up a sketch, pay attention to the following points:
- if there are slopes and boxes in the room, the drawing begins to be laid out from them;
- if there is a decorative element in the room, then it is a priority;
- Try to hide all possible undercuts in a corner or at the bottom of the floor.
After the sketch is drawn up, it is transferred to the wall.
Apply glue
Gluing mosaic tiles is not difficult, but you need to choose the right glue. When choosing an adhesive composition, the surface material on which the tiles are laid matters. To prevent the appearance of an unwanted shade, it is better to choose white glue for glass mosaics.
As for the preparation of the glue, the solution is prepared in accordance with the requirements specified on the packaging. After studying the instructions, apply the glue to the surface using a rubber spatula.
It is undesirable to apply glue directly to a surface with a large area, because... it dries quickly and forms a film on the wall. It is better to dilute the amount of glue that will be used immediately.
Laying on floors and walls
Laying mosaics with your own hands should begin with those places that catch your eye the most. Unlike the technology for laying ceramic tiles, in this case there is no need for additional support - if the work is done evenly, the mosaic will not slip or fall off. Given the high flexibility of the material, you should not press it with your hands - because of this, the sheets may lie unevenly. The optimal tool in this case would be a silicone roller.
Laying mosaic tiles on a grid:
- In this embodiment, the sheet is turned with its front side towards itself, and its back side is completely immersed in the glue.
- The sheet is gently pressed with a rubber spatula.
- The distance between the mosaic pieces is checked (it should be the same).
- The remaining adhesive is removed from the tiles, which are left to dry completely.
Laying on paper base:
- Turning the sheet of paper with the paper side towards you, glue it to the wall and tap it with a spatula to distribute it evenly.
- After laying the second line, we return to the first and blot the paper with a damp sponge until it begins to easily peel away from the surface. Remove paper from the mosaic from the top corner, getting as close to the surface as possible.
- After removing the paper backing, the seams and tiles are leveled with a small spatula.
- Before applying grout, the tiles are left to dry for 24 hours.
We produce grout
Grouting is carried out only after the solution has completely dried, and for this a minimum of 2 days must pass. The facing surface is cleaned with a brush and warm water. If there are smudges of glue at the joints, remove any remaining glue with a knife or sharp blade.
The mixture is diluted according to the instructions and applied at an angle of 45°. The grout is left to dry for 20 minutes, after which it is cleaned with a dry cloth to remove any remaining mixture. It is then washed with water and polished after drying.
Mapei grout is a win-win option from the Italian manufacturer. Its only disadvantage is that it quickly sets to the surface.
Mosaic tiles can add sophistication and originality to even the most unprepossessing and conservative interior. This material has gained popularity among consumers and is in demand along with other facing materials. Mosaic installation work is more expensive and significantly increases the renovation budget. With the advent of mini-tiles on the grid, the installation technology has become simpler, and you can implement your planned design project on your own.
Mosaic tiles: advantages of installation
Mosaic tiles are a popular type of facing material, widely used for decorating bathrooms, saunas, swimming pools, kitchens, living rooms and facades. Mosaics are decorative compositions made from many small glass, ceramic, and mica elements. All parts are fastened on an elastic mesh, forming a flexible finishing material.
Installing mosaic tiles is a modern, original and stylish interior design solution that allows you to realize different design ideas. Before making the final choice in favor of mosaic, you should familiarize yourself with the features of the cladding:
- Small tiles are made from materials that are resistant to high humidity and temperature fluctuations. High wear resistance allows the use of mosaic decor in public places.
- Mosaic finishing has similar characteristics to tile cladding: strength and durability. The aesthetic and attractive appearance of the product is maintained for a long time.
- Possibility of installation on surfaces of different configurations: round niches and bath screens. The mosaic panel is easy to cut into pieces of the desired shape - this simplifies installation in hard-to-reach places.
- A large assortment of mosaics allows you to create any decorative panel, interesting pattern or ornament.
The disadvantages of mosaic finishing include:
- high cost of material;
- more complex installation compared to laying conventional ceramic tiles;
- High-quality mosaic installation requires careful preparation of the base.
The advantages of tiling with mosaic tiles outweigh its disadvantages. It is better to entrust laying a wall or panel of small mosaics to a professional. In order not to overpay for the work of an experienced craftsman, you can select a small accent area and lay out a strip of mosaic yourself.
Features of different types of mosaic tiles
Based on the manufacturing materials, the following types of mosaics are distinguished:
- Stone. The tiles are made from quartz, marble, granite, slate or travertine. This material is highly durable, so it is used not only for finishing walls, but also for floors. Stone mosaic has a natural aesthetic and gives the room a special style. Some manufacturers offer exclusive collections made of malachite or agate.
- Glass. Excellent for covering surfaces exposed to moisture. However, the material is less resistant to impacts and scratches, so it is not recommended for laying on floors or finishing tabletops. Glass mosaics with a translucent structure must be attached with special glue.
- Ceramic. An expensive material suitable for finishing any area of the house. The mosaic is covered with a glossy glaze or remains matte. Laying ceramic mini-tiles allows you to get a textured non-slip surface. Ceramics are resistant to mechanical damage and abrasive detergents.
How to lay a mosaic on a wall.
What is the difference between laying mosaics and laying ceramic tiles?
- First. These are slightly different tools and skills for working with them.
- Second. Different glue.
- Third. The surface for the mosaic is prepared more carefully.
To apply glue under the mosaic, use a notched trowel with a tooth size of 2-3 mm. For thick marble mosaics, it is possible to use a 4-6 mm spatula. If a flat plane is enough for laying tiles, then for gluing mosaics you need a smoothly flat surface, without holes and sinks. In such depressions, a notched trowel forms an increased layer of glue. This leads to squeezing out its excess into the seams. This is why applying thin is so important. uniform and continuous layer of glue. The surface for the mosaic can be round.
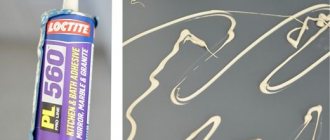
applying glue for laying mosaics
What makes it so valuable #8211 is the ability to cladding curved planes on countertops, round steps, the ability to create smooth transitions in corners, etc.
Live here
How I glued a mosaic for the first time
How I glued a mosaic for the first time.
I couldn’t find any topics on working with mosaics on the forum. Let this one be the first. So, a short report for those who, out of their own convictions or for some other reason, decided to work with mosaics. Why mosaic and why did I choose it? Because the tiles in the bathroom are more traditional and banal, but I wanted something that was not quite standard and more original. Maybe I just wanted to believe: could I make a bathroom myself and lay the mosaic with my own hands, while having only modest experience in working with tiles. Well, in general, I became fixated on this mosaic, and even when obstacles began to appear to make this dream of mine come true in the bathroom, I did not give up on my idea. And the initial obstacles and “chains in the wheels” were the following:
-Price. This is something unrealistically overpriced and incomprehensibly priced! In the building materials markets in the region, they ask for accommodation from 2 thousand to 7 thousand per square meter! It’s easy to calculate that for a small 2x2 bathroom with a total wall area of 20 square meters. m (or even less, since there is a door to the bathroom) you need to pay from 40 to 140 thousand rubles! And this price is only for the mosaic itself, without glue, waterproofing, plumbing, shower, sink, toilet! (For me, it’s easier to buy another car!) But I didn’t despair and began to surf the Internet. And soon I came across an online store with a fabulous sale of the remains of mosaic tiles at prices of about 1 thousand rubles. However, this was followed by further obstacles in the wheels:
What is good about an online store? Prices! And... that's it. It’s impossible to actually touch, touch, or even just look at the product. The product photos on the computer monitor are ideal, attractive, beautiful and inviting. But in reality, what was left was only the color that... well, naturally, which I didn’t quite count on. But, like a stubborn sheep, I still decided to go to the end! Well, let there be a very original bathroom in terms of color! Although, of course, I really wanted to make it light green, or blue, or beige, or warm orange or yellow. But this pleasure, unfortunately, did not fit into the budget. Since the price also depends on the color. After some deliberation, a “stretch” type mosaic was chosen. Yes, it’s not enough for me to go crazy with just a mosaic! What I need is “stretching”! This is when the tile has a pattern: it is darker at the bottom, and going up the wall, it becomes lighter and lighter in tones and shades, forming such an interesting thing - just very beautiful!
Soon, another spoke was thrown into the wheel: the manager of the online store called and said that part of the mosaic would be on paper, and part on a grid. Without giving it much thought, I said I didn't care. And in vain I did not pay attention to this in advance. The fact is that my “stretch”, forming an abstraction drawing on the wall, is conditionally divided into “belts” or levels. And you can’t confuse these levels and glue them as you please, otherwise you won’t get the right design on the wall.
Of course, I also purchased glue, spatulas, grout and everything else and related items. To finish with the shopping, I’ll tell you what kind of jambs I had to work with:
The mosaic, whether to the paper or to the mesh, is already glued crookedly at the factory! The gaps between the tiles are uneven! I just hate these bastard manufacturers from the Asian region! But this is not enough! The shades of the same mosaic level on paper and the same level on the grid are different! This is visible to the naked eye. But, naturally, I only discovered this at home, and when I started preparing for gluing and more than 2 weeks had already passed, and exchange or replacement of the product was no longer possible. Of course, I could have kicked and shouted something about protecting consumer rights, but there was no time to do this, and I didn’t want to waste my nerves and time.
The spatula – a 4 mm toothed one – was quite satisfactory. The glue is a very, very good two-component one. It is closed only with latex (according to the manufacturer's instructions). Suitable for swimming pools. When latex hardens, it forms a generally waterproof film. Yes, and it was glued to the wall so that if it was necessary to remove the tile, it could fall off with the plaster! The only thing that bothered me was that according to the manufacturer’s recommendations, the glue and latex had to be diluted in a ratio of 4:1. And when I diluted it according to these recommendations, the glue turned out so thick - almost like plasticine! It is impossible to apply it to the wall. And if you struggle and still apply it, then the glued mosaic, even if it is leveled, turns out to be glued with “bumps.” Soon I abandoned the idea of diluting the glue correctly, and began to mix it incorrectly - by eye according to the viscosity until it was thick like thick sour cream. It was more convenient and familiar this way.
There is no need for excess glue on the wall either. Perhaps you should glue it without sparing the glue, but after removing the paper base, this excess stuck out at the seams and spoiled the look so much that you wanted to swear! The volume on the spatula was determined experimentally. The main thing is that the glue does not stick out in large quantities through the mosaic seams. (Although operation will show that it may be better when the glue comes out everywhere through the cracks). I just didn’t like the sight of the rut coming out. My opinion is that there should be a seal in the seams!
Also, after watching a video on YouTube of gluing mosaics, I heard a recommendation: remove the paper backing soon after gluing. This is motivated by the fact that after removing the base on not yet dried glue, you can adjust the location of the mosaic tiles. DO NOT try to do this! Following this recommendation, at first several “mosaics” always flew off the wall along with the paper, and all the rest moved! Then it is quite difficult to position them evenly on the wall. In short: the tighter the mosaic sticks, the better! I then removed the paper altogether the next day. Even if it was necessary to make adjustments to the drawing, you can pick out several mosaics with an ordinary slotted screwdriver or knife without fear of damaging or moving adjacent tiles. And then glue it as needed.
And then, as I wrote above, to correct the color and shade, I simply cut out several mosaics in a common grid on the floor with a sharp knife before gluing, after which I glued the grid to the wall, and manually inserted and glued single mosaics of the desired color into the cut out places. It’s tedious and time-consuming – but there’s nowhere to go.
Another problem: the mesh and paper, when glued to the wall, are of different sizes! This is due to the fact that the paper is less rigid than the mesh, and when you move it along the wall, making the necessary gaps with neighboring tiles, the paper is deformed, wrinkled or stretched. Take this into account when applying the sticker! Better yet, never buy mosaics on paper and on mesh in the same set!
Also, at first I was very tormented: those ordinary crosses for tiles are not quite suitable for mosaics. The mosaic base, mesh or paper, is soft. Having placed crosses in the seams with the mosaic that, for example, is glued below, the base still slowly slides down, tightly pressing down the lower crosses and disturbing the location of the side ones. This really annoyed me, and I began to additionally attach the mosaic base with paper masking tape from above directly to the wall. After that it became much better and more convenient.
Another tip - if you work with mosaics, be sure to buy a self-leveling laser level. An irreplaceable thing. When working with good, even tiles, I set one corner correctly, maybe plumb, and went to lay it to the next corner. This will not work with mosaics, especially if you don’t have much experience and you are encountering mosaics for the first time. I tried to control each row using a laser level. And all the same - I would really like to glue it more evenly than it turned out in real life.
No matter how hard I tried, no matter how much I avoided mistakes, they still happened. If the manufacturer cannot evenly glue the mosaic tiles to the base, then what can we take from the one who did it for the first time? Therefore, I decided to correct my main problems in the form of uneven gluing “surgically”! The “surgeon’s” tool was a grinder with a 115mm disc for stone! It was with this that I walked along the seams between the mosaic tiles. Those tiles that moved or moved away from the place where they were supposed to hang were carefully sharpened and sawed with a grinder right along the seam. Carefully, slowly, without unnecessary pressure and zeal. Pay attention to the thickness of the disc. It would be ideal if it matches the thickness of the mosaic seams. Glass tiles (it turns out!) can be slightly sharpened on either side. They won't burst, even though they are made of glass! Unless of course you overdo it. It is possible, and even necessary, in such cases, to carefully remove the chamfer on the mosaic without damaging the seam deeply. The chamfer will be rubbed with grout and everything will be fine. The basic principle is that the better the mosaic looks without grouting, the better for the owner. The grout hides flaws and jambs very well. But if it’s glued crookedly, no amount of grout can save it! So I tried and aligned the little mosaic tiles as best I could.
Unlike ordinary tiles, which can be cut in any place with millimeter precision using a tile cutter, another difficulty when working with mosaics is the inability to cut glass mosaic sheets like tiles. You can only cut it to a multiple of the size of the mosaic pebble, that is, simply cut off the unnecessary row from the paper or mesh base. But sawing every pebble in half won’t work, even if you do it with a grinder. However, on the forum I saw advice on how to cut a mosaic - it is also covered with paper tape and sawed with the same grinder. But I tried to avoid this. And for a long time before sticking, he measured, put marks on the wall, or laid out the mosaic on the floor from corner to corner along the future mosaic wall. And if you still couldn’t fit it “skin to size”, you can make a groove in the corner of the wall to match the thickness of the tile, if the outer row of tiles on the base does not fit completely. Then, by inserting a mat with tiles, the outermost ones will be in this groove and everything turns out OK. However, several times I still had to cut directly on the tiles. But they also crack. The best result is obtained if the tiles are not sawed, but are ground down with the same grinder with a stone disc. And try not to overheat them.
Is it necessary to say here that the room where the mosaic will be glued must be ideally prepared? Therefore, before gluing, I prepared and putty and finished my future bathroom for a very long time. And still 1-2mm errors were obtained.
In conclusion, I'll throw in a few photos. Despite the fact that I was filming with my mobile phone, the jambs that need to be avoided are clearly visible. There are some bad photos here. I specifically provided them here so that those who, like me, dare to work with mosaics for the first time, could see what they need to be afraid of and try to avoid. Well, once I finish the bathroom, we’ll see what happens in the end.