One of the best improvements you can make when renovating a toilet is to install a cabinet above the toilet. Firstly, it is beautiful and makes your closet look very stylish and homey, just like any other room. Secondly, a toilet plumbing cabinet helps cover unsightly water pipes and meters. But even if you have a toilet with an installation that is built into the wall and invisible to the eye, you will still need a convenient cabinet above the toilet where you can store toilet paper, towels, air freshener and various other small items.
In this article you will find 17 models of stylish toilet cabinets, including built-in and wall cabinets, floor cabinets and other varieties. Unlike shelves hidden behind roller shutters or blinds, they look much more comfortable and elegant, and some of the models can even be made by hand. We hope that here you will find that toilet idea that will make this room much more comfortable!
Choosing a suitable cabinet for the toilet
It's amazing how spacious the closet behind the toilet can be. After all, the main problem of our toilets is the lack of space for storing toilet paper, napkins, detergents, etc. It has become quite common to see a freshener on the toilet cistern or just standing on the floor, hasn’t it? But do we like it? Rather annoying. As well as the need to store things needed in the toilet in the bathroom (when the bathroom is separate). And this is when even a small closet in the toilet can accommodate a lot of things!
Happy owners of large bathrooms and shared bathrooms should also not pass by our selection of photos of closets in the toilet. By installing such a cabinet above the toilet, you will free up space on the vanity cabinet or shelves, which can be occupied by beautiful decor, candles and other pleasant items.
So, which toilet cabinet will you choose?
Photo of cabinets in the toilet behind the toilet
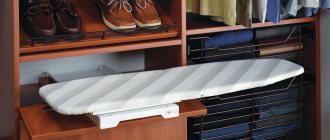
The easiest toilet to install is a cabinet with legs. It can also be very spacious (note the closet on the left in the first photo). The only thing is that when choosing such a cabinet, it is important to pay attention to its width so that it does not exceed the width of the tank and the cabinet body does not touch you.
Pay attention to cabinets with open shelves. They can be used for beautiful decoration, such as a vase with flowers, a wicker basket, a jar of soap, etc. This will make the toilet even more stylish and comfortable.
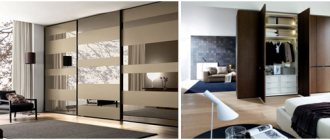
Next in our line is a wall cabinet for the toilet, which can hang over the toilet, be built into the wall or installed in a niche above the toilet installation. Wall cabinets for the toilet are presented in the greatest variety.
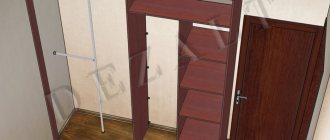
However, wall cabinets are generally not designed to hide pipes or toilet installations. If you need a bathroom cabinet that will perform this function and also provide storage for some things, then you need to buy a built-in cabinet. Here's a look at what a built-in closet in a toilet looks like:
When receiving a long-awaited apartment in a new building, moving to another home, or when planning renovations in an old familiar place, the first thing people pay attention to is, of course, the usable area. Namely, its size. I really want every centimeter of space intended for housing to be used. There are things in every home that you don't want to show off. For example, rolls of toilet paper “in reserve”, all kinds of jars with toiletries, cleaning products, brooms, rags, etc. The question arises: how to make a cabinet in the toilet behind the toilet with your own hands?
Many will agree that a closet for a toilet is quite a useful, practical piece of furniture for such a room.
There are many options for such solutions. It is necessary to take into account the design features of such a cabinet.
A beautiful design will add zest to the interior, plus provide the necessary functionality.
One way or another, it is better to make the facade from chipboard in order to achieve an attractive appearance of the structure.
The main ones are:
- material intended for use in sanitary facilities (must be moisture resistant);
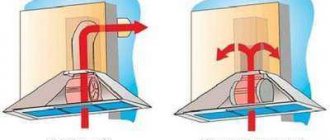
- ensuring free access to equipment control levers, which are usually located in bathrooms; water consumption meters, valves for hot and cold water, ventilation duct, sewer pipe fastening);
- the size of the built-in wardrobe in the toilet, since it must be precisely built into the dimensions of the room, which often have a complex geometric shape, especially in old houses;
- integration of the plumbing cabinet into the overall interior of the apartment, its harmonious design solution;
- cabinet design with a maximum number of shelves;
- reliability of fastenings.
There are a lot of options for using cabinets; you just have to choose how exactly you will use the free space of shelves, drawers and other elements.
If you wish and have the money, these sheets can be sheathed, covered with decorative films, and decorated to your taste.
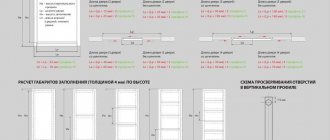
Before you start work, you need to make a plan, take measurements and draw a plan of the plumbing cabinet in its actual dimensions on a piece of paper. A plan is needed from the facade and the side. It is necessary to take into account the number and size of shelves, as well as select the option and mounting locations. You need to think about how to make a closet for the toilet with your own hands step by step, write a short instruction plan so that you do not subsequently redo the already formed material.
Before you begin the actual assembly, you should decide on the materials that will be used to assemble the cabinet.
We use serious fasteners for the wall.
Let's consider various options
Absolutely every plumbing closet in the toilet is a space that is important to use with maximum benefit. Therefore, you can use different modifications of already finished products. Or take a different, more complex path - create built-in cabinets in the toilet.
Both types are considered equally useful and are a unique design element. In fact, such a design has become part of the entire interior, so pay attention to how such cabinets can be designed. We offer you several options; the photo shows the most popular ideas that can be used in different apartments and private houses.
In one case, it will be a well-known, but small wall cabinet for the toilet; in another, it will be a more spacious design that will not only allow you to hide all the pipes, but will also become a full-fledged addition.
Depending on the size, such a structure can be used or exist as an enclosed space. The appearance of any of the options should be designed in accordance with the general style. Therefore, you can use the same color scheme and material as finishing. This means that the cabinet doors can be covered with wallpaper or painted. If it is a one-piece design, then it is purchased exactly to match the overall color palette.
Choosing material
What is better to make a cabinet, doors, shelves from, what will cover the hatch, designs of shelf holders? A hatch, for example, can be made of plastic; this is an economical and practical option, but a built-in hatch under the tiles will look more aesthetically pleasing - this will make it almost invisible.
If the objects are heavy, it is better to use laminated chipboard sheets.
Not every ready-made toilet cabinet meets the availability of free space, wishes or requirements of the client.
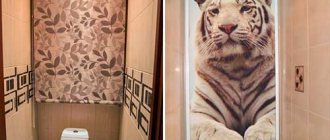
If you hang a mirror in place of the hatch, it will disappear from the angle of view; if it is decorated with artificial modern materials, for example, stone or tiles with bright patterns, then this can become a particularly attractive composition. There are many options!
Obviously, purchasing a ready-made cabinet for a toilet is not difficult, just like installing it.
Calculate the dimensions accurately so that obvious problems do not appear during installation.
It is better to choose the material from which the doors can be made based on the design of the room. Wood, ceramic tiles, plastic, chipboard, MDF, laminate, metal, etc. are suitable. The main thing is to ensure waterproofing.
You will be satisfied with the work done, you will have something to be proud of, plus you will be able to create exactly the furniture that is ideal for your particular case.
Blinds can be a budget option. They are easy to install, light weight, easy to dismantle and change. Also, the easiest way to use the space above the toilet is to install regular shelves. To do this, you will need bars, corners, screws and the shelf itself, cut to the size of the opening or slightly smaller. The depth of the shelf is calculated separately depending on the design features of the space behind the toilet.
Preparing to create a toilet cabinet with your own hands begins with design.
For those who are accustomed to more expensive materials, glass can be successfully used. Since moisture accumulates in the plumbing room, it is better to choose tinted glass with a matte finish. When cutting glass, it is necessary to process the edge of the glass with special grinding so that all edges are smooth. It may also be interesting to have a metal sanitary cabinet option. Designers like to use this material when designing loft-style interiors.
The frame is made of bars measuring 30 by 30 millimeters. Try to make all markings evenly, using a level and tape measure.
An interesting material for cladding the facade of a toilet cabinet is a mirror. It has the amazing property of expanding space, which can be important for small bathrooms. In addition, the refraction of light through a mirror prism can play an interesting role in the overall interior.
Mark the wall where you plan to install the cabinet.
When using wood, you need to take into account that it easily absorbs moisture and the prepared material must be covered with a special protective coating before installation.
Assemble a frame from the cut bars, connecting the elements together with corners and self-tapping screws.
When making a cabinet from ceramics, you first need to make a frame from bars, cover it with moisture-resistant plasterboard and glue ceramic tiles.
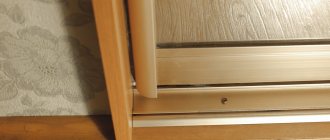
It is most convenient to mount the shelves to the wall using an aluminum corner profile 25x25 mm.
Shelves can be made open or closed, located inside the structure. When installing shelves, it is necessary to take into account the height of packages of standard detergents, rolled paper blocks, the height of the holder for floor rags and other toiletries and household items. It is better to strive to make such a design that everything that needs to be hidden can harmoniously fit into the niches. You should not make shelves at the same distance from each other and strive for a symmetrical design of the shelves in the filling of the cabinet. It is better to measure the distance for their fastenings in accordance with the existing standard set of things intended for storage in the toilet.
Making and installing a toilet cabinet with your own hands is unthinkable without the appropriate tools.
Some structural elements, for example, false panels, can be purchased ready-made in specialized stores. In this case, the dimensions of the structural elements of the sanitary cabinet must be adjusted to the size of the pre-purchased façade elements.
However, before starting any cuts, it is necessary to calculate the position of the shelves - the pipes do not run vertically and the holes are made to specific dimensions for each shelf.
To work we need the following tools and materials
- level and tape measure;
- screwdriver and screwdriver with self-tapping screws;
- electric drill;
- jigsaw;
- covering material for plumbing and flooring to ensure cleanliness in the work area.
Of course, a closet in a toilet cannot be called complete if it does not have doors and fittings.
As accessories you may need:
- loops;
- magnets;
- door handles;
- furniture corners, false panels;
- fasteners;
- furniture corners, etc.
Take measurements for the doors, cut blanks for them.
It is better to purchase fittings from good manufacturers, since this is an actively used part of the structure and all mechanisms must be reliable in operation.
As you can see, making a closet in the toilet with your own hands is not as difficult as it might seem.
Door handles can be made integrated from aluminum profiles. They differ from ordinary handles in their attachment location and appearance. They are a long thin aluminum strip mounted into the upper end of the door; usually they are made along the entire length of the upper end of the door. Thus, they seem to “disappear” from the overall appearance of the facade, and besides, it is quite easy to care for such a smooth surface of the door, since it has no protrusions. And to install standard handles, you need to drill through holes in the facade doors and the handles turn out to be protruding, visually creating a rather bright accent.
Of course, doors can be made not only from wood or chipboard. An alternative is roller shutters, characterized by practicality and modern design.
Separately, it must be said that before installing a cabinet in the toilet, it is better to take care in advance and check the condition of the plumbing networks. It may be necessary to carry out preventive maintenance, eliminate possible weak points that could lead to leaks, and replace valves and gaskets.
Plus, if there are tiles in the toilet, you can use simple sheets of plywood, which are then covered with the same tiles that are mounted on the walls of the bathroom.
How to make it yourself?
Shelf above the toilet
Shelves above the toilet are very popular, hiding unsightly utility fixtures. The design is easy to make with your own hands. You should start working with a drawing; it can connect all the elements of the future structure.
Having made an accurate calculation on paper, it is necessary to transfer the measurements to the prepared walls. If wood, MDF, or chipboard is chosen as the material for the shelves, you can order ready-made cut parts of the product with a processed edge in workshops. This approach simplifies the work on the design. For those who like to do everything with their own hands, you will have to cut out the material for the shelves yourself.
The cut boards are sanded and treated with a special compound, paint, and varnish. The dried finished products are suitable for further work with them.
It is necessary to attach the corners according to the marks on the walls, checking with a level the ideal installation of each of them. The size of the fastenings depends on the weight they will have to withstand. For more massive structures, in addition to side fasteners, a support is also used on the central wall.
When the base is ready, boards are laid on it. You can order lightweight doors for the shelves above the toilet, or make them yourself from plywood, decorating them with adhesive film to match the color of the tiles.
Corner shelf
Fans of corner shelves can also create the design themselves. The easiest way to work is with plywood. A model consisting of straight or curly shelves is selected. Then a drawing is created on which the shapes of the product are drawn, and a clear calculation is made.
Next, the sketch at scale is transferred to a sheet of plywood. If the model has the same parts, it is better to make a template for them and use it to create a pattern on the canvas. Each workpiece is carefully cut out with a jigsaw, and the ends are sanded.
All parts should be covered with stain and varnish. For the ends, edge tape is used. It can be selected according to the color of shelves, tiles, and accent elements of the interior.
The shelves are attached to a corner structure prepared from plywood, and this entire piece of furniture is mounted in the corner of the room.
Selection of plumbing fixtures and furniture
The main role is played by the choice of plumbing fixtures, since they need to be placed in the interior of a bathroom of 1-1.5 square meters. m. in a panel house. Since we have a small toilet area, you can choose a wall-mounted or corner toilet. Also, if you want to place a sink, we advise you to pay attention to the combo toilet. With three necessary functions that will save space and make the room functional. As for design and color, today the modern market is simply overflowing with various models, taking into account every taste.
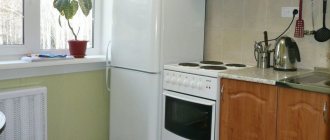
If you have nowhere to place the washing machine, there is a modern model that is mounted above the toilet. What saves space in an apartment - a Khrushchev or a panel house - having such a small room.
When choosing a sink, pay attention to wall-mounted models, maybe even with cabinets below. A glass sink would also be a good option, which will add lightness and originality to the interior of a bathroom of 1-1.5 square meters. m. in Khrushchevka.
To place all accessories, you can install glass shelves or a small cabinet.
Don't forget about choosing small details. For example, a brush, a small rug, a paper holder, a towel rack, a soap dish, etc.
Modern toilet interior 2 sq. m with suspended plumbing
It is difficult to fit furniture and toiletries into a small bathroom in a panel house, and at the same time create an interesting interior in it. In order not to overload a small area with unnecessary parts and objects, use only the essentials: plumbing fixtures, a minimum of decor and hygiene equipment.
Do you need soundproofing in the room?
A competent interior of a 2 sq.m toilet in a panel house involves equipping the walls with soundproofing slabs, allowing you to isolate yourself from sounds from the neighboring apartment. Having secured a relief wooden panel to the side wall, fill the empty space between it and the concrete base with fiberglass. The back wall is covered with felt slabs, which perfectly absorb the sound of draining water. It is better to choose a suspended type of plumbing with a silent water supply function.
Bathroom decoration and color scheme
To decorate the walls and ceiling, you can use either simple wallpaper, liquid or photo wallpaper. The main thing is that they should not have a large pattern or patterns that would not visually reduce the area of the bathroom by 1-1.5 square meters. m. without bathroom. In addition, this is a good budget option. This also includes painting the walls, of course, in a light shade. For example, beige, white, light green, coffee with milk, sand, light purple.
Another option is the use of plastic panels, more suitable for those who are not afraid to sacrifice a little space. They are very moisture resistant and easy to wet clean without losing their appearance.
The choice of tiles should be taken very seriously. For such a small bathroom 1-1.5 sq. m. without a bathroom, it is better to use the average size of the tile. Since a large one will visually reduce the space, and too small will look disharmonious.
As for the flooring, tiles are usually used in darker shades than the walls themselves. Which, by the way, looks good in the design of a bathroom of 1-1.5 square meters. m..
Little tricks in design
To visually expand the space in small bathrooms, designers use several small tricks. Which do not require much time and large expenses.
- The first is laying tiles diagonally, both on the walls and on the floor.
- Having 1.-1.5 square meters in the toilet room. m. low ceiling, with a decent width, in this case we recommend placing vertical or patterned inserts on the walls.
- Also, rectangular tiles with a long side can be placed on the floor, along a short wall. This technique is suitable for those who have a narrow toilet room.
- Having a high ceiling, but the room is narrow and cramped. In this case, we recommend making a border. That is, decorate the lower part with a dark shade, and the upper part with a light shade. What will create a simple, and at the same time original design of a bathroom of 1-1.5 square meters. m..
Corner shelves
If you are a fan of original design solutions, then you can make a corner shelf for your bathroom with your own hands; it is not difficult and will not take much time.
To work, you will need a piece of plywood, a jigsaw, a screwdriver, self-tapping screws, a level and a pencil with a tape measure. To attach the finished shelf to the wall, it is advisable to use hidden fasteners that will be located on the walls that will be adjacent to the wall.
Making an original corner shelf for your bathroom with your own hands is actually very simple.
First you need to draw a circle on a piece of plywood or other material from which you want to make a shelf. To do this you will need a simple pencil and a piece of rope. If the piece has an even square shape, then you must first draw diagonals on it. These marks will be needed in order to later divide the circle into four equal parts. Next, drive a small nail into the center, to which a piece of rope is tied. A pencil is attached to the other end, with which a circle is drawn.
Next, the circle is cut out along the marks and divided into four even parts. One of the parts needs to be made smaller, since it will be the top shelf. To do this, you just need to attach a rope with a pencil attached to the sharp end to correctly trace the semicircular shape. After this, the part is simply cut off according to the mark.