Wooden mosaic, in itself, looks very unusual. Advantageously emphasizes any surface. And also fits any style interior solution. Doing a wooden mosaic with your own hands is not difficult. The main thing is to know some nuances.
In this article we will tell you how, without any special skills, anyone can make a wooden mosaic. Thus, making your home more comfortable, more beautiful and more sophisticated.
If you have an idea to decorate a wooden surface, then you should pay attention to wooden mosaics. Wooden mosaics can cover a fairly large area of the wooden surface. And not even in small areas, wooden mosaic looks amazing.
Also interesting: Woodworking for children
DIY wooden mosaic
To make a wooden mosaic, you need practiced skills and experience. But anyone can make a picture from a wooden mosaic, for example, make a bouquet of flowers.
Wooden mosaic tiles are made from wood veneer. Wood veneer is thin slices of wood. These plates cut well and are easy to process.
The number of wood species includes several thousand varieties. They differ from each other in color, shade and structure. This makes it possible to select the necessary options for making a drawing.
To make a color design, choose a veneer of a suitable structure. Next, the veneer can be tinted with brilliant green, iodine or aniline dye.
Finishing features
The wooden mosaic is made in the form of small fragments of different shapes - in the form of a square, rectangle, polygon. The size of the parts may be the same or different. As a rule, the size of one element varies from 1 to 8 cm.
Parts are made from natural wood, which is distinguished by a variety of textures and shades. Mosaics combine several types of wood to achieve an expressive decorative effect.
Mosaic tiles are made from oak, walnut, cedar, teak, bamboo, coconut, ash and other species. During the installation process, thin pieces of natural wood are fixed on a plywood base in a certain geometric or chaotic (abstract) sequence, creating a decorative pattern, ornament or composition.
Positive properties of the material
Among the positive properties of natural wood mosaics for wall cladding, the following can be noted:
- The textured material perfectly hides the unevenness of the base;
- Proper operation and timely processing of the material guarantees a long service life of the cladding;
- The material is not afraid of high humidity, temperature changes and other influences, and therefore can be used in any room;
- Wall cladding with wooden mosaics is relevant for interiors made in many popular styles, as it goes well with many materials - glass, metal, ceramics, concrete;
- This cladding is unique, since each fragment has a unique natural pattern and shade;
- The material is environmentally friendly and safe, has all the properties inherent in natural wood;
- The coating has heat and sound insulation properties.
Let's start with a drawing
To get started, we need, strictly speaking, the drawing itself. We draw up a drawing and, in accordance with it, transfer petals, etc., to the veneer, from which the bouquet will be made.
Elements of the design are cut from veneer. Using a sharp knife with a beveled blade. The knife should be held strictly perpendicular to the cutting surface. Parts should be cut in one motion from the beginning to the end of the line. To increase the contrast of the pattern, the petals are cut from two or more shades of veneer. For example, alternating light and dark veneer. If the veneer is fragile, then make several cuts along one line.
What is wall wood mosaic tile?
If you are tired of wallpaper, panels and all kinds of tiles, then this type of decoration will definitely interest you.
Firstly , because wooden mosaics for walls are just beginning to gain their space on the market and look unusual and impressive.
Secondly , because it is an environmentally friendly product, living with it in close proximity is safe and comfortable.
Wooden mosaic elements are made in the form of plates of various sizes: from 10X10 mm to 86X86 mm.
The photo shows how beautiful wooden mosaic can be.
The material for mosaics is either solid wood of various species (including exotic trees), or industrial waste - shavings, which are mixed with water and cement and given the desired shape, thickness and density.
As for color, it depends on the type of wood . Light wooden mosaic elements can be obtained from ash, darker will be oak, and even darker will be ash that has undergone heat treatment (thermal ash).
And here is a video on how to lay wooden mosaic tiles for walls with your own hands.
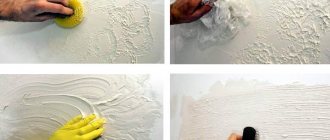
Gluing
It is best to glue the cut out elements using planned tape. It is made from tissue coated with bone glue. Glue is applied to the lower surface of the cut out elements. And the element is glued to the surface and pressed down. You need to press down the veneer with a flat, heavy object.
In order for the drawing to turn out the way you wanted it to be, you need to draw it with a pencil on the surface. And glue the cut veneer elements onto this template.
After gluing is completed, a colorless varnish is applied to the drawing. Often applied in several layers. With the obligatory complete drying of each layer.
Wooden mosaic has a number of advantages. Such beautiful decor is absolutely environmentally friendly and safe.
Subscribe to our Yandex.Zen channel
Wood mosaic laying technology
Wooden mosaics are usually sold in sections, which are most often 30x30 cm in size. This sectional type of mosaic greatly simplifies its installation.
Installation and finishing mixtures are very important when working with wooden mosaics, since ordinary glue for wooden products cannot be used in this case. When gluing mosaics onto plywood, the sheets are joined diagonally so that there is no visible divergence of the cladding along the seam lines during thermal deformation.
When finishing joints, it is not recommended to use ordinary grout, which is used when processing joints for ceramic tiles. For this purpose, there is a special two-component epoxy grout, which is designed for grouting hardwood. The grout for ceramic tiles does not have the required flexibility; if used during further use, at the slightest fluctuations in the wood, that is, with changes in temperature and humidity, when the wood “breathes,” the mineral grout may begin to crack and crumble. In addition, it must be washed off with a large amount of water, and this can damage the material of the wooden mosaic.
Teak mosaic on a cork backing is used for the floor. Floor boards are 0.7 cm thick, and wall boards are no more than 0.3 mm thick. This means that such a floor must be sanded many times. All seams in the floor are filled with silicone glue. This type of coating lasts for decades. Caring for a wooden mosaic will not cause much trouble: it can be wiped with a damp and then a dry cloth once a week.
Features of installing wooden mosaics
As we have seen, this facing material truly has unique technical characteristics.
The most important thing is that when using it you can create beautiful interior design. The following is a consistent technology for laying wooden mosaics:
- Mostly mosaics measuring 300x300 mm are used. This size is very convenient when working.
- For fixation, special wood glue is used. The choice of glue also depends on the base of the wall.
- If the base is plywood, then it is attached diagonally. This method is also recommended for joining plywood sheets. Otherwise, thermal deformations may occur. That is, the mosaic will be glued across the joints on the plywood.
- After gluing, it is necessary to process all the resulting seams. Conventional grout, which is used when laying ceramic tiles, is not suitable for sealing them.
Wooden mosaic tiles require the use of a two-component epoxy grout.
It is mainly used in all cases where it is necessary to process the seams between mosaics made of hardwood. This is explained by the fact that the tiles do not deform when exposed to moisture. As a result, the grout remains in place.
In the case of wooden mosaics, at the slightest fluctuations in temperature, humidity, etc., it begins to change its shape, that is, to deform. If you use regular grout, it will simply and quickly crack. For this reason, epoxy grout is used, which has the necessary elasticity.
If you decide to lay wooden mosaic tiles on the floor, then it is important to take into account some of the features of this work. First of all, a cork substrate should act as a base. For the floor, the tiles must have a thickness of at least 7 mm. While for walls, only up to 3 mm is allowed.
Floor preparation involves a number of important technological processes. So, it must be carefully sanded several times. If there are joints or other flaws in the wooden floor, they are leveled using silicone glue. By following installation technology, you can be sure that such a floor will last for decades.
Helpful advice! Caring for wooden mosaics does not require complex manipulations. It is enough to treat it with a damp cloth, and then wipe it dry with a napkin. It is enough to carry out this procedure once a week.
Thus, you can give a beautiful design to absolutely any covering in a house, apartment, and even when finishing the facades of buildings. At the same time, you can combine all kinds of colors, shapes and much more.
Conclusion
So, wooden mosaic tiles can be placed on a par with wooden parquet. This coating has a lot of positive aspects. Numerous reviews prove this. Gradually, this finishing method is gaining more and more attention, and after a while, it can become the main one.
Wood mosaic (Teak), laying on a concrete floor base
After all, the technique of forming a sketch from a wooden mosaic is truly impressive. We hope this material has helped you gain insight into this unique and unusual material. In addition to this material, we suggest watching an introductory video that will help you learn about other nuances of such tiles.
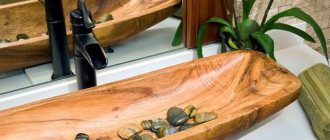
Mosaic has been used in interior design for a long time; it can be used on almost any surface and object. Wooden mosaics for walls, floors or furniture can decorate any interior, becoming a wonderful addition - both in classical and avant-garde styles.
Wooden mosaic is a unique and original material for finishing walls or floors. It is used in the design of not only living rooms and kitchens, but also in bathrooms, baths and saunas, and even in public spaces such as restaurants, cafes and offices. With its help, you can hide surface unevenness, divide the room into functional zones, or create an emphasis on a specific piece of furniture. Piece parts of wooden mosaic, in addition to the classic square shape, can have a curved, rectangular shape, etc.
Wooden mosaic has the following set of advantages:
- It is an excellent material for decorating walls with uneven surfaces that are difficult to level;
- This is a very warm and environmentally friendly material, with a long service life;
- Multifunctional when combined with various exquisite and unique ornaments.
LiveInternetLiveInternet
Quote from hypermarket_VIENNA message
Read in full In your quotation book or community!
Master class on mosaic
.
| Mosaic is always beautiful and fashionable |
Perhaps one day your work in the name of beauty will be rewarded by saving at least one person who cannot indifferently pass by the mosaic gazebo in your garden.
| Mosaic can be dynamic |
A person who is tired of life and, perhaps, has lost all meaning of his existence, but suddenly feels a surge of life-giving power of inspiration and a flash of instant insight, when the outlines of your house appear among the trees with mosaic decoration not just by an artist, but by a real genius in love with his home, your family, art and life itself.
| Mosaic dream No. 1 |
If you think that the mosaic technique is very difficult, you are mistaken. The main thing is not to be afraid. Remember the saying: “The head is afraid, but the hands are doing!”
| Mirror with mosaic finish |
| Draw decorative elements on the base |
Master class No. 1 – bathroom mirror And so, let’s try it together. Let's start, perhaps, with a very beautiful and uncomplicated frame for a wall mirror, made in a mosaic style. Do-it-yourself mosaic - master class No. 1: 1. We will need a base: it can be a beautiful wooden slab or a slab made of fiberboard (chipboard) of an unusual shape (it needs to be cut out with a jigsaw). You can use leftover drywall; it can be easily cut with a utility knife. In general, any dense surface that can withstand the weight of ceramic fragments is suitable for the mosaic base. 2. A mirror that can be attached to a stand using liquid nails. 3. For decoration you need: ceramic tiles, old ceramic dishes, a broken mirror, any suitable jewelry and other various small items. 4. Working tools: nippers, glue for gluing tiles, grout for tiles, any old and unnecessary utensils for mixing grout, spatula, sponge, soft and dry cloth, gloves. All this can be found in any hardware store. Broken tiles of amazing beauty can always be taken away almost free of charge from stores that sell them. We have cleared the workplace, prepared tools and materials, and let’s get to work.
| Preparing mosaic elements |
The procedure for laying a mosaic with your own hands on the base for a mirror: Step 1. First, you need to draw the design itself on a wooden surface, which will then be recreated in the form of a mosaic. It is best to keep the drawing simple, so as not to complicate the process of turning it into a mosaic picture. The initial idea can be transformed and changed depending on the material at hand. Follow the flight of your imagination, but do not fly into cloudless heights, remember that often the simplest is the most beautiful. Step 2. When the drawing is ready, we examine the ceramic and other materials we have for decoration and, using wire cutters, we form large pieces of ceramic into small ones of the shape and size we need. Gradually lay out the finished mosaic elements on the surface of the picture. Step 3. Now we take the tile adhesive and very carefully, slowly, begin to glue the laid out mosaic pieces to the wooden surface of the mirror frame. Don't forget that the glue will take about 24 hours to dry.
| Gluing the mosaic to the base |
| Ready-made mosaic decor |
Step 4. Prepare the grout. We dilute it with water to the consistency of sour cream (so that it is not liquid, but not thick). Then use a spatula to cover the work surface with this mixture, trying to ensure that the grout gets into the cracks and evenly covers the finished product. Step 5. Using a damp sponge, very carefully remove the remaining grout from the mirror mosaic frame. And after a few minutes we begin polishing the glued material with a dry and soft cloth to remove the remaining traces of grout on the ceramic product. That's all. A very delicate, elegant and original do-it-yourself mosaic frame for a mirror. This mosaic frame can be used to decorate a box, dressing table, headboard of a double or children's bed, as part of the overall mosaic of the kitchen or bathroom, etc. You can use multi-colored ceramic tiles and decorations according to the needs of the furniture style and the room itself for which the decoration is intended. There is nothing complicated about making things in the mosaic style. One catch is time. Now, in our age of constant employment and the race for wealth, it is almost impossible to find an extra minute. But why not combine business with pleasure? Why create anything in one sitting? When you can stretch the pleasure over several days. Master class No. 2 - laying mosaics on the wall In addition, doing mosaics is not only interesting and entertaining, but also very useful! Just imagine: you come home from work, tired, exhausted after a hard day at work, and your wife immediately rushes up to you with reproaches about why it’s so late, children wanting to play, and, of course, your mother-in-law peeking out from the kitchen, supporting her daughter with heavy silence. in her righteous anger. And you really want to break or break something. Forward! Take a hammer or nippers and prepare the material for work (better by locking yourself in the bathroom, away from everyone). After a few minutes, the tension passes, irritation, aggression and anger recede from the first mosaic tiles laid out. You call the children and together with them continue the process of creating a new work of art. Peace is restored, tension is gone, harmony in the family, in the shower and in the bathroom. All you have to do is try and your bathroom will be transformed.
| Mosaic in the bathroom |
| Mosaic laying tool |
If you want to use mosaic elements in the bathroom, then for this you need: 1. use mosaic along with the most ordinary tiles, but it should be laid in those places that are most susceptible to moisture testing (as a rule, these are those areas of the walls that located above the sink and bath); 2. To simplify the process of laying mosaics on the walls, you should buy not individual mosaic elements, but ones already fastened together using a special mesh. These are sort of ceramic sheets, but they are not cheap; 3. you will need several mosaic sheets for work (depending on the size of the pattern that you intend to insert between the tiles), glue for ceramic products, a little cement, a rubber spatula and another one - a spatula-comb, spacers, grout and sponge. Step 1. Mix the glue with cement and water, bringing them to the desired consistency (it is better to use the instructions given on the glue packaging). Then spread the resulting mixture using a spatula-comb onto a previously cleaned and wiped dry wall. Glue can also be applied to the back of the mosaic to be more confident in the strength of the masonry. Then attach the finished sheet to the wall, being careful not to warp it.
| Applying glue under the mosaic |
Step 2. Now you will need spacers in the form of crosses. They need to be inserted between sheets of ceramic mosaic. Then it will not be difficult for you to attach two different sheets to the wall quite evenly.
| When laying mosaics we use crosses |
| Grouting joints |
| DIY mosaic decoration of the wall near the sink |
Step 3. As soon as all the mesh sheets of the mosaic are in their place on the wall, we start grouting. First, we fill all the seams between the cubes with it, being very careful not to miss a single one. Then, using a rubber staple, as shown in the figure, we remove excess grout. When it dries, take a damp sponge and use it to carefully wash the entire surface of the mosaic from excess grout. That's all. The result of laying mosaics on the wall in the bathroom is in the photo. Finally, I will say that you should not forget about the whole variety of mosaic elements that the market offers today: starting from clay and ceramics, natural, semi-precious and precious stones and ending with any unnecessary things in the house that can be broken, “picked” or simply glued . Good luck to you and your new masterpieces.
Do-it-yourself mosaic. Marquetry technique
Palace wooden parquet floors became the prototype of modern wooden mosaics. Even then, many years ago, the most beautiful geometric and floral patterns decorated the floors of noble people. And to this day they have not lost their beauty, they were made so well.
In general, the craft of creating a whole picture from small wooden parts is called marquetry. It originates in Ancient Egypt, but has also reached Europe, where furniture and musical instruments were decorated with this technique.
Due to the fact that this was a very labor-intensive task, only rich people could buy something decorated with wooden mosaics.
And today, things decorated with marquetry remain relevant and unique. Only now they are much more accessible thanks to modern technology. You can try this technique at home, learning how to cut the necessary shapes from veneer.
Mosaic as a facing material is in great demand today. It can process a variety of surfaces. Moreover, it allows you to convey different design styles. As for wooden mosaics, this is a real art.
This unique finishing material is used both for processing walls and for processing floors. For example, it can be used in arranging a kitchen, sauna, cafe, bathhouse, restaurant, bathroom and other premises.
Great demand and popularity is explained by a sufficient number of advantages. We invite you to learn more about what wooden mosaic tiles for walls are.
Wood mosaic in 3D technology
A modern apartment often presents interesting design projects. How to create an emphasis on individual areas of the room? An expressive material can help - wooden mosaic for walls in 3D technology. A three-dimensional surface can be created using different techniques: processing parts with different coloring compounds, firing individual parts or painting them with dull paints. Inserts from other materials will also help.
Currently, artificially aged volumetric mosaics are gaining popularity. There may be traces of woodworms, nails, scratches, traces of old paint, and so on. These tiles are actively used to create atmospheric interiors that imitate old wooden walls.
Wooden mosaic in the interior is a harmonious combination of style and taste, history and modernity. Wood is one of the most popular materials in the decoration of houses and apartments to this day. Its only drawback is the high price, but it also pays off with the long service life of the mosaic.
But our craftsmen, after looking at the samples, decided that it was quite possible to do this on their own.
It is based on ordinary wood: you can take solid wood, you can use shavings. Shape - whatever you like. Usually these are squares or hexagons, octahedrons.
The output product is wooden mosaic.
Color
– from light to dark brown.
Effect
– stunning, despite the simplicity of the idea.